In this article, discover how to configure a letter to suit your needs: adjust its settings and properties.
Warning:
Only Room administrator can access the items described in this article.
Accessing the Letter Settings Screen
You can access the letter configuration screen in two ways:
During their creation: select the letter you want to configure and drag and drop it onto the board.
Through the element's contextual menu: click Settings.
As a Room administrator, you can modify all the properties of a letter.
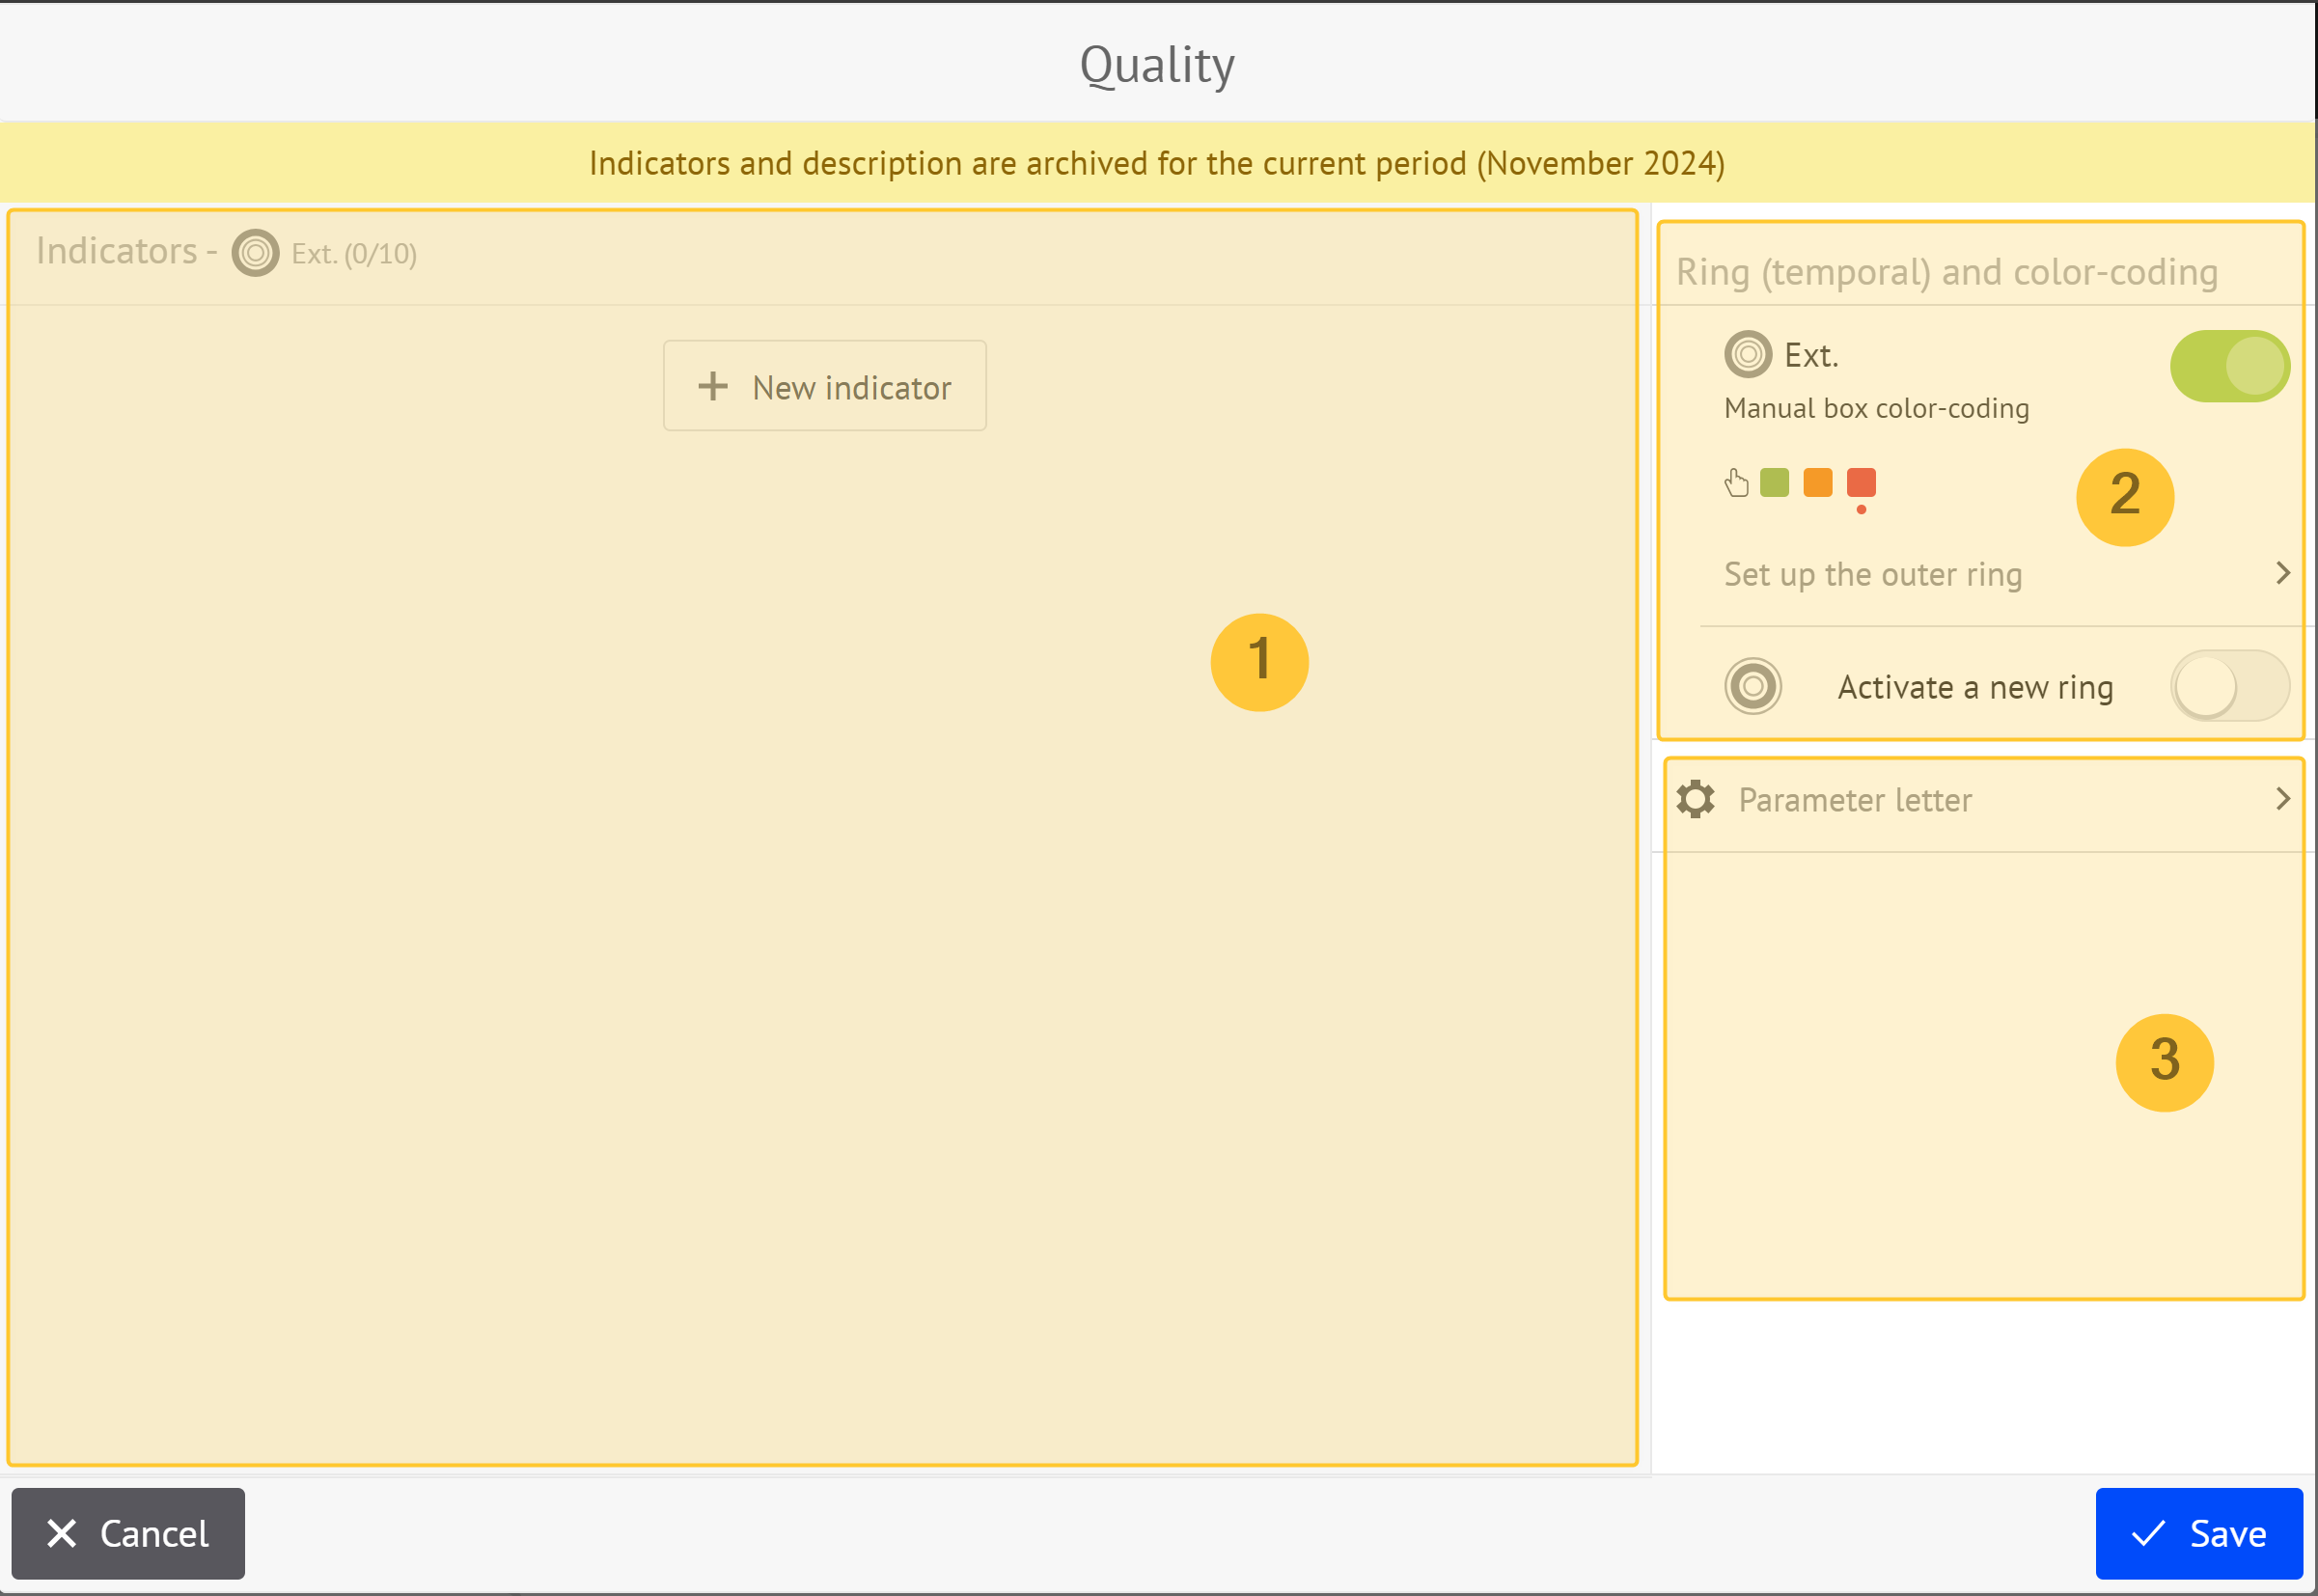
This settings interface is divided into 3 parts:
Indicators setting: allows to define the various indicators associated with the letter. Specify their thresholds, values, etc.
Ring & color-coding settings: allows to configure rings, the letter's color-coding, to visually highlight information related to indicators and actions.
Letter parameters: allows to edit the letter's global properties: rename the letter, enter a group and enter a description.
Note:
If you have editing permissions for the board, you can access the letter configuration and view all the settings defined by the room administrator.
However, the following restrictions apply:
No change in indicators,
No modification of the description,
Restricted edition of rings: if the ring has a custom cut-out, you can only modify the box labels.
Setting Rings
This setting depends on the number of rings defined in the tool and their parameters.
Note:
You can set parameters for each ring defined.
Cut-out Type: Temporal
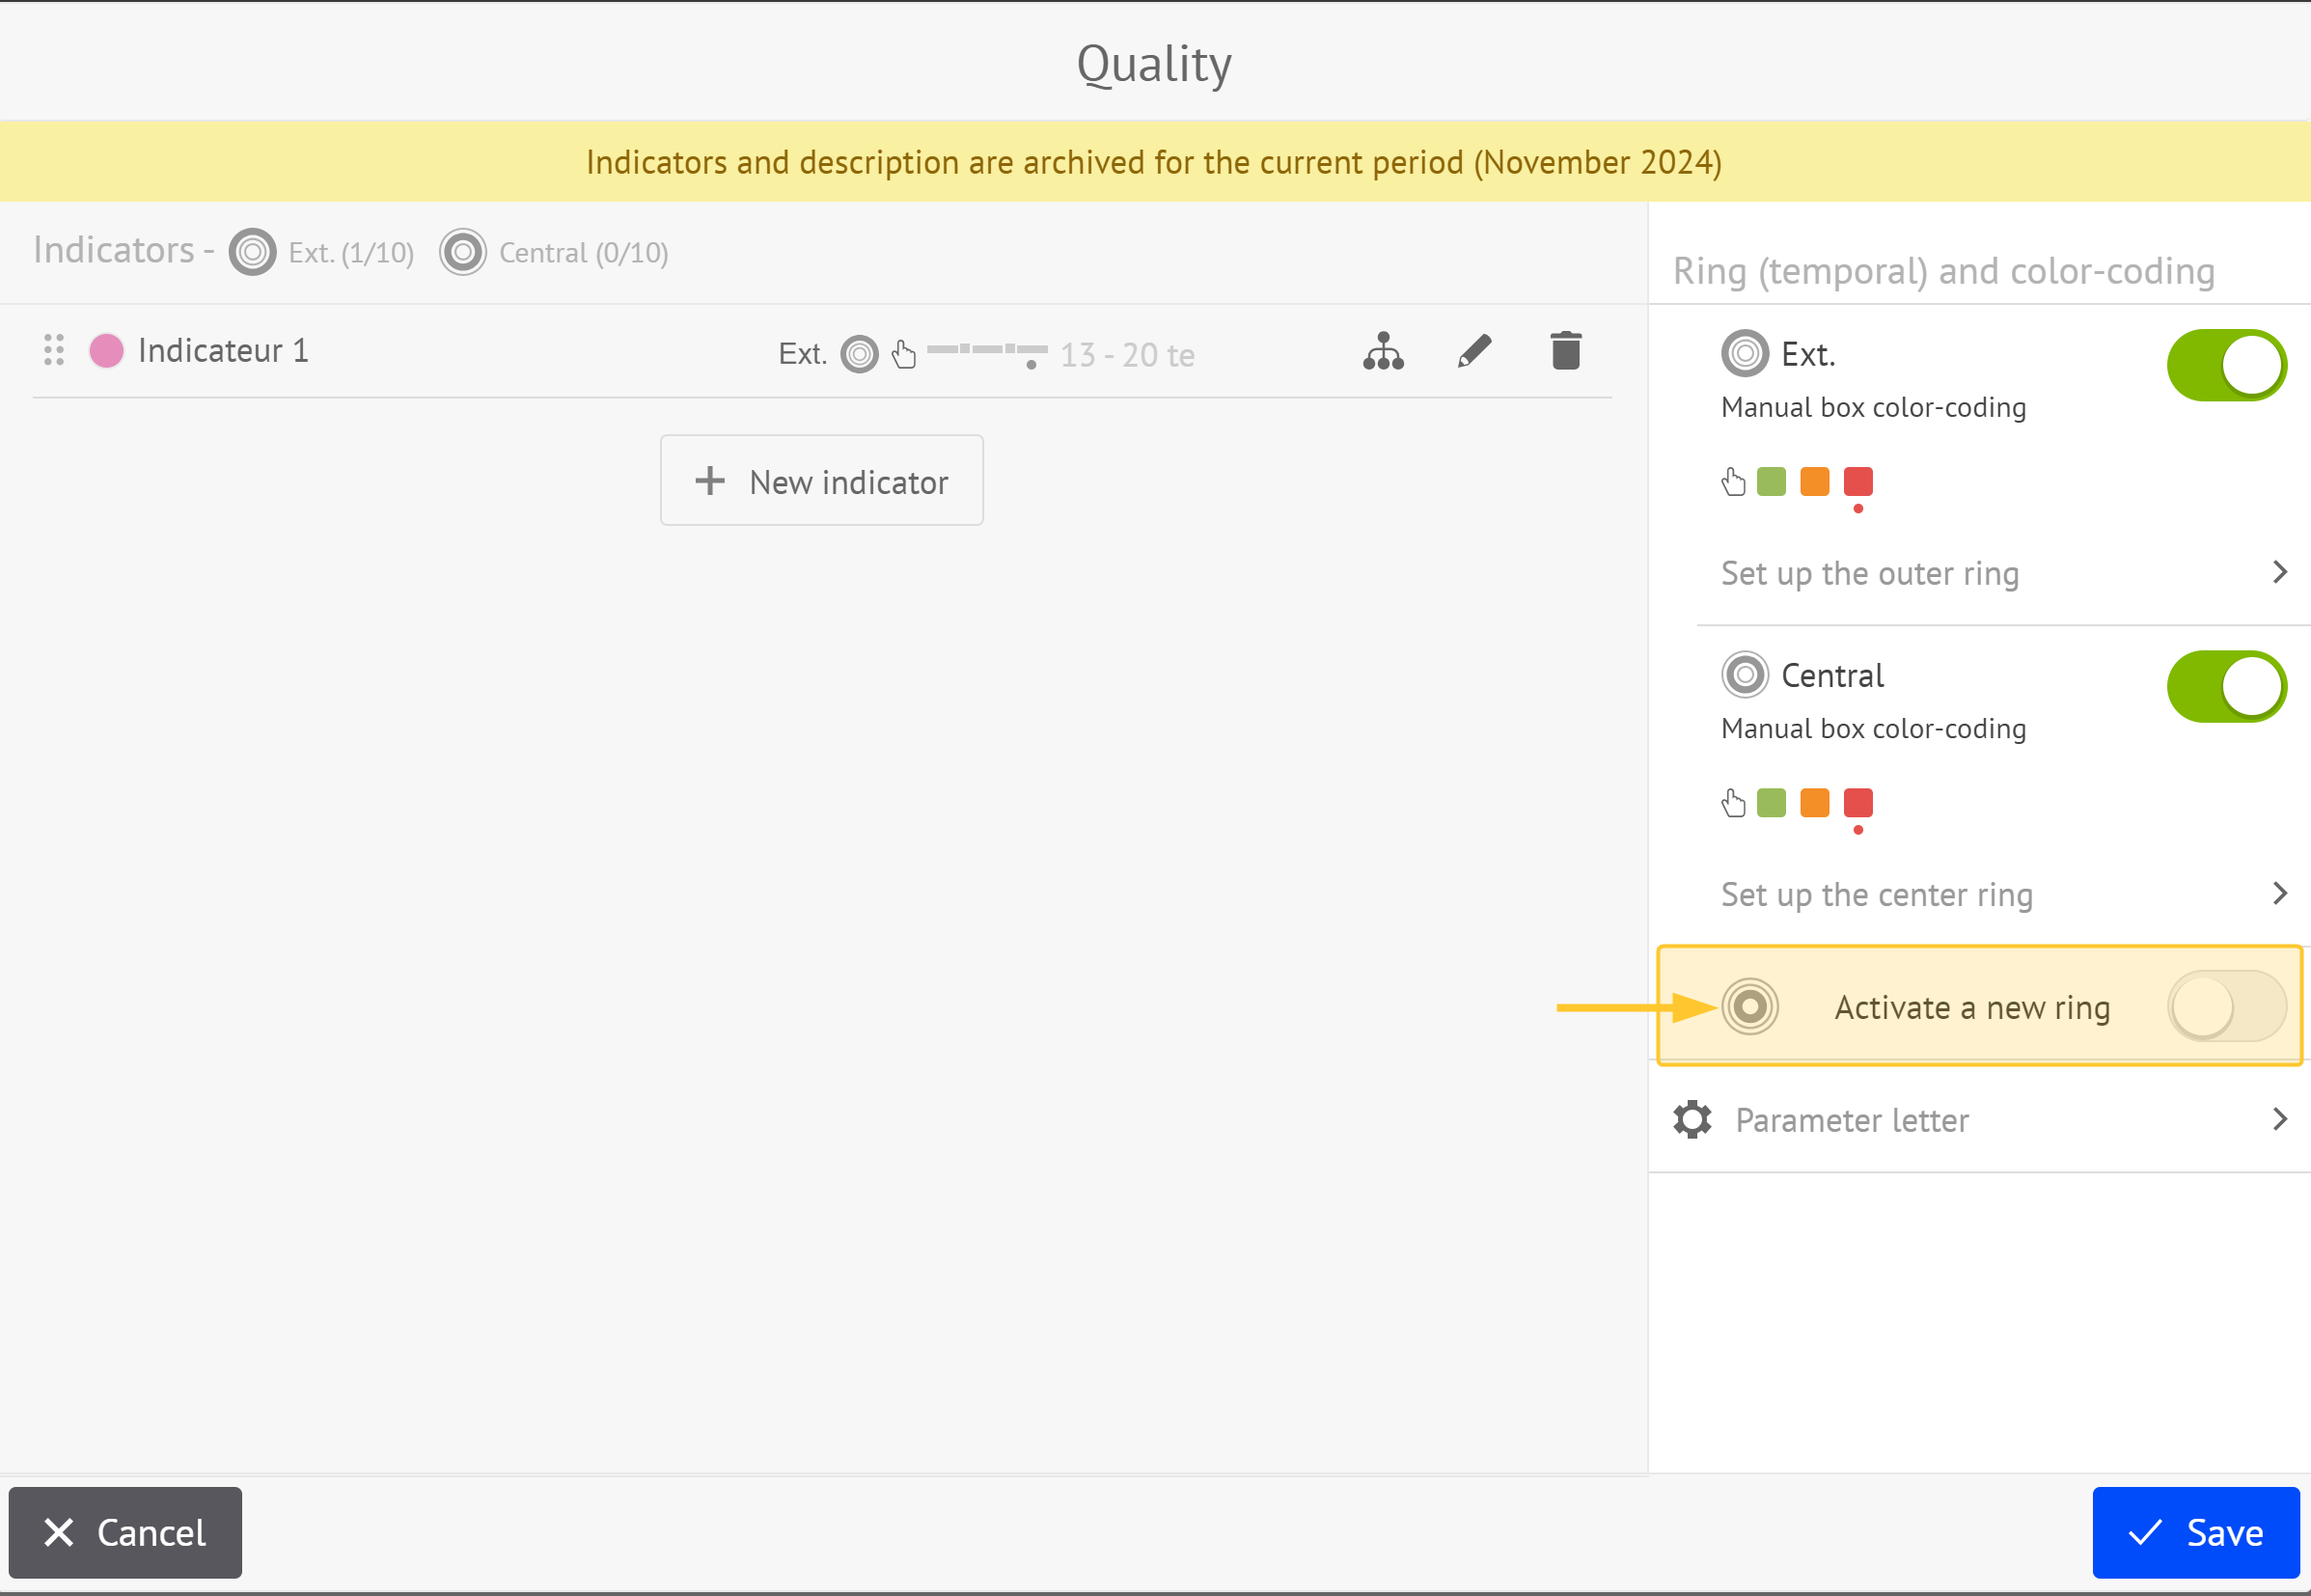
From the “Ring(temporal) and color-coding” area:
.png)
Click Set up the outer ring.
The following screen is displayed:
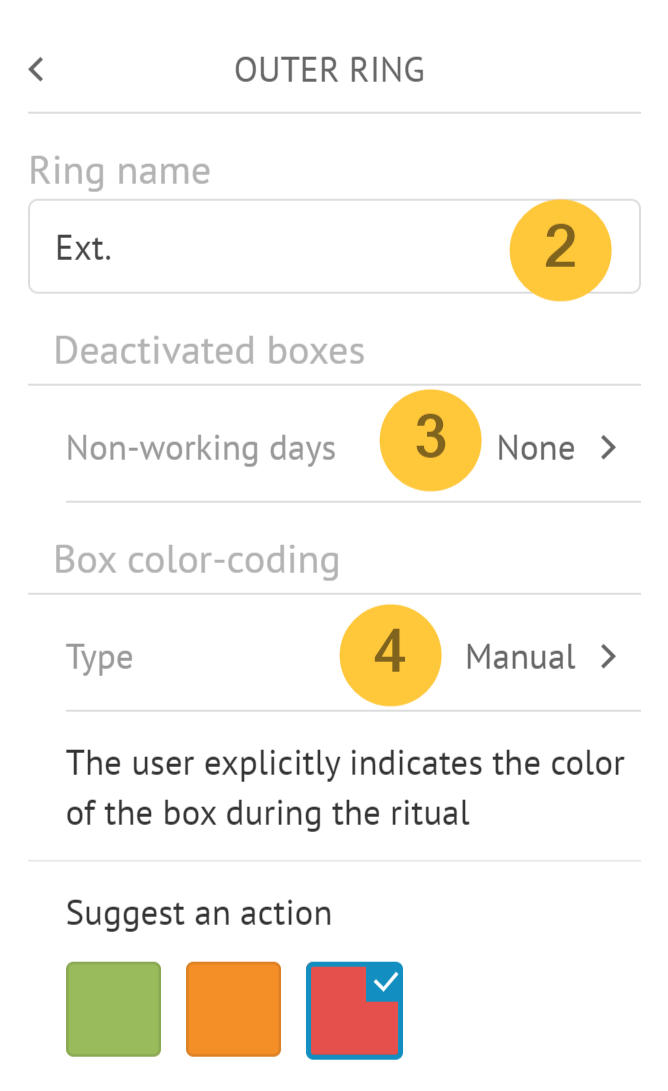
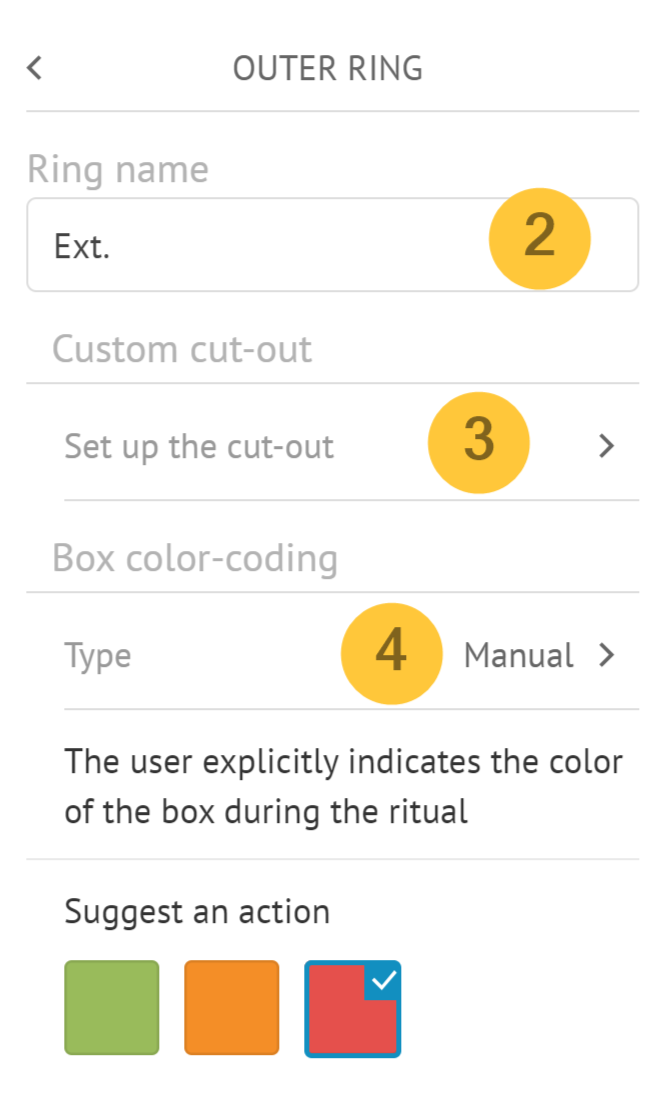
Enter the ring name.
Note:
You can find this name in the definition of the indicators, in the filters of the other tools, in the legend of the letter
Declare non-working days if necessary.
Note:
Automatically turns Saturday and/or Sunday boxes gray according to the current short term time window.
Select the box color-coding:
Note:
This action defines how the letter's boxes are colored.
You can specify whether the user is prompted for an action.
By default, action creation pop ups are set in the box on the right.
When you return to the “Ring(temporal) and valuation” area, you can add a new ring if required. To do so:
Enable the “Activate new circle” toggle.
Select the ritual frequency.
Click Save.
Warning:
You cannot edit the ritual frequency afterwards.
Cut-out Type: Custom
From the “Ring(custom) and color-coding” area:
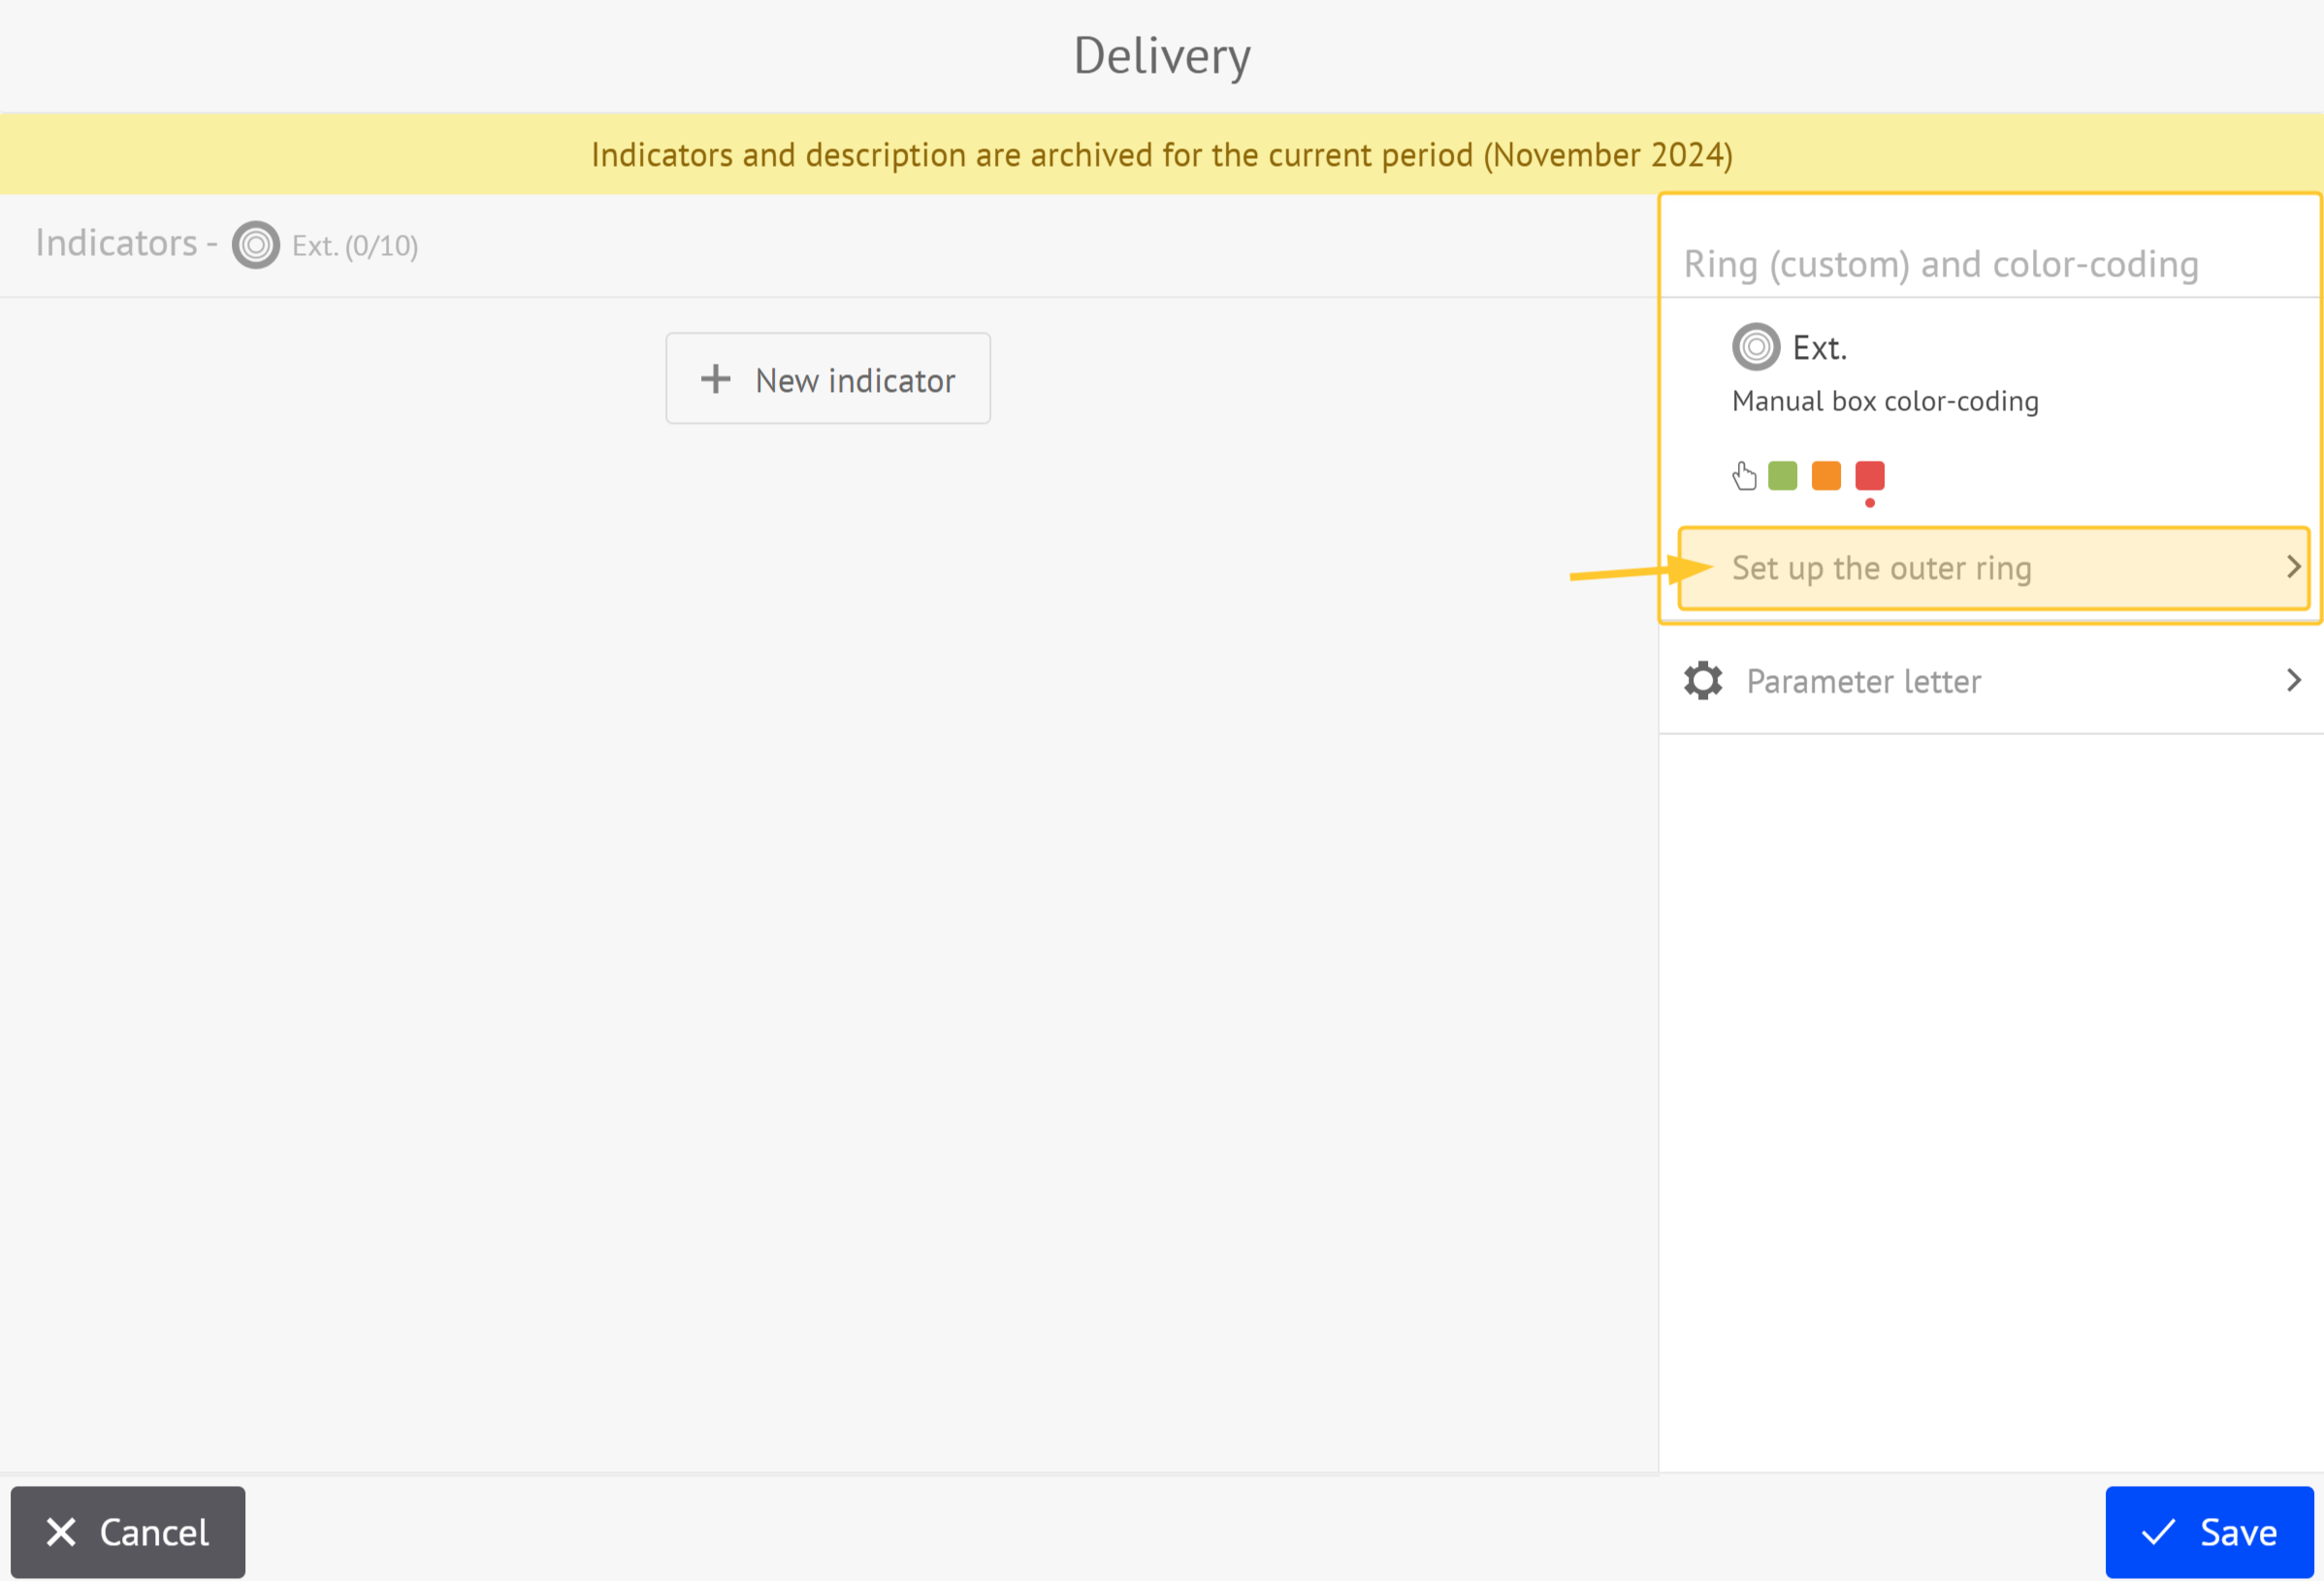
Click Set up the outer ring.
The following screen is displayed:
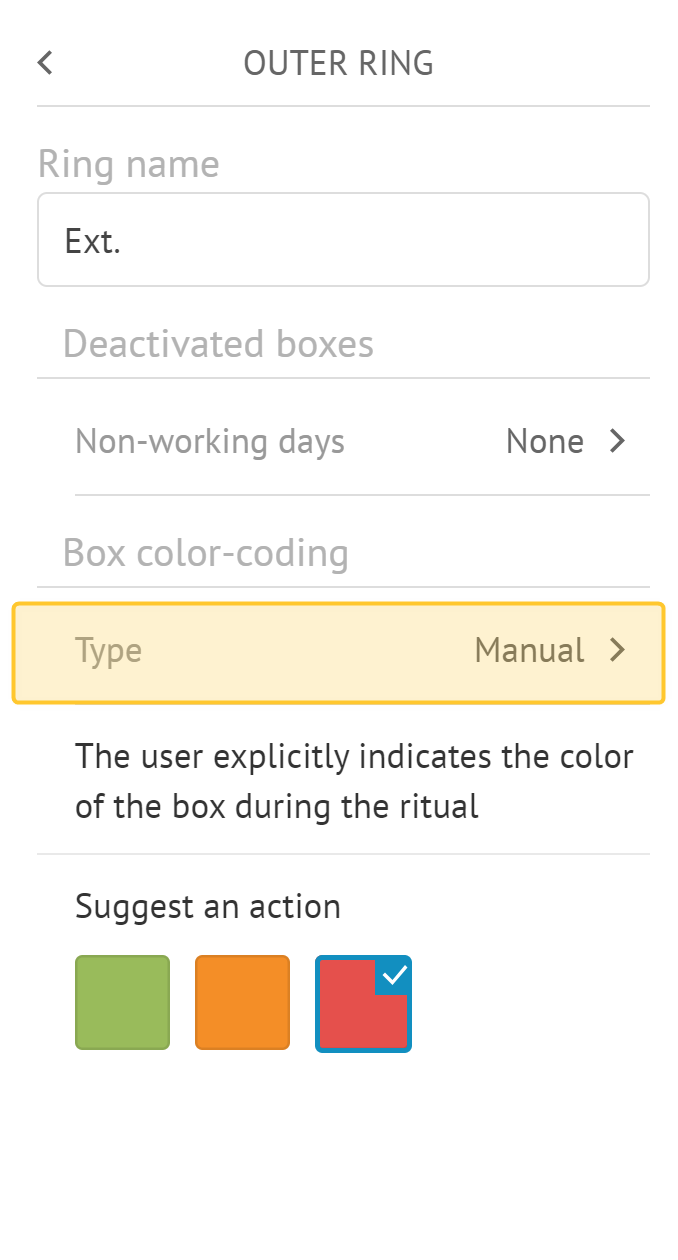
Enter the ring name.
Note:
You can find this name in the definition of the indicators, in the filters of the other tools, in the legend of the letter.
Configure cut-out: enter box labels (5 characters maximum).
Note:
Allows you to define the text that is displayed in each box.
Select the box color-coding:
Manual
Global threshold
Single thresholds
Note:
This action defines how the letter's boxes are colored.
You can specify whether the user is prompted for an action.
By default, action creation pop ups are set in the box on the right.
Enabling a New Ring
Warning:
This feature is only available for temporal cut-out.
From your board, click the letter in which you want to add a ring.
From the contextual menu, Click Settings.
Click Activate a new ring.
Select a ritual frequency.
Click Save.
Note:
The ring(s) already configured cannot be moved on the letter. The new ring is automatically added to the external side of the letter.
Showing or Hiding a Ring
Warning:
This feature is only available for temporal cut-out.
From your board, click the letter in which you want to edit.
From the contextual menu, Click Settings.
Click on the toggle associated to the ring you want to show or to hide.
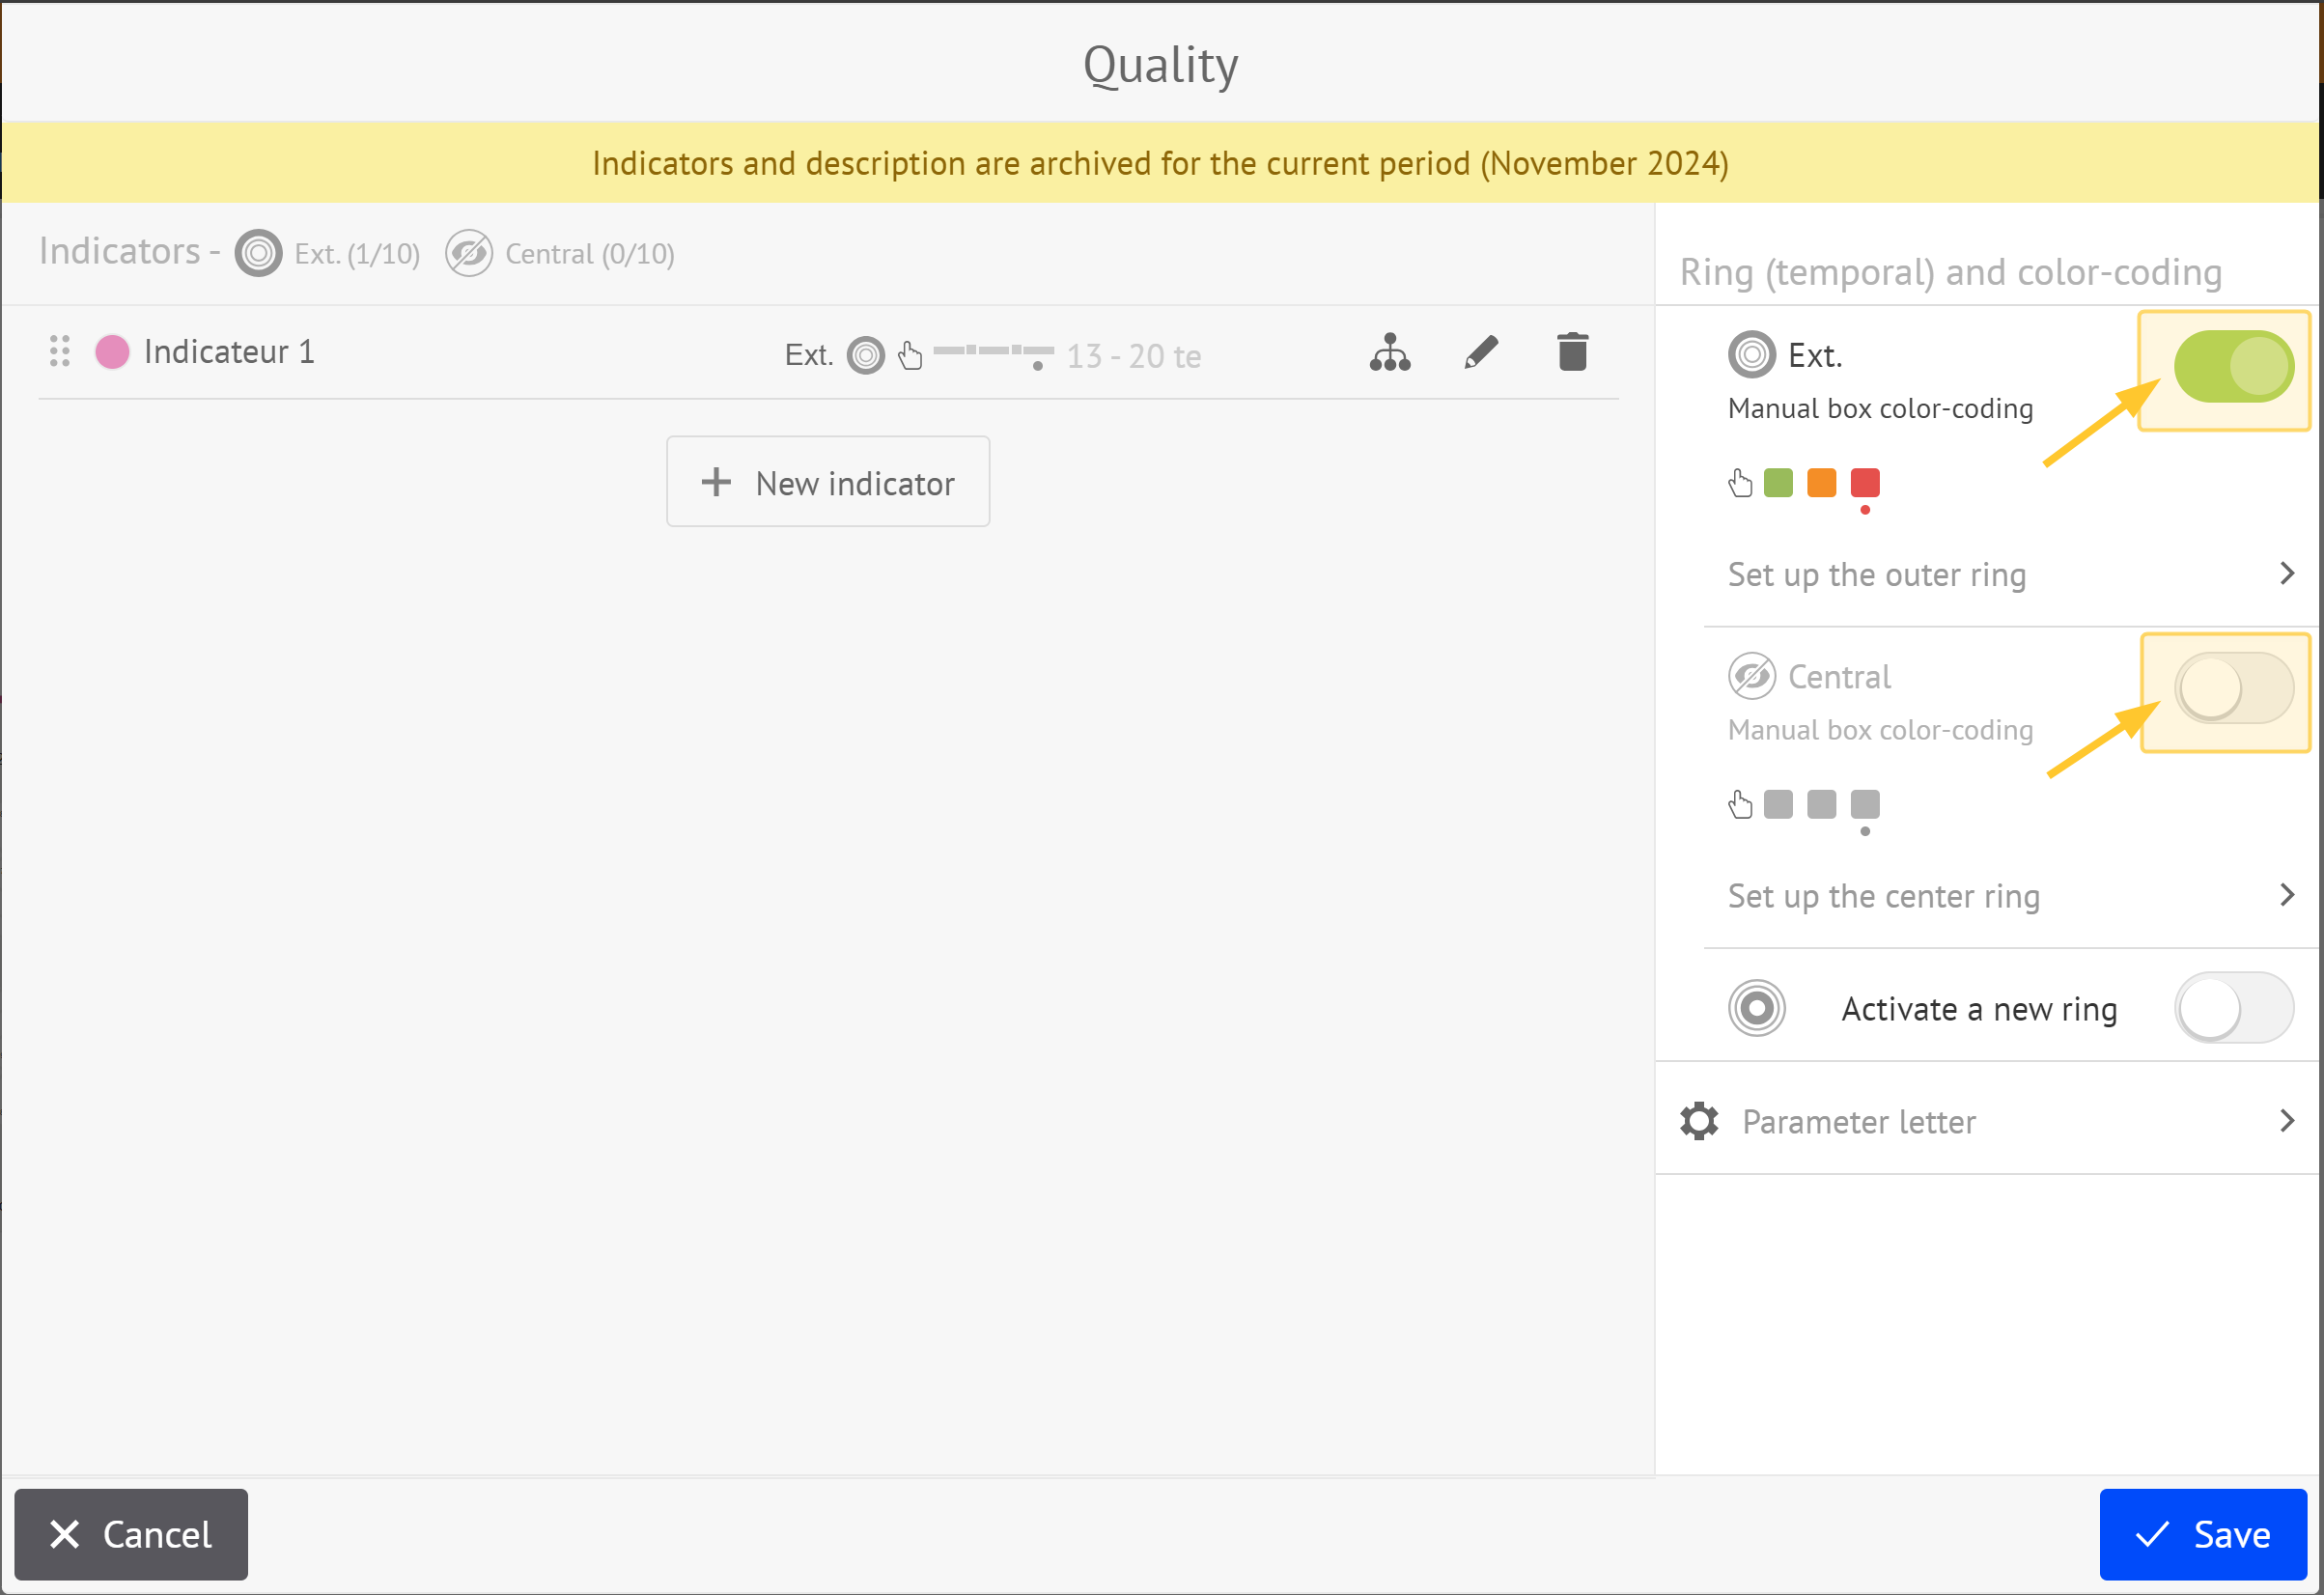
Click Save.
Box Color-Coding
Manual
The user manually indicates the box color during the ritual.
For each available color (depends on the Platform configuration restricted to green orange and red), you, as administrator, can specify whether the user is prompted an action.
By default, action creation pop ups are set in the box on the right.
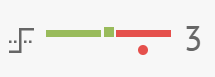
Single thresholds
.png)
The indicator with the warmest color sets the box color:
If at least one indicator is red, the box will be red.
Otherwise, if at least one indicator is orange, the box will be orange (depending on platform settings).
Otherwise, if at least one indicator is green, the box will be green.
For this type of color coding, boxes are given a color based on single rules defined for each indicator.
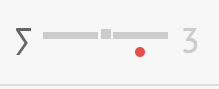
Global Threshold
.png)
The sum or the avergage of the indicators set the box color, depending on the global threshold.
For this type of color coding, you have to explicitly define a rule: click Settings.
This rule is based on the following elements:
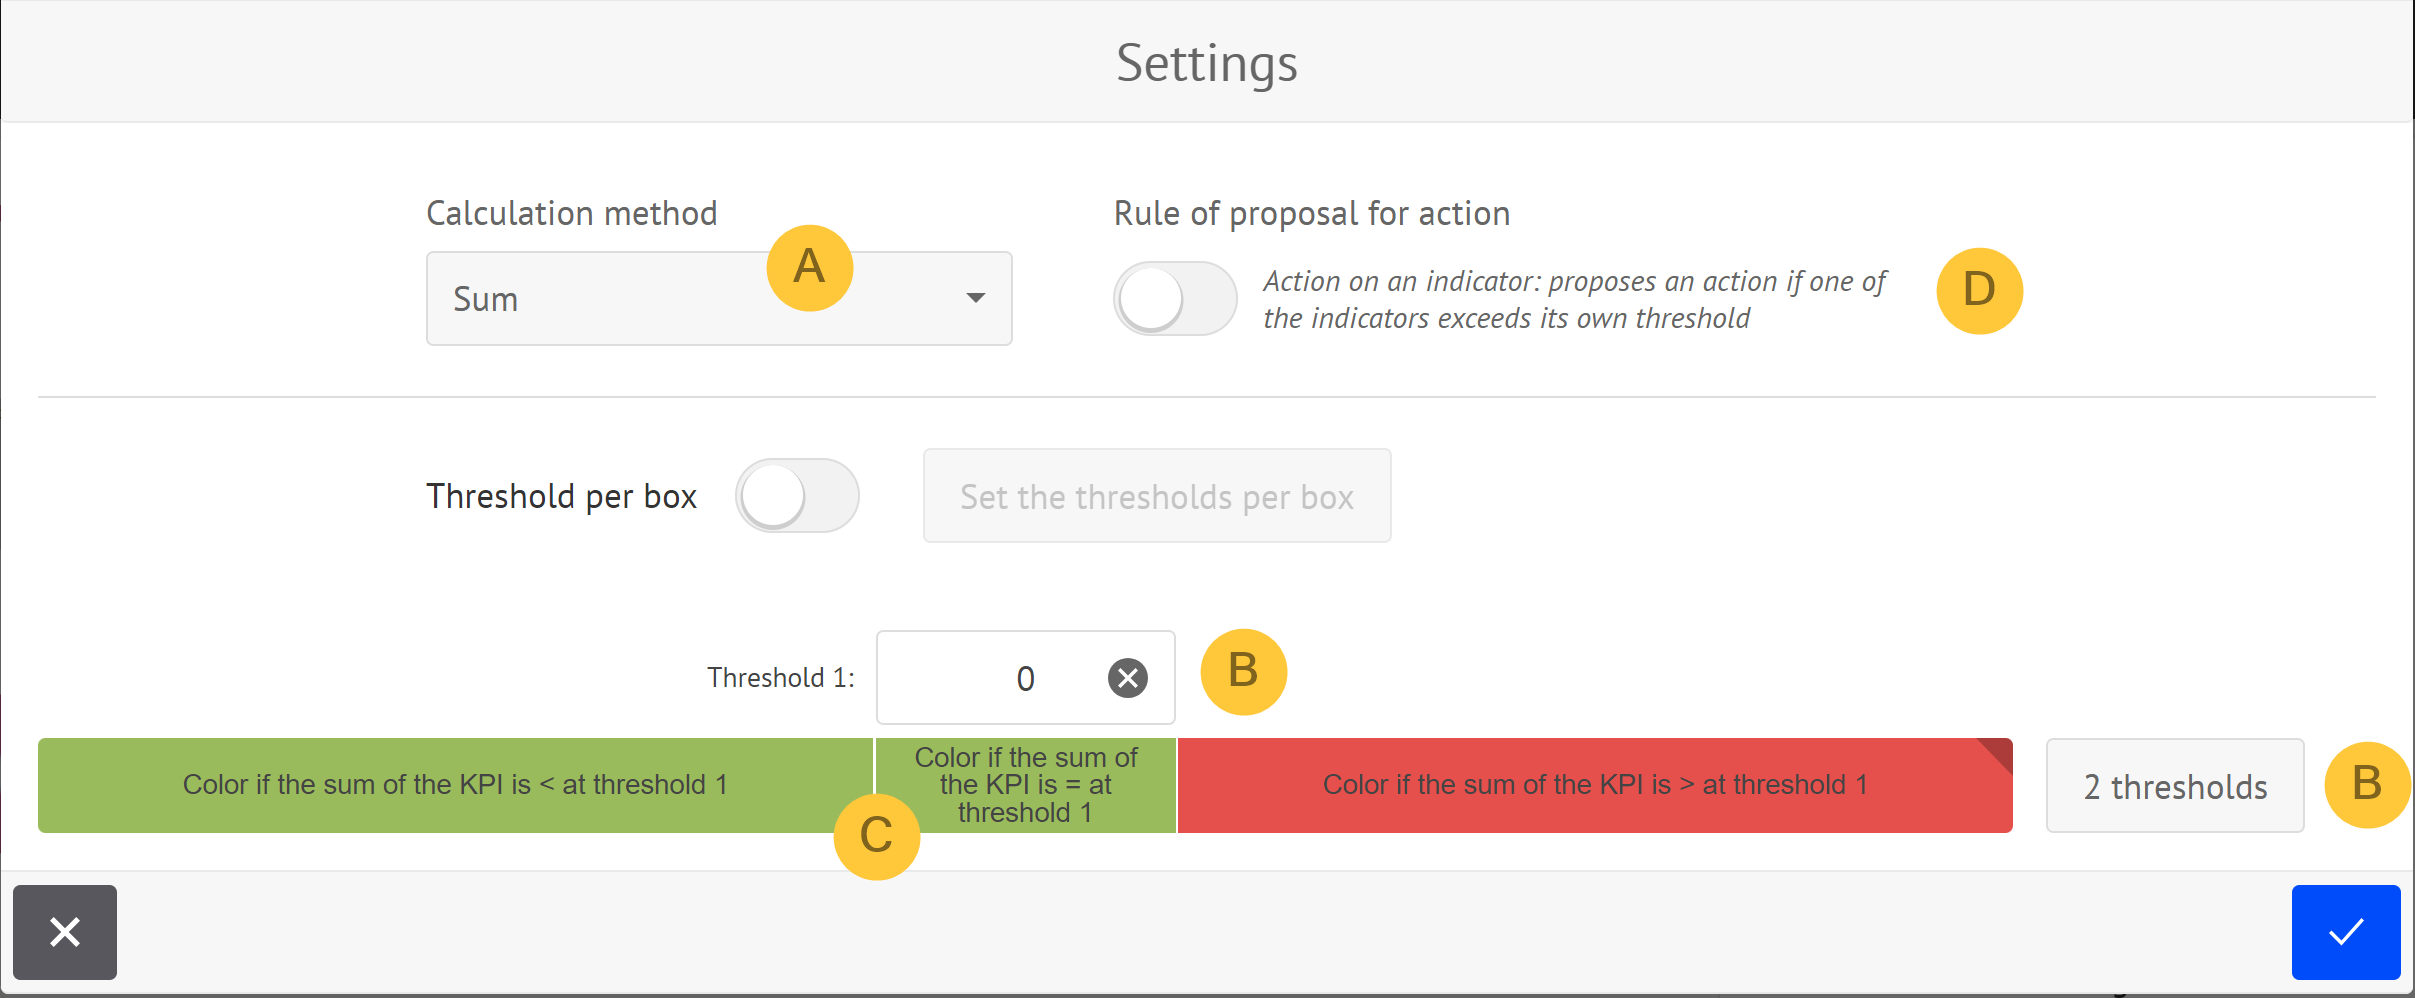
Calculation method, that can be:
the sum
the average of the indicator values
1 or 2 thresholds depending on the Platform configuration
Formula, that defines box color by comparing indicator sum or average to threshold(s)
Action creation pop-up that you can trigger from a formula including all indicators or from a formula defined for a single indicator
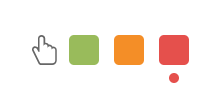
Color-Coding Icons
Ring color-coding | Ring color-coding icons | Indicator color-coding icons |
|---|---|---|
The dot under each color indicates whether you have defined an action proposal. |
| |
|
|
|
| If you do not enable the “action proposal rule” toggle:
| If you do not enable the “action proposal rule” toggle:
|
None |
All the properties of the rules are used. |
%20-%20symbole%20avec%20r%C3%A8gle%20de%20propostion%20d'action.png)
%20-%20moyenne%20des%20indicateurs.png)
Setting Indicators
Note:
You can define up to 10 different indicators per ring.
To define an indicator associated with your letter, click +New indicator.
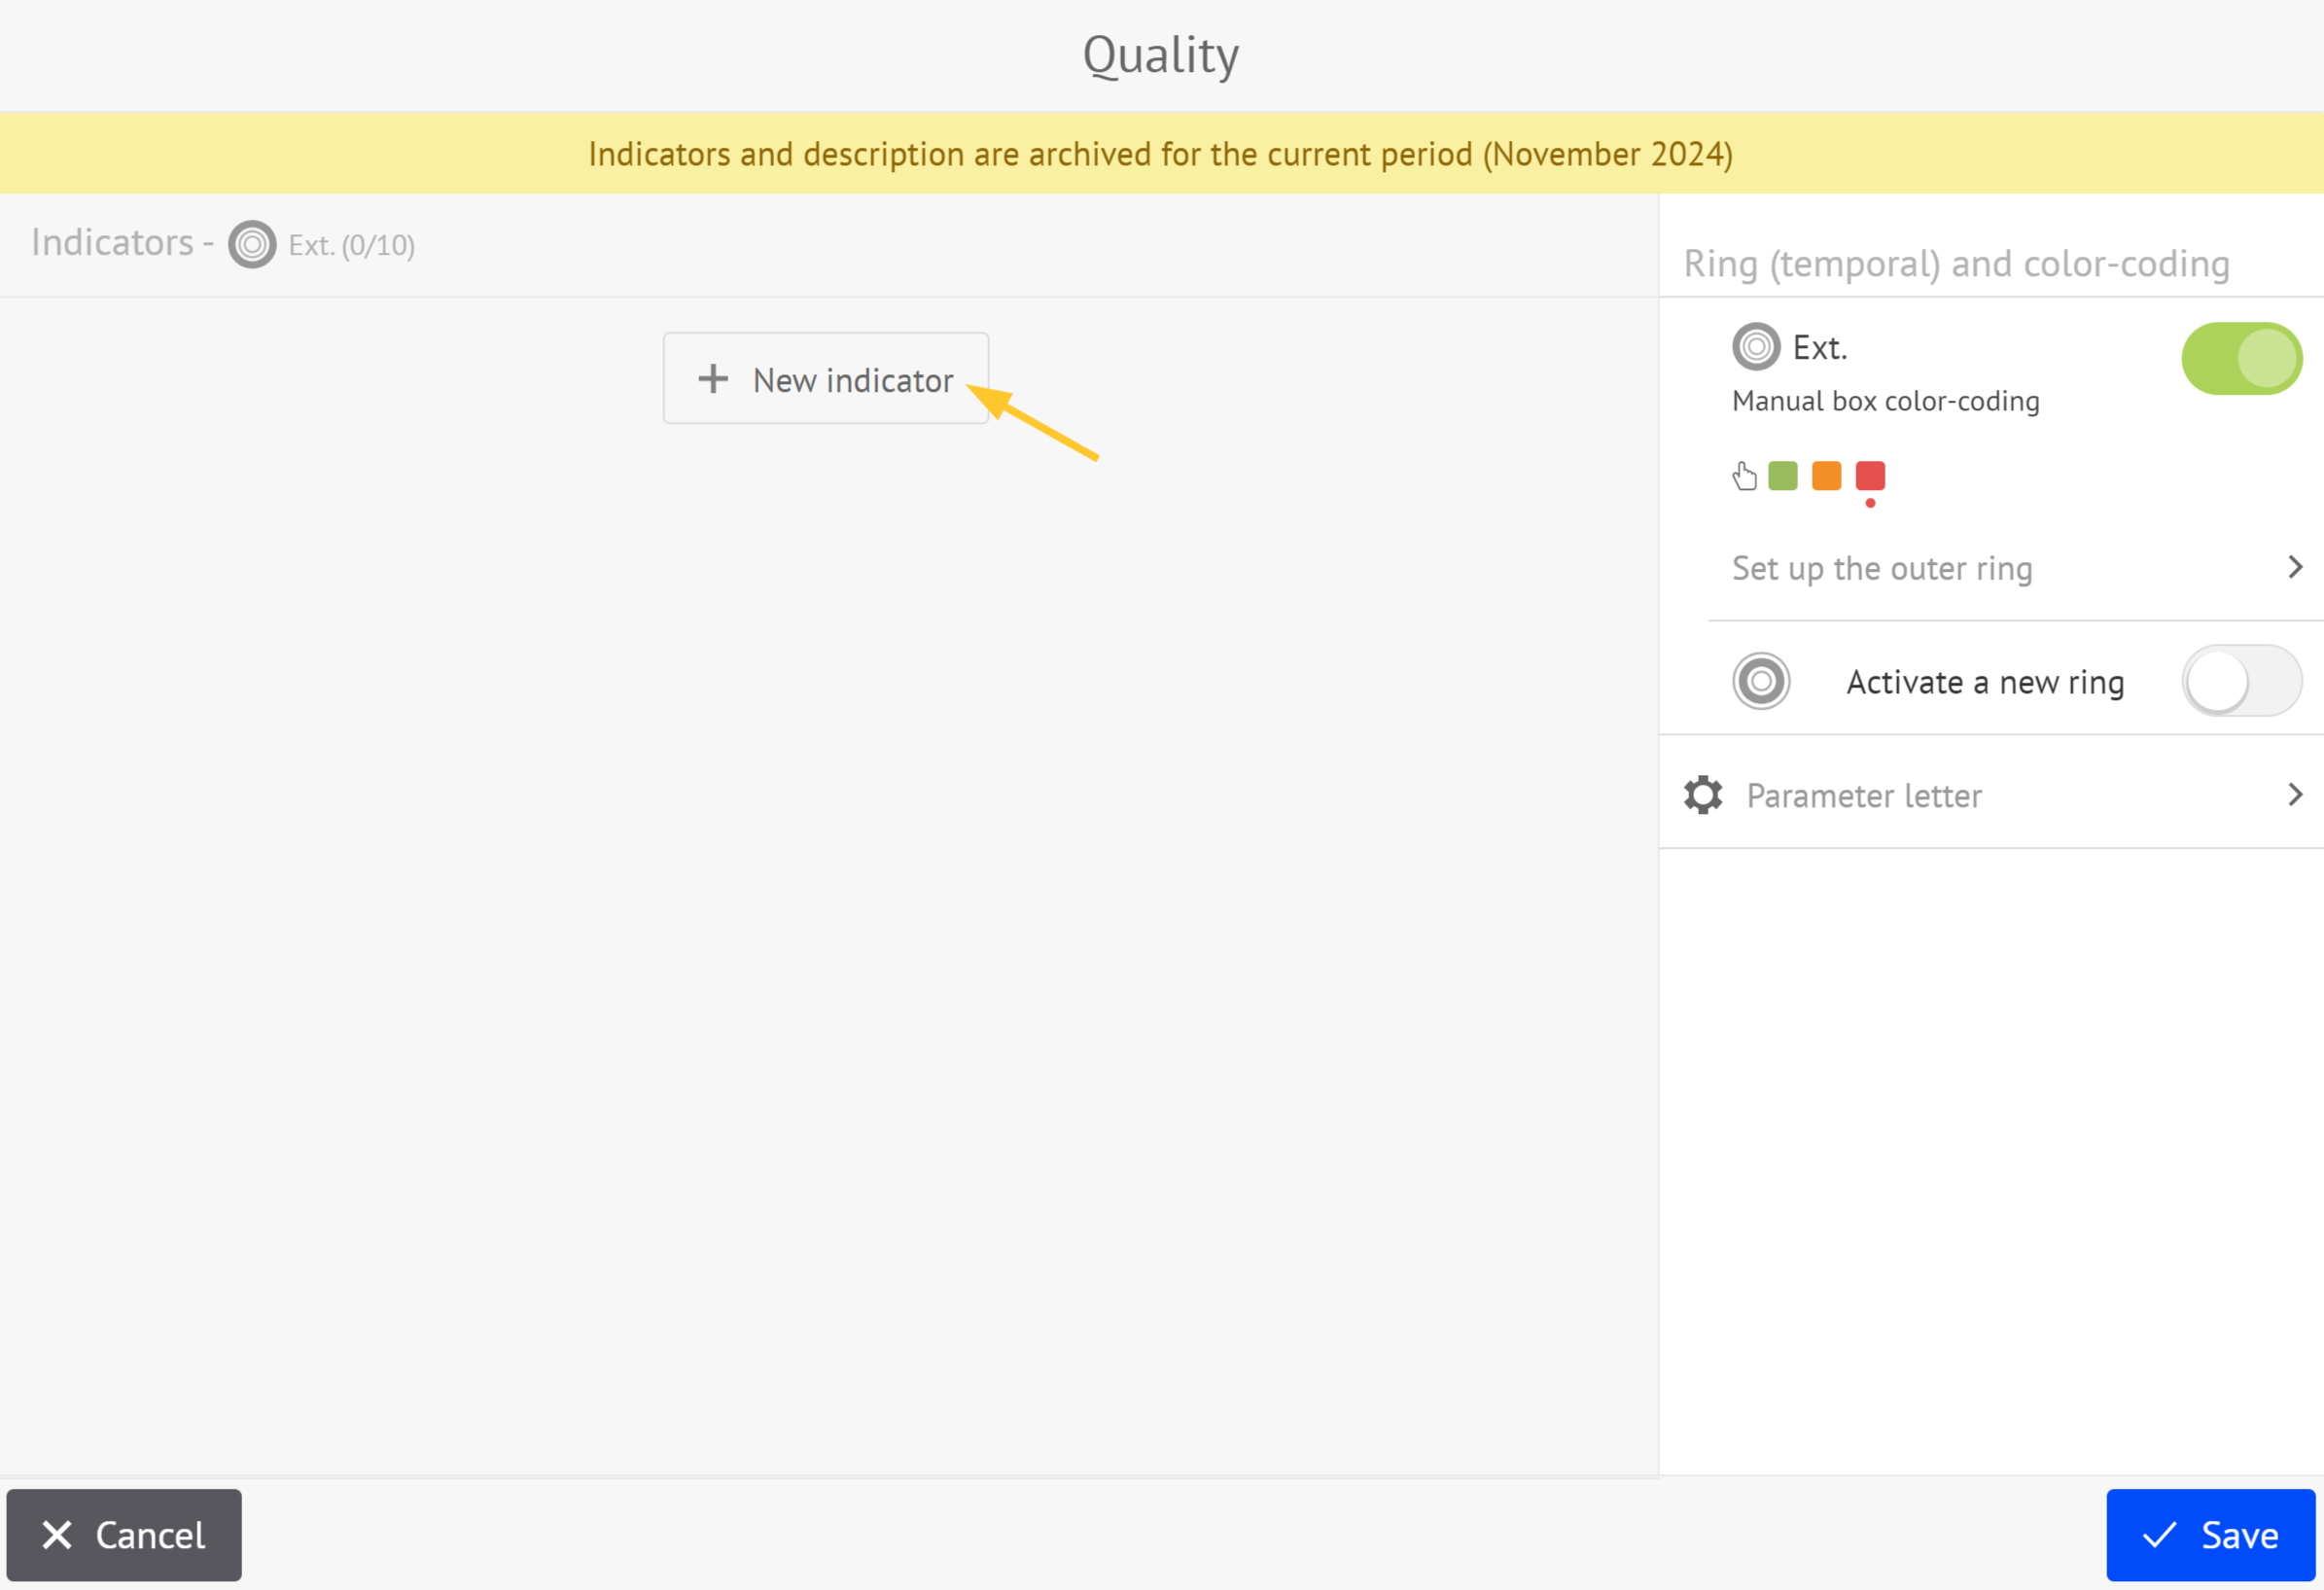
The Indicator settings screen is displayed:
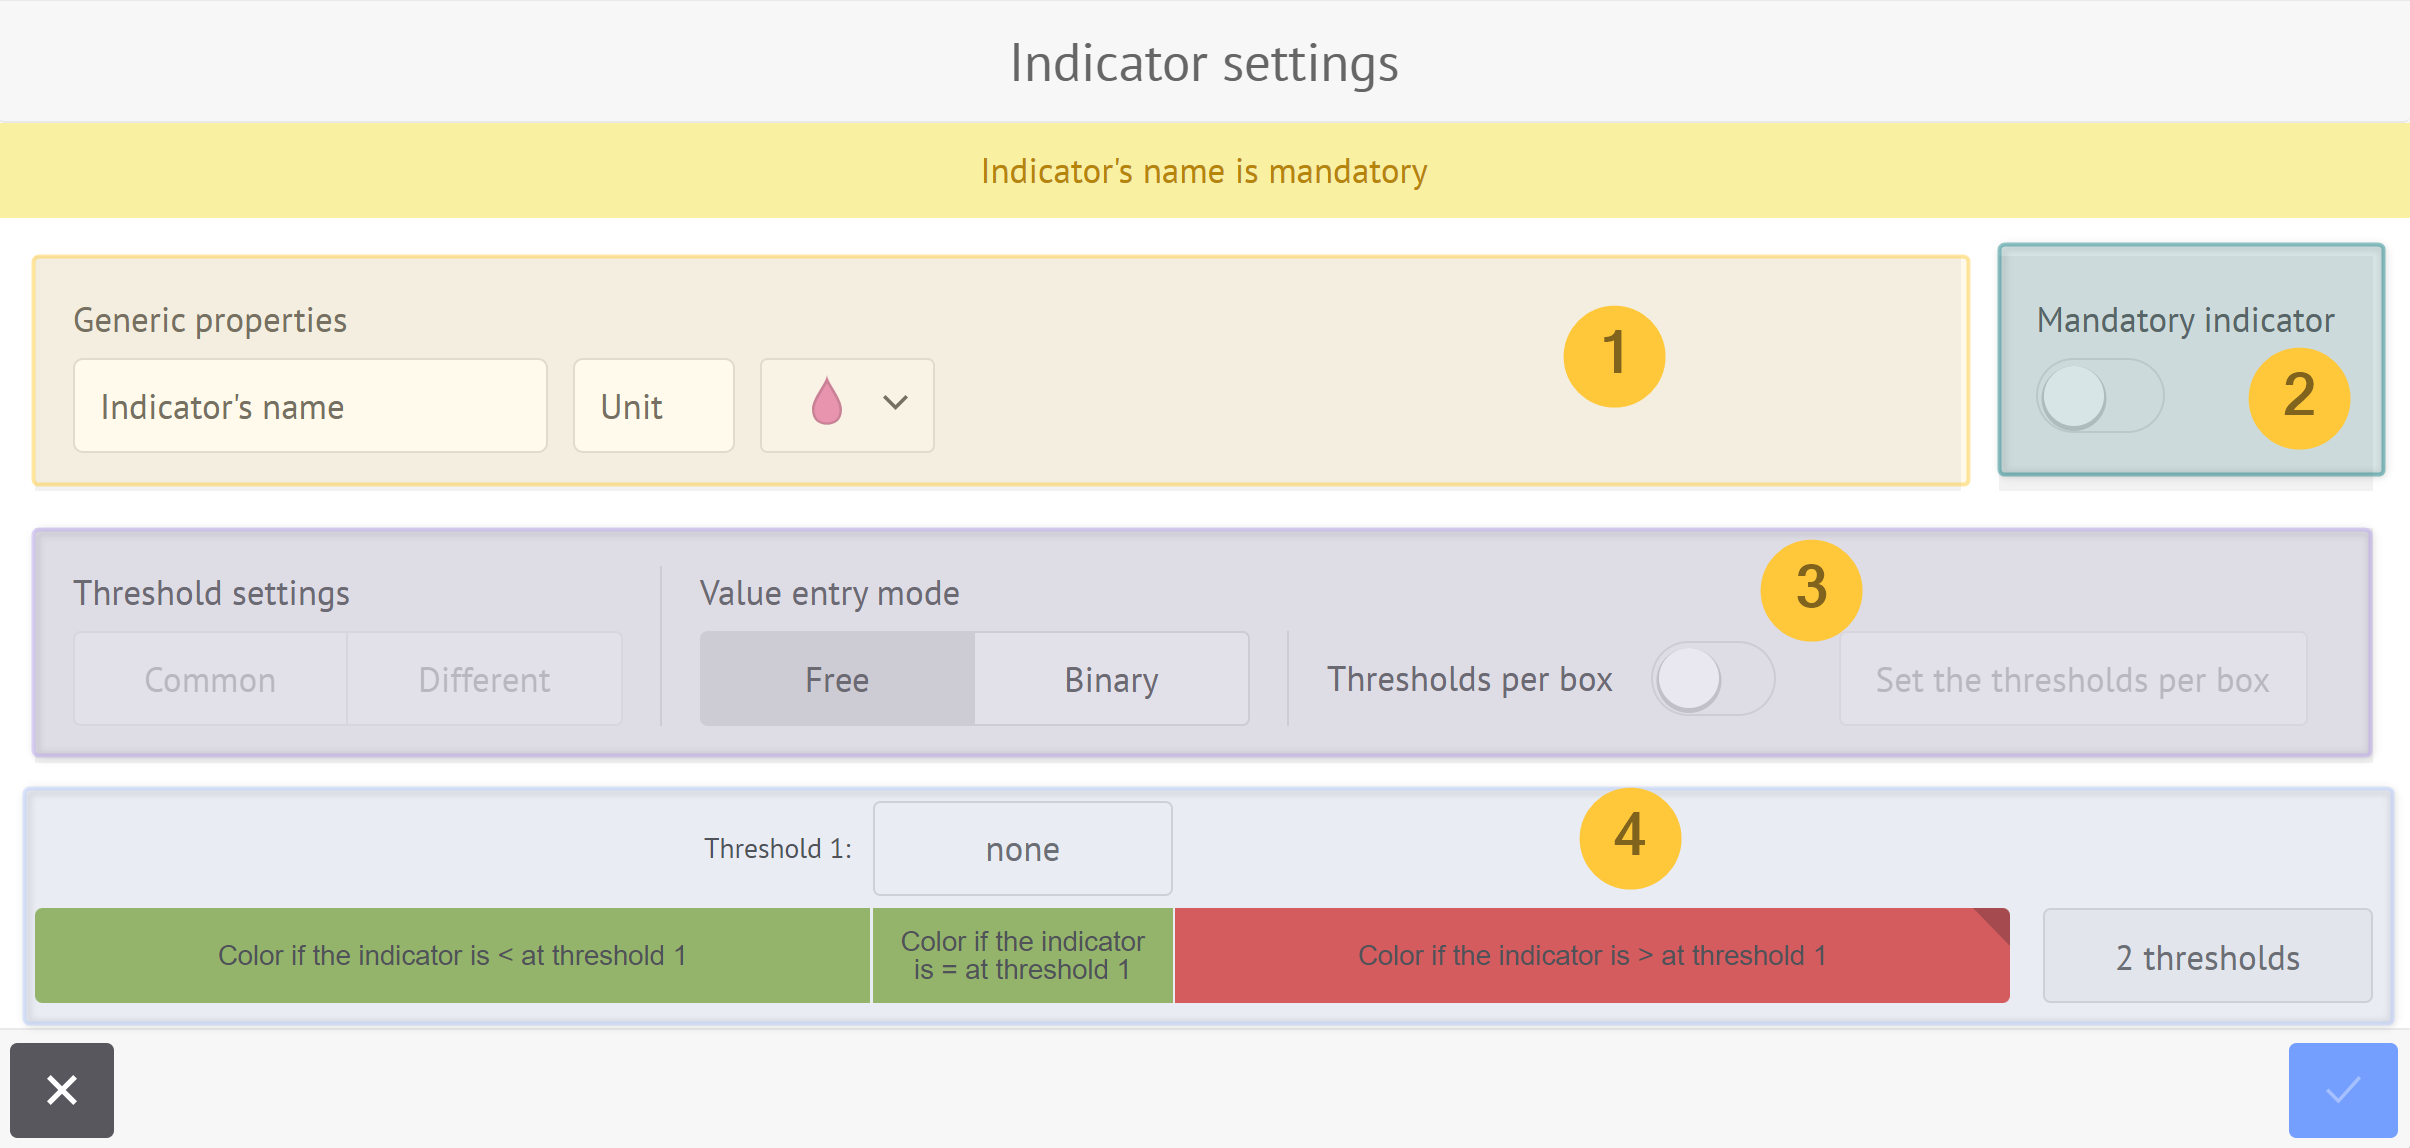
Generic properties:
Enter:
name (40 characters maximum).
unit of measurement (3 characters maximum).
Select a color.
If you define more than one ring, select the ring(s) that contain(s) this indicator.
Note:
If you do not define any rings, the indicator is created by default in the outer ring.
“Mandatory indicator” toggle : if a mandatory indicator is given no value, the ring it belongs to are not color coded if its color coding type is set on single thresholds.
Value entry mode:
Select the valuation mode for your indicator:
Free: threshold value entry type, with on 1 or 2 thresholds
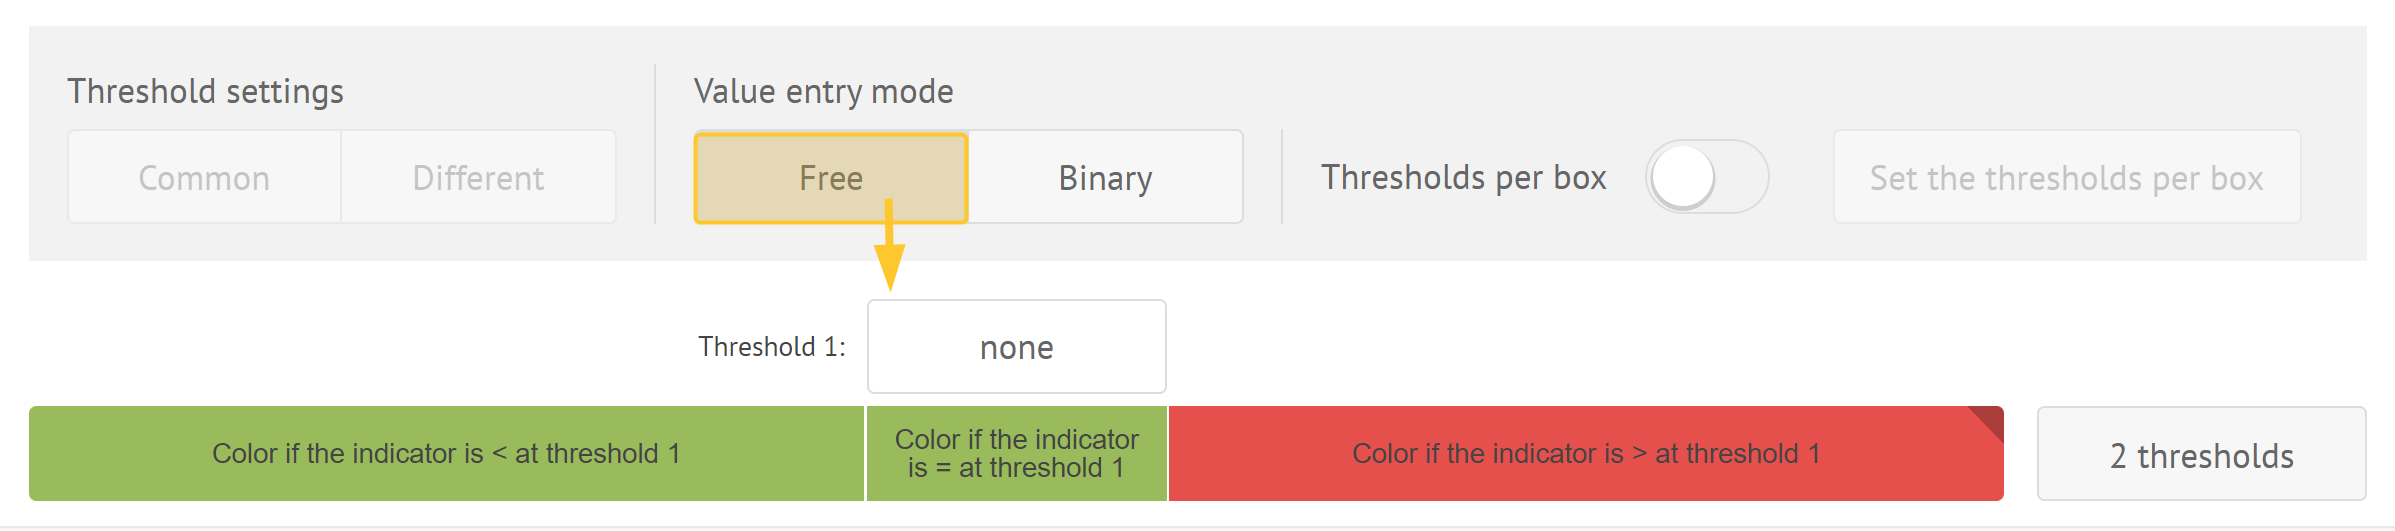
If you select this value entry mode, you can define thresholds per box. To do this:
Enable the “Thresholds per box” toggle.
Click Set the thresholds per box.
Enter the threshold values for each box. You need to enter them for each time sequence (weekly, monthly, etc.).
Note:
If you definemore than on ring, enter the threshold values for each box in each ring.
Confirm your entry.
Binary: Binary value entry type, with the indicator bearing 2 values only (its use is based on a state.).
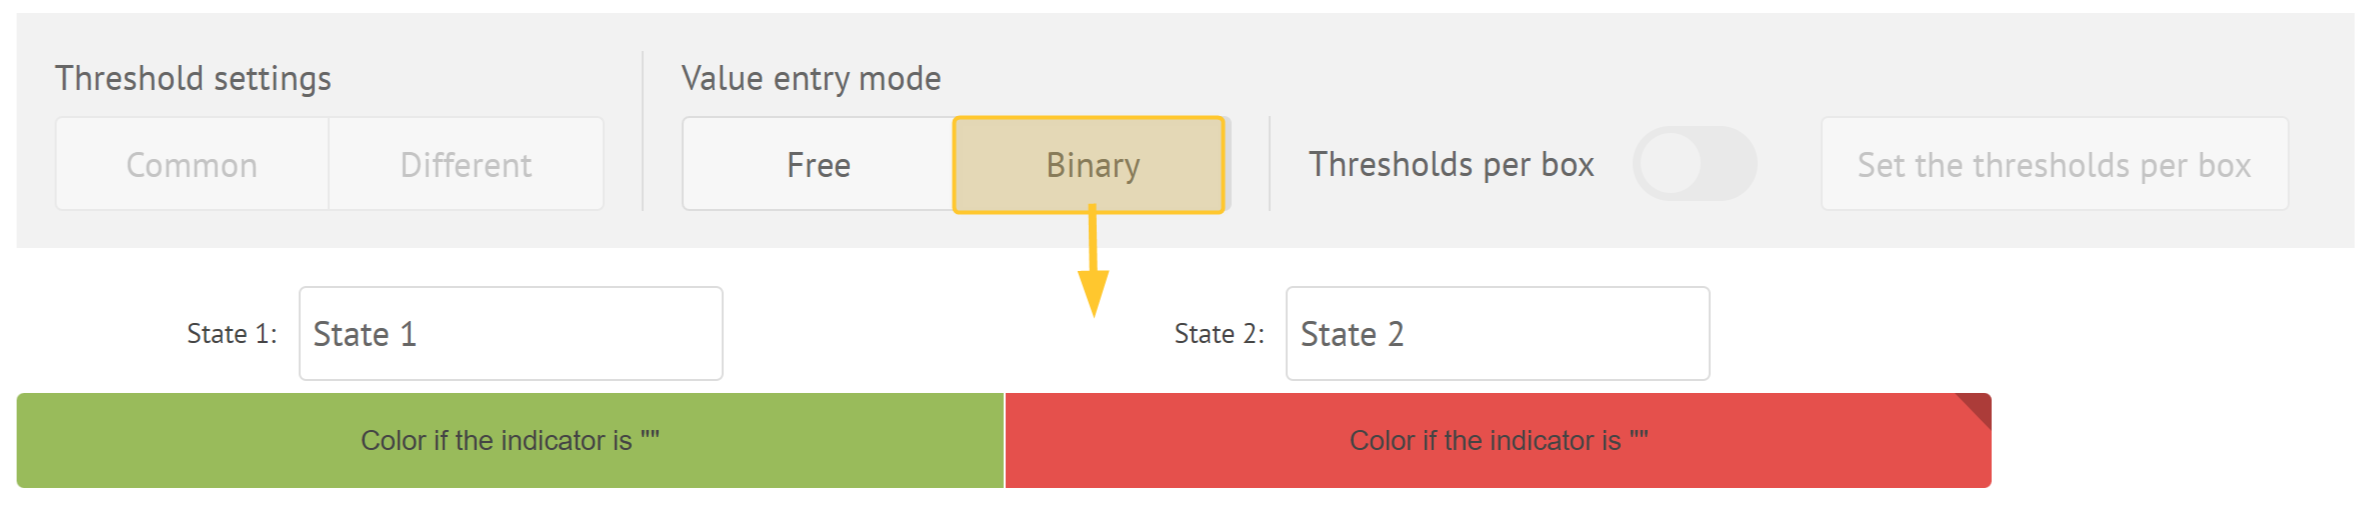
Note:
Changing the State fields in the binary valuation mode only affects the button label, its value does not change.
The values used for the binary valorization mode are always 0 and 1. The value 0 is on the left.
During consolidation, only the values of the buttons (0 and 1) are used.
Define the box color-coding: use indicators thresholds.
Confirm your indicator.
See Inputting your indicators to find out more about how to input indicator values on the letter.
Using Indicators Thresholds
The indicator thresholds allow you to define box color-coding based on 1 or 2 thresholds.

Case of 1 threshold
In the case where you use 1 threshold, you need to define 3 colors:

The one displayed if the value entered in the box is below the threshold.
By default, the box is green.
The one displayed if the value entered in the box is equal to the threshold.
By default, the box is green.
The one displayed if the value entered in the box is greater than the threshold.
By default, the box is red.
Click on one of the blocks to select the color.
Cas de 2 thresholds
In the case where you use 2 thresholds, you need to define 3 colors:

The one displayed if the value entered in the box is below the lower threshold.
By default, this color is green.
The one displayed if the value entered in the box is equal to the lower threshold.
By default, this color is green.
The one displayed if the value entered in the box is between the lower and higher thresholds.
By default, this color is orange if available, red otherwise.
The one displayed if the value entered in the box is equal to the higher threshold.
By default, this color is orange if available, red otherwise.
The one displayed if the value entered in the box is greater than the higher threshold.
By default, this color is red.
Click on one of the blocks to select the color.
Note:
In case of 2 thresholds:
The second threshold must be greater than the first threshold.
If the first threshold is defined, then second one has to be defined as well.
Using the Suggested Action
Regardless of the type of color coding of a ring or the color of a single box, the system may ask you to take an action.
As an administrator, you can specify whether your team are prompted to take an action. When you select the color of an indicator, you can choose to propose an action: check the associated box.

By default, action creation pop ups are set in the box on the right.
For other color-coding types, you can define whether or not an action are proposed. An indicator is displayed on the block if the answer is Yes.
Letter Parameters
From the Letter Parameters screen, you can change/set the following parameters:
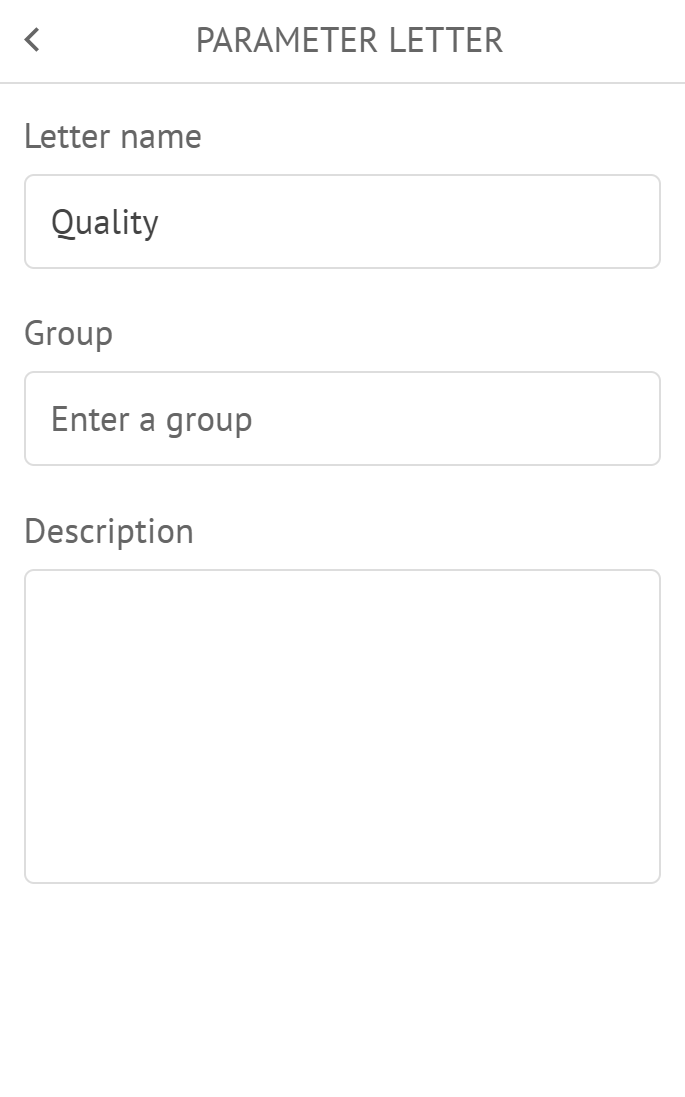
Letter name: You can edit it after you add it to the board. The new name is displayed at the top left of the letter.
Warning:
You cannot edit the letter character defined in the dock once the letter is added to the board.
Group: Parameter allows to filter your letters by groups from the indicator entry.
Description: Description of your letter that is displayed at the top right of the letter.