Inputting your Indicator Values
- 3 Minutes to read
- Print
- PDF
Inputting your Indicator Values
- 3 Minutes to read
- Print
- PDF
Article summary
Did you find this summary helpful?
Thank you for your feedback
You can enter the indicators either:
from the QCD utility > Input of indicators.
via the user interface > iObeya Services Hub.
Note:
You can upload Excel or CSV files populated with performance indicators to input data directly into QCD Letters. This service supports simple use cases as well as more advanced configurations, including QCD Letters containing multiple rings and indicators.
The file format and required fields are described in an article directly available on the service’s page or here so that you can prepare your data correctly before attempting to import.

In this article, learn how to enter the values of your indicators.
Inputting Indicators in the Boxes of a Letter
A box is a display unit that presents data with the finest granularity. Each box carries the values of the Key Performance Indicators (KPIs) being tracked, as well as information on the associated corrective or preventive actions.

Box (A)
You can value each indicator associated with the ring to which the box belongs.
.gif)
Note:
A mandatory indicator has a star (*) in the middle of its color code pin:

To input your indicators in a box:
Click a box.
A contextual menu is displayed: its contents depend on the ring color-coding to which the box belongs.
Input your indicator values:
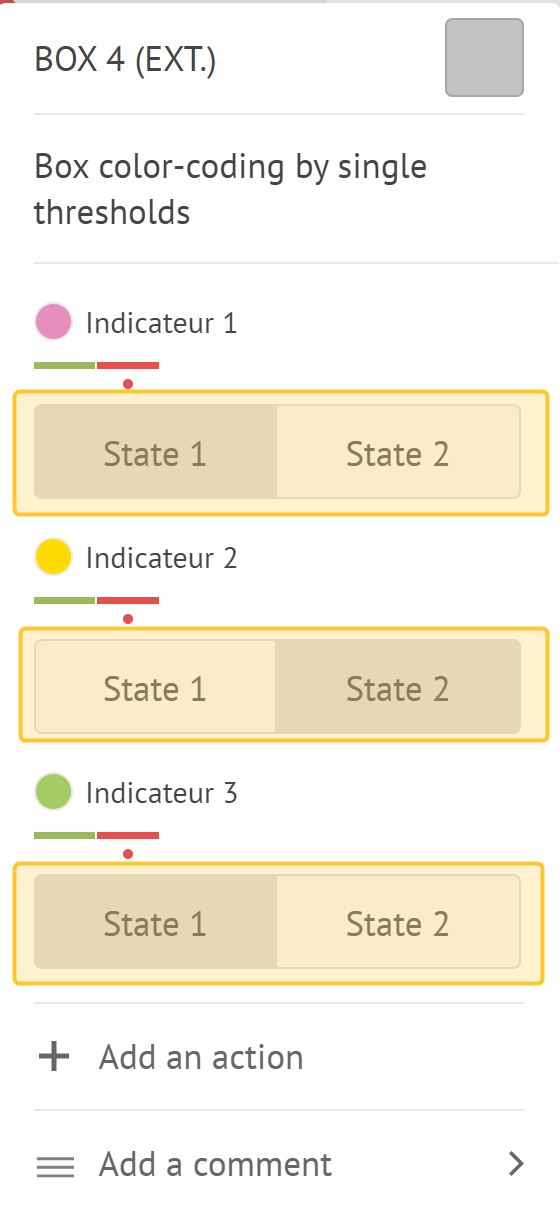
For rings with color-coding by threshold (global) and by threshold (by indicator), these indicator values are used to color the box:
If you are in "free” indicator value entry mode, you can either:
directly enter a number of up to 6 whole digits (up to three whole digits with 2 decimal digits).
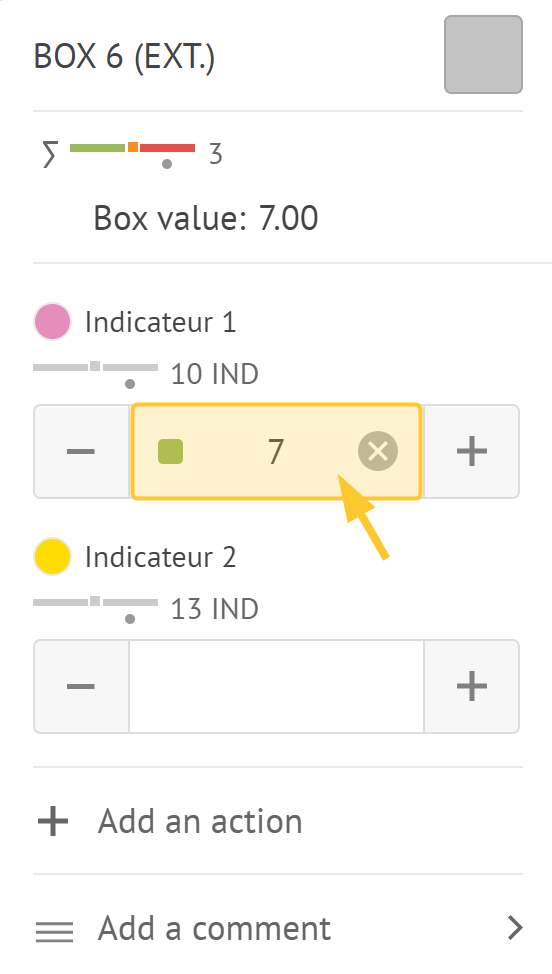
use + and -.
click on an indicator data field: a virtual keyboard is displayed:
.png)
If you are in "binary” indicator value entry mode, you need to select one of the two possibilities defined in the indicator settings.
If you want, you can also use the buttons:
+ Add an action: enter an action directly on a box: the action editing pop-up is displayed.
Add a comment: enter a comment.

.png)

Tip:
You can also access indicator input from the QCD utility.
Defining the Box Color Code
If a box corresponds to a day off, it is automatically grayed out. Nonetheless, you can always manually: select a color code for your box, if no automatic color coding is enabled
select a color code for your box, if no automatic color coding is enabled.
grey out a box that has not been automatically greyed out.
For a box belonging to a ring with manual color coding, you can give the box a color: click on it. 
For other types of box colour coding, the color depends on indicator values.
Inputting Indicators from the QCD Utility
The Input of indicators allows to enter your data for the current time window.
.png)
From the QCD utility, click Input of indicators to access it.

You can now:
sort letters alphabetically, left to right or top to bottom.
select:
a group from those defined during configuration. See Letter settings in the Configuring Letters.
a box name from a custom cutout letter.
Warning:
This filter is only available if custom cut-out letters are on the board.
a date to display the temporal cutout letters whose time window includes the selected date.
Warning:
This filter is only available if temporal cut-out letters are on the board.
search for letters, rings and indicators.
select a letter.
Note:
If a letter has a custom cute-out, you can also select a box.
select the ring on which you want to add your input.
define the status of the time window.
enter your indicators.
Note:
You can input indicator values in the same way as in the boxes. See step 3 of the procedure described here.
add an action: the action editing pop-up is displayed.
Was this article helpful?