About Board Settings
- 9 Minutes to read
- Print
- PDF
About Board Settings
- 9 Minutes to read
- Print
- PDF
Article summary
Did you find this summary helpful?
Thank you for your feedback
The board settings panel lets you manage parameters for your board. Find out here in this article how to set up your board.
Warning:
To access the board settings panel, you need to be assigned the permissions to set up a board.
You can access the board settings panel in 2 ways:
When you add a board to your room, click the board.
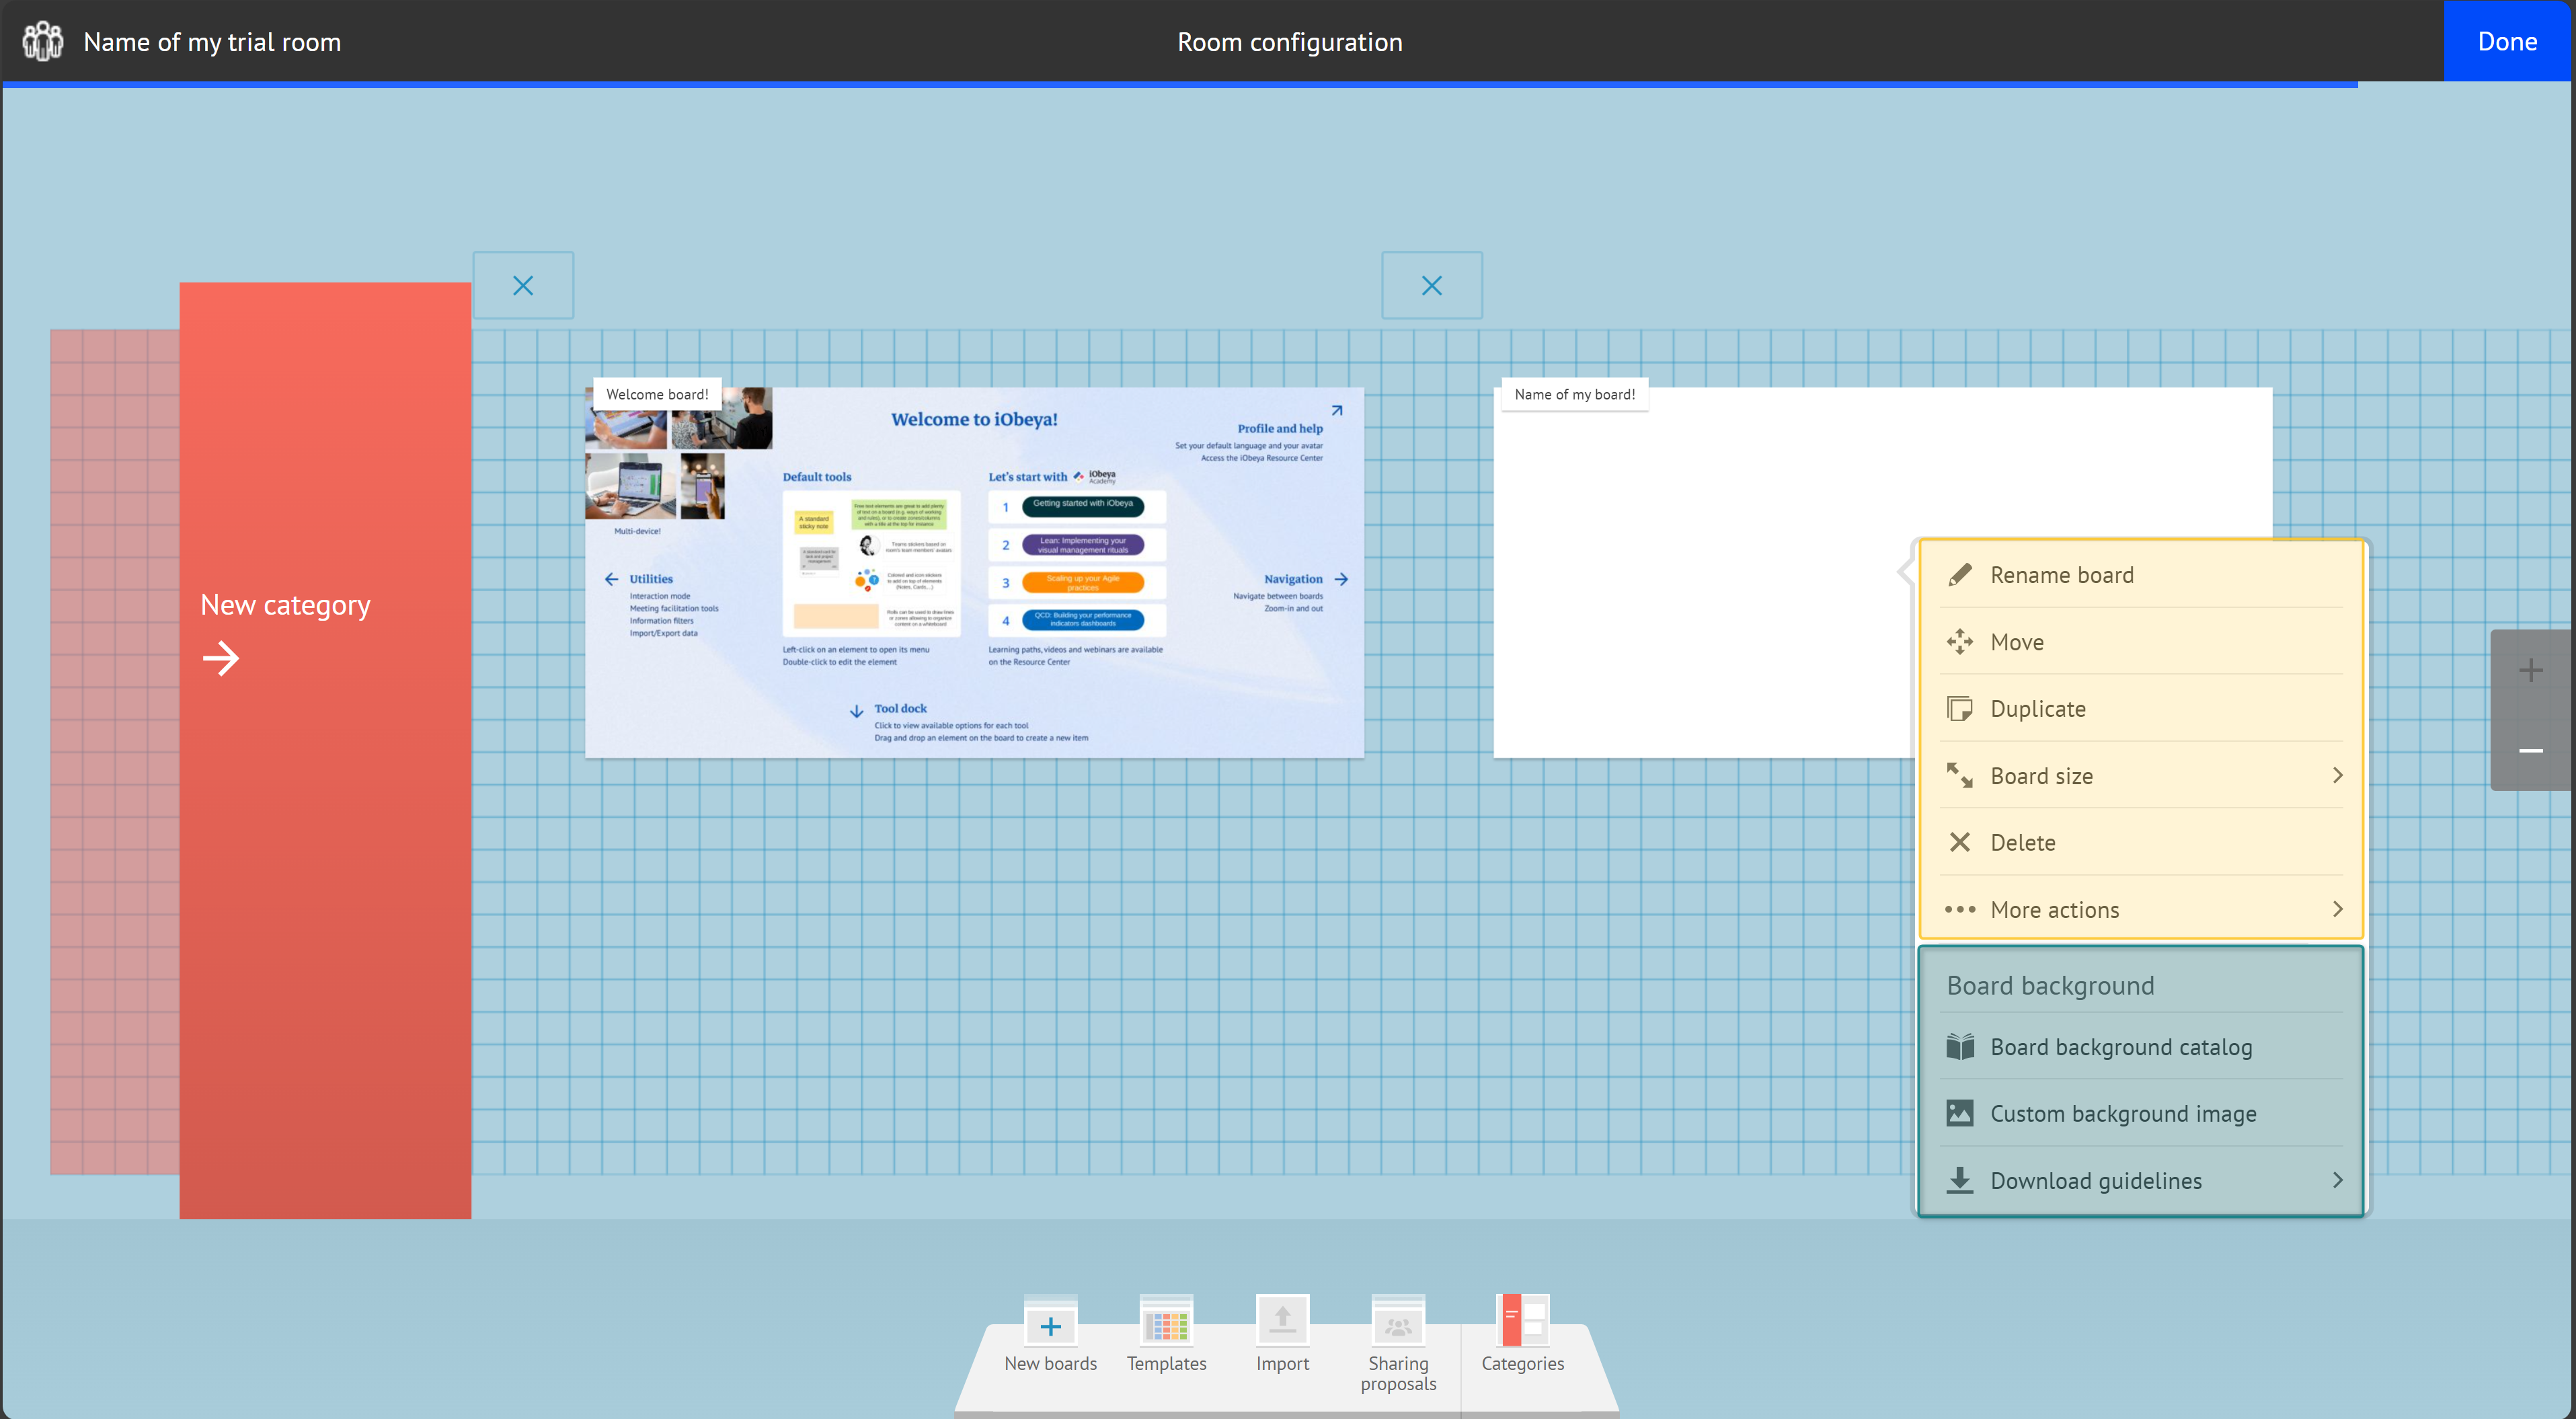
Click the Settings icon located in the top bar actions of your board.
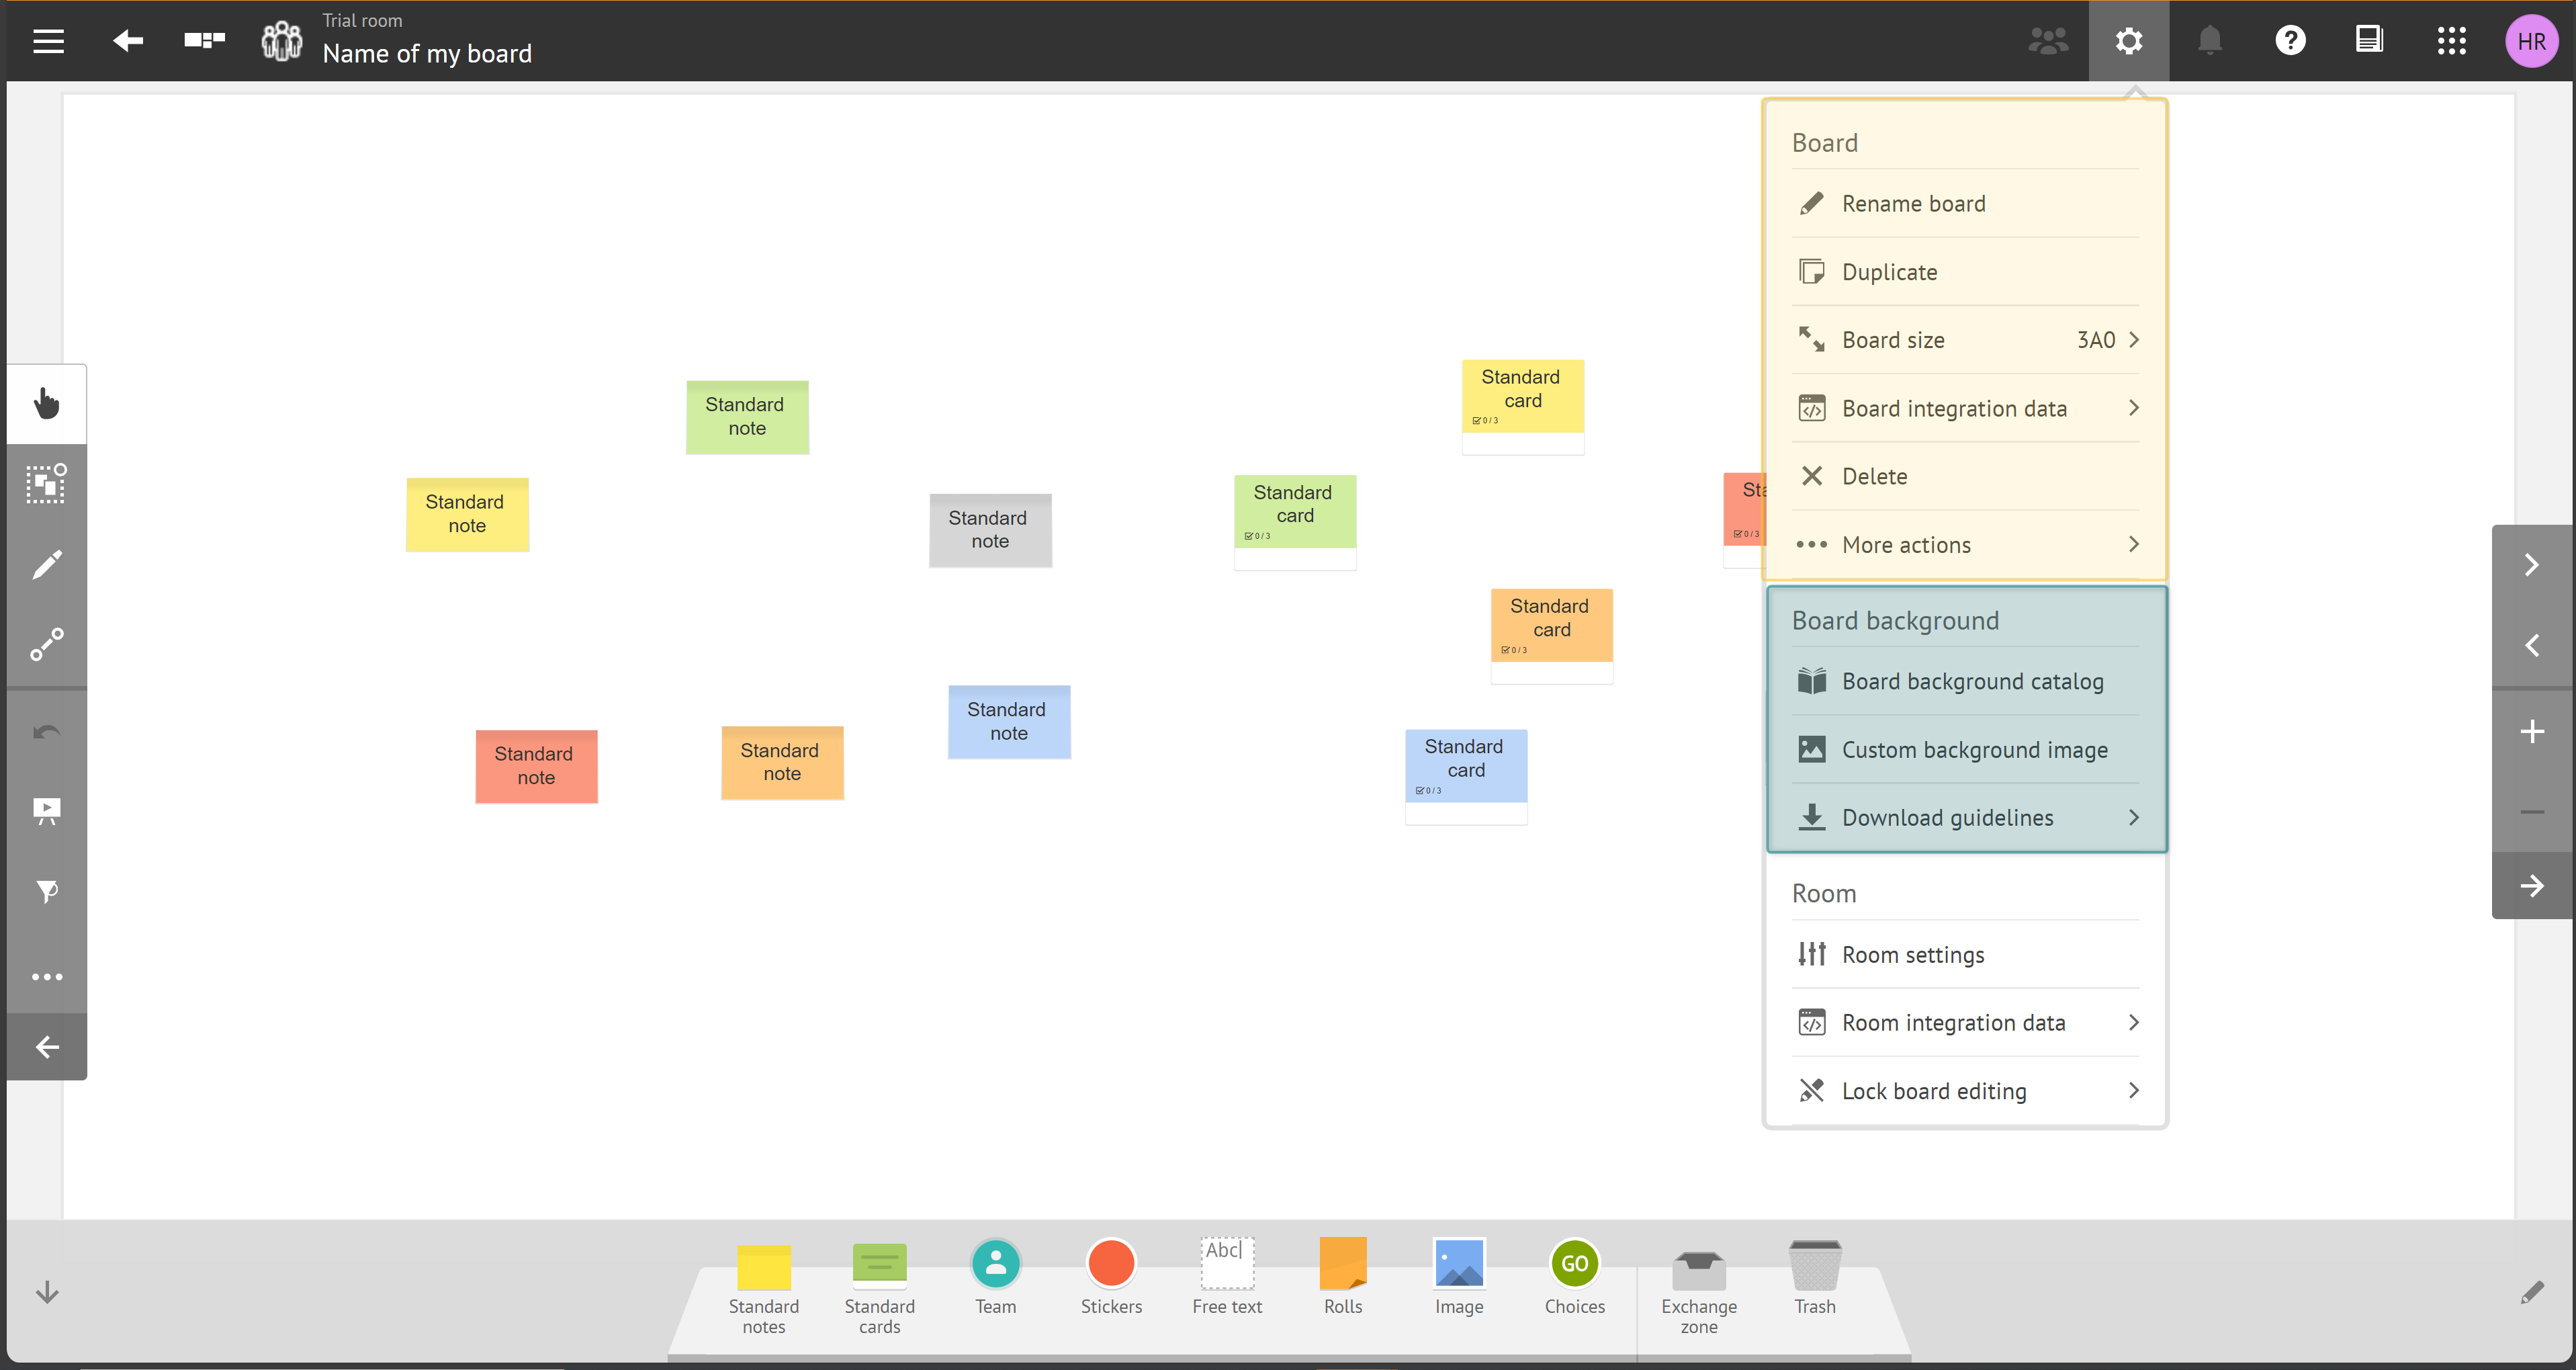


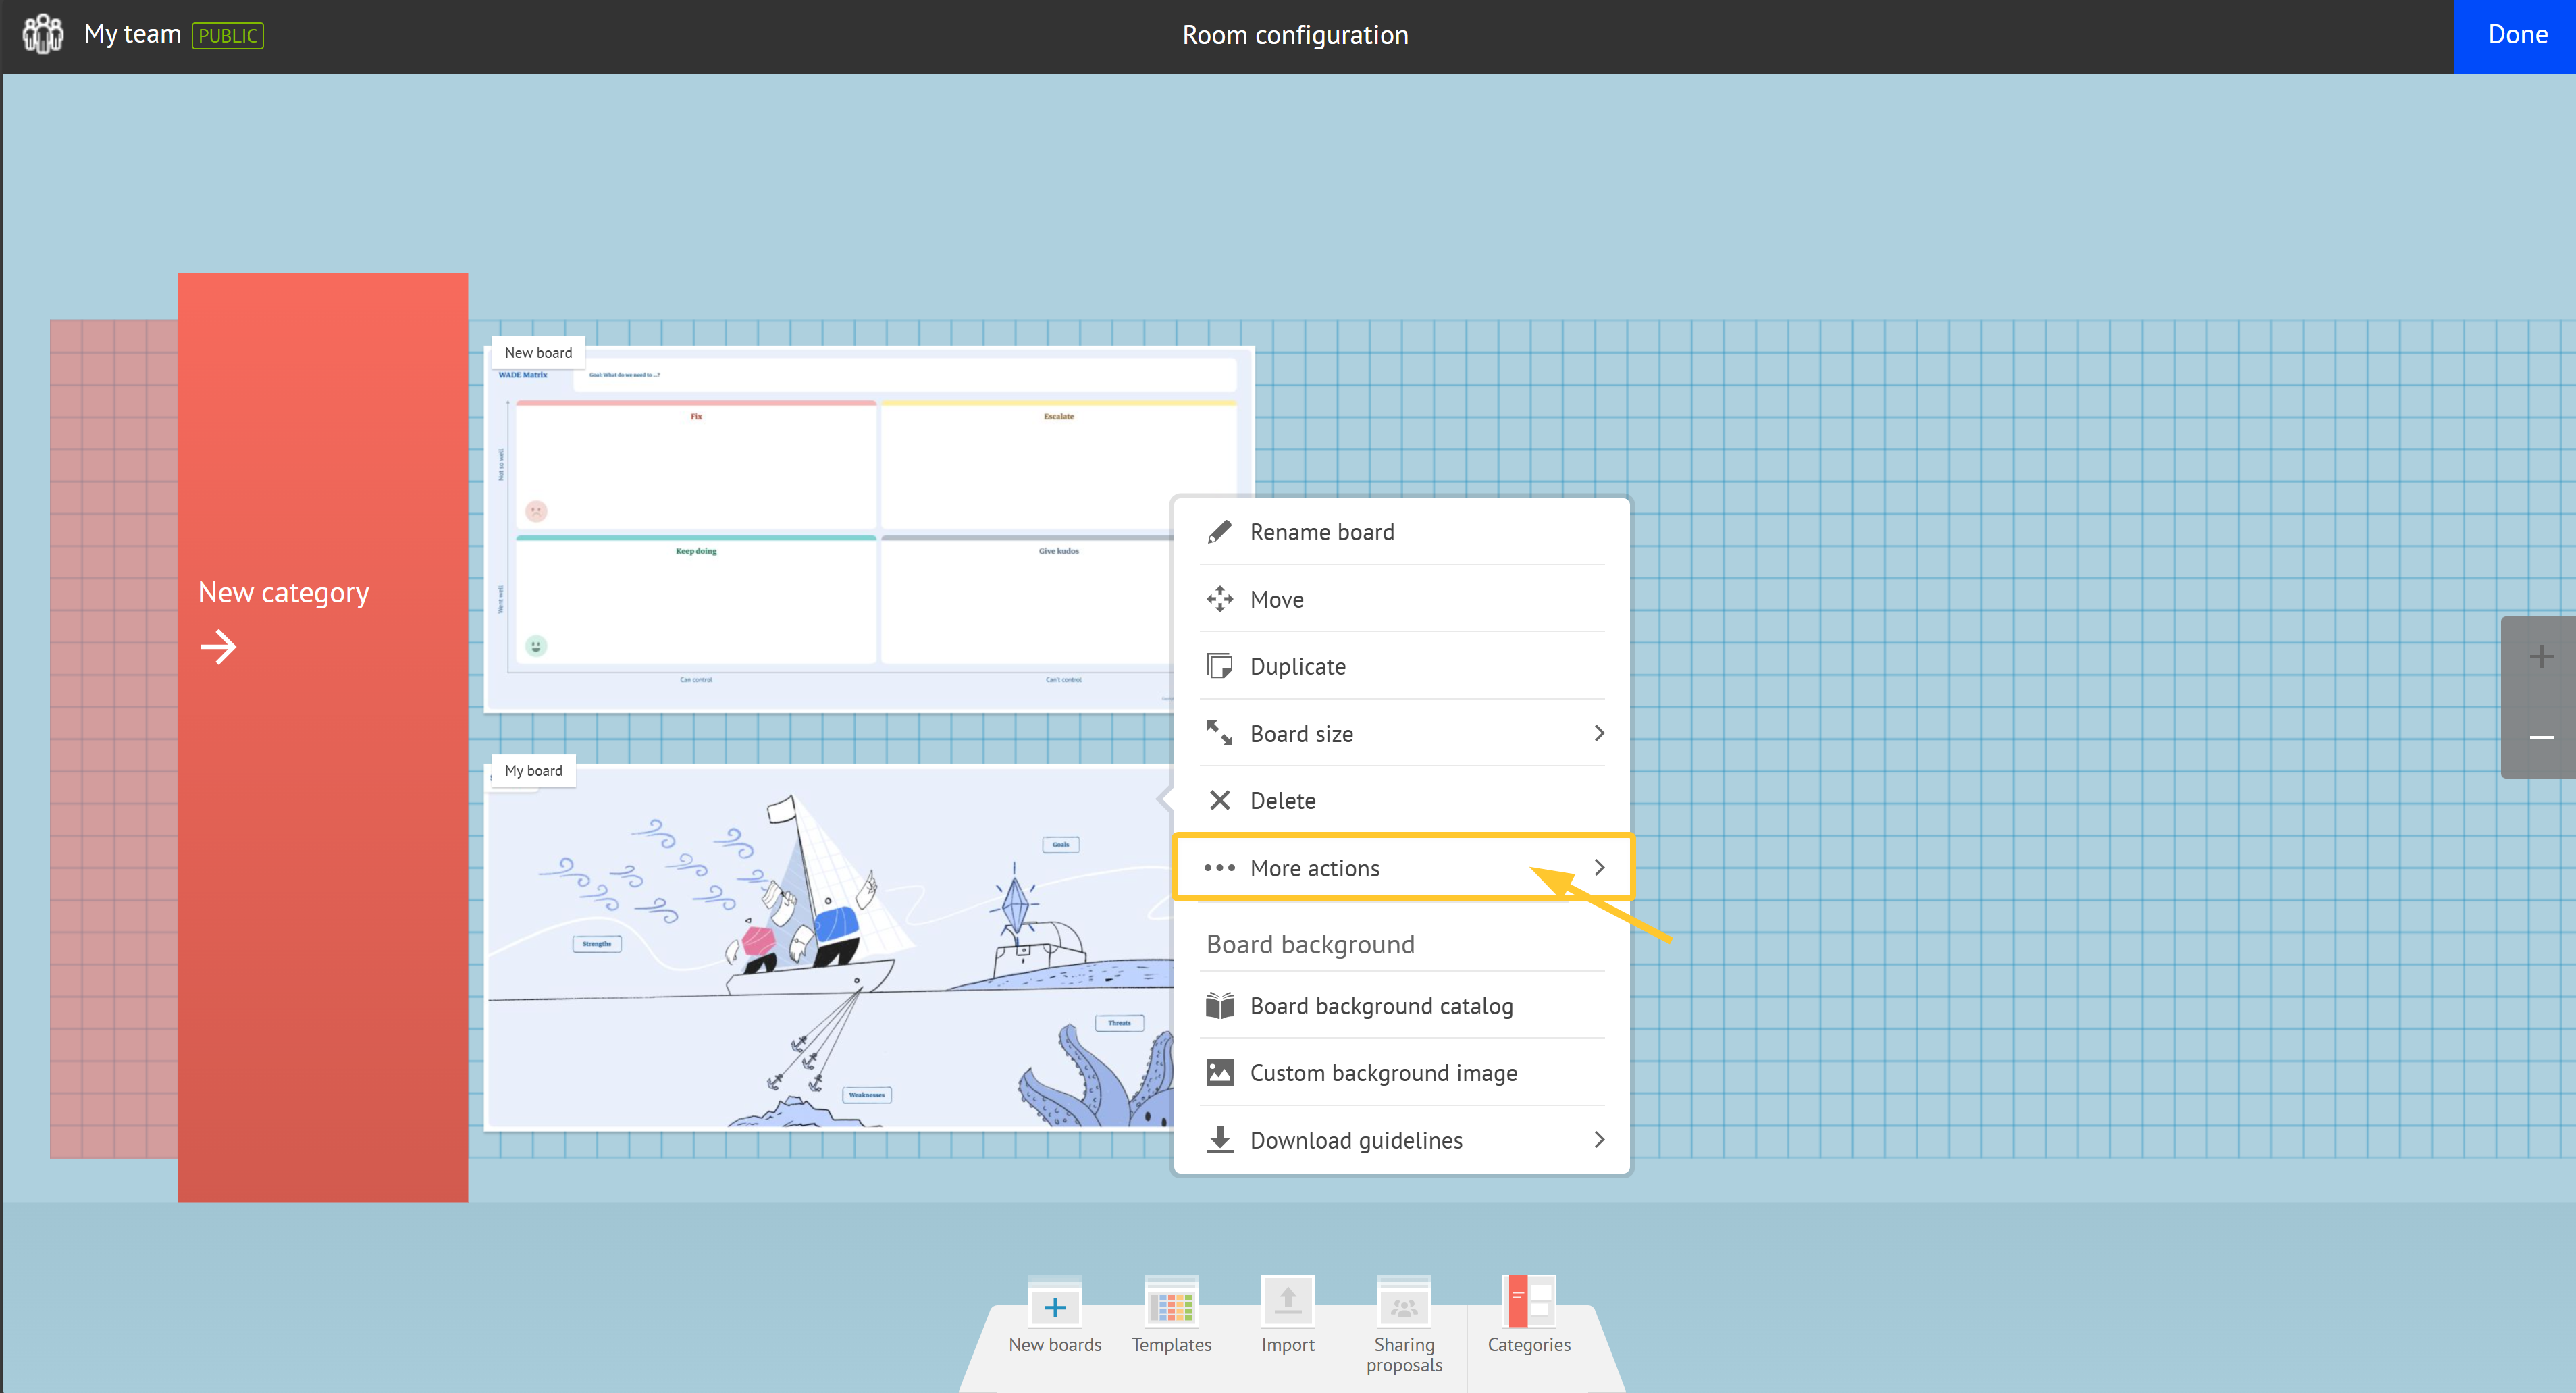
From the board settings, feel free to:
rename your board,
duplicate your board,
resize your board. See the iObeya board size chart to find out more.
integrate data to your board: integration data allows to add contaxt and target your rooms, board and elements when you integrate iObeya with other tools.
delete your board,
share your board,
create a template,
download the board in ZIP format,
display information about the board,
select a board background from our catalog,
About Board Background
iObeya gives you access to more than 150 visual board templates ready to use for your teams for free.
From your board's top bar, click the Settings icon > Board backgrounds catalog to access it.

Here is a list of boards where you can use board background:
Whiteboard,
Jira board,
QCD board,
Azure board.
See Adding a Board to your Room to find out more.
Creating a Custom Board Background
To create a custom board background:
Download guidelines.
From your room
Click Configure the room.
Click the board you want to modify.
From the Contextual menu, in the board background section, click Download guidelines > Download (ZIP).
From your board
From your board's top bar, click the Settings icon.
Click Download guidelines > Download(ZIP).
Create background with PowerPoint.
Open a PowerPoint file with the same size as your board. See About custom board background formats for reference.
Use the different assets to create your own board background.
Save your board background as a PNG file for better quality.
Tip:
To get high resolution board backgrounds from PowerPoint:
From the Save as menu, select the PNG format file type.
Click More options.
Click Tools > Compress images.
Select High fidelity or the highest option available.
About Custom Board Background formats
Format | Size in cm | Size in px | PowerPoint export in px | Size limit in iObeya |
|---|---|---|---|---|
A4-2A0 | 26,88 x 19,2 | 5040 x 3600 | 3072 x 2194 | 5040 x 3600 |
3A0 | 40,37 x 19,2 | 7560 x 3600 | 3072 x 1463 | 7560 x 3600 |
4A0 | 53,85 x 19,2 | 10080 x 3600 | 3072 x 1097 | 7560 x 2700 |
5A0 | 67,33 x 19,2 | 12600 x 3600 | 3072 x 878 | 7560 x 2160 |
Double 3A0 | 40,37 x 38,94 | 7560 x 7300 | 3072 x 2966 | 7560 x 7300 |
Double 4A0 | 53,85 x 38,94 | 10080 x 7300 | 3072 x 2225 | 7560 x 5475 |
Double 5A0 | 67,33 x 38,94 | 12600 x 7300 | 3072 x 1780 | 7560 x 4380 |
Using your Custom Board Background
To use your custom board background:
From your room
Click Configure the room.
Click the board you want to modify.
From the contextual menu, in the Board background section, either click:
Board background catalog to use a predefined board background template,
or
Custom image to import an image or a custom board background.
Select a board background.
Click Done.
From your board
From your board's top bar, click the Settings icon.
In the Board background section, either click:
Board background catalog to use a predefined board background template,
or
Custom image to import an image or a custom board background.
Select a board background.
Click Done.
Tips:
For board formats bigger than 3A0, click Custom image to add your board background as a background image.
To get a better quality:
Image Quality: Use high-resolution images to ensure clarity.
Aspect Ratio: Match the aspect ratio of your image to the board to prevent stretching or squishing. See About custom board background formats for reference.
Design Elements: Keep important elements away from the edges to avoid them being cut off.
About Board Size Chart
Find out the lists the different board formats available in iObeya and their size in millimeters, inches and pixels:
Landscape
Format | A4 | A3 | A2 | A1 | A0 | 2A0 | 3A0 | 4A0 | 5A0 | Double 3A0 | Double 4A0 | Double 5A0 |
|---|---|---|---|---|---|---|---|---|---|---|---|---|
mm | 300 x 210 | 420 x 300 | 594 x 424 | 841 x 600 | 1200 x 840 | 1778 x 1270 | 2667 x 1270 | 3556 x 1270 | 4445 x 1270 | 2667 x 2575.3 | 3556 x 2575.3 | 4445 x 2575.3 |
inch | 11.8 x 8.2 | 16.5 x 11.8 | 23.3 x 16.6 | 33.1 x 23.6 | 47.2 x 33.0 | 70.0 x 50.0 | 105.0 x 50.0 | 140.0 x 50.0 | 175.0 x 50.0 | 105.0 x 101.39 | 140.0 x 101.39 | 175.0 x 101.39 |
px | 850 x 595 | 1190 x 850 | 1683 x 1201 | 2383 x 1700 | 3401 x 2381 | 5040 x 3600 | 7560 x 3600 | 10080 x 3600 | 12600 x 3600 | 7560 x 7300 | 10080 x 7300 | 12600 x 7300 |
Portrait
Format | A4 | A3 | A2 | A1 | A0 | 2A0 | 3A0 |
|---|---|---|---|---|---|---|---|
mm | 210 x 300 | 300 x 420 | 424 x 594 | 600 x 841 | 840 x 1200 | 1270 x 1778 | 1270 x 2667 |
inch | 8.2 x 11.8 | 11.8 x 16.5 | 16.6 x 23.3 | 23.6 x 33.1 | 33.0 x 47.2 | 50.0 x 70.0 | 50.0 x 105.0 |
px | 595 x 850 | 850 x 1190 | 1201 x 1683 | 1700 x 2383 | 2381 x 3401 | 3600 x 5040 | 3600 x 7560 |
Number of elements by board
Format | A4 | A3 | A2 | A1 | A0 | 2A0 | 3A0 | 4A0 | 5A0 | Double 3A0 | Double 4A0 | Double 5A0 |
|---|---|---|---|---|---|---|---|---|---|---|---|---|
small note | 5 x 6 | 8 x 8 | 11 x 12 | 16 x 17 | 22 x 24 | 32 x 34 | 48 x 34 | 64 x 34 | 80 x 34 | 48 x 68 | 64 x 68 | 80 x 68 |
medium note | 5 x 4 | 8 x 5 | 11 x 8 | 16 x 11 | 22 x 16 | 32 x 22 | 48 x 22 | 64 x 22 | 80 x 34 | 48 x 48 | 64 x 48 | 80 x 48 |
large note | 2 x 2 | 3 x 3 | 4 x 5 | 6 x 7 | 9 x 10 | 12 x 15 | 19 x 15 | 25 x 15 | 31 x 15 | 19 x 30 | 25 x 30 | 31 x 30 |
large card | 2 x 2 | 3 x 2 | 4 x 5 | 6 x 5 | 9 x 8 | 12 x 11 | 19 x 11 | 25 x 11 | 31 x 11 | 19 x 22 | 25 x 22 | 31 x 22 |
Switching a Single Board to Read-only Mode
As a Room administrator, you can define access restrictions for your boards, preventing any edits or changes by users who do not have edit permissions:
Click the Settings icon located in the top bar actions of your board.
Switch Read only on.
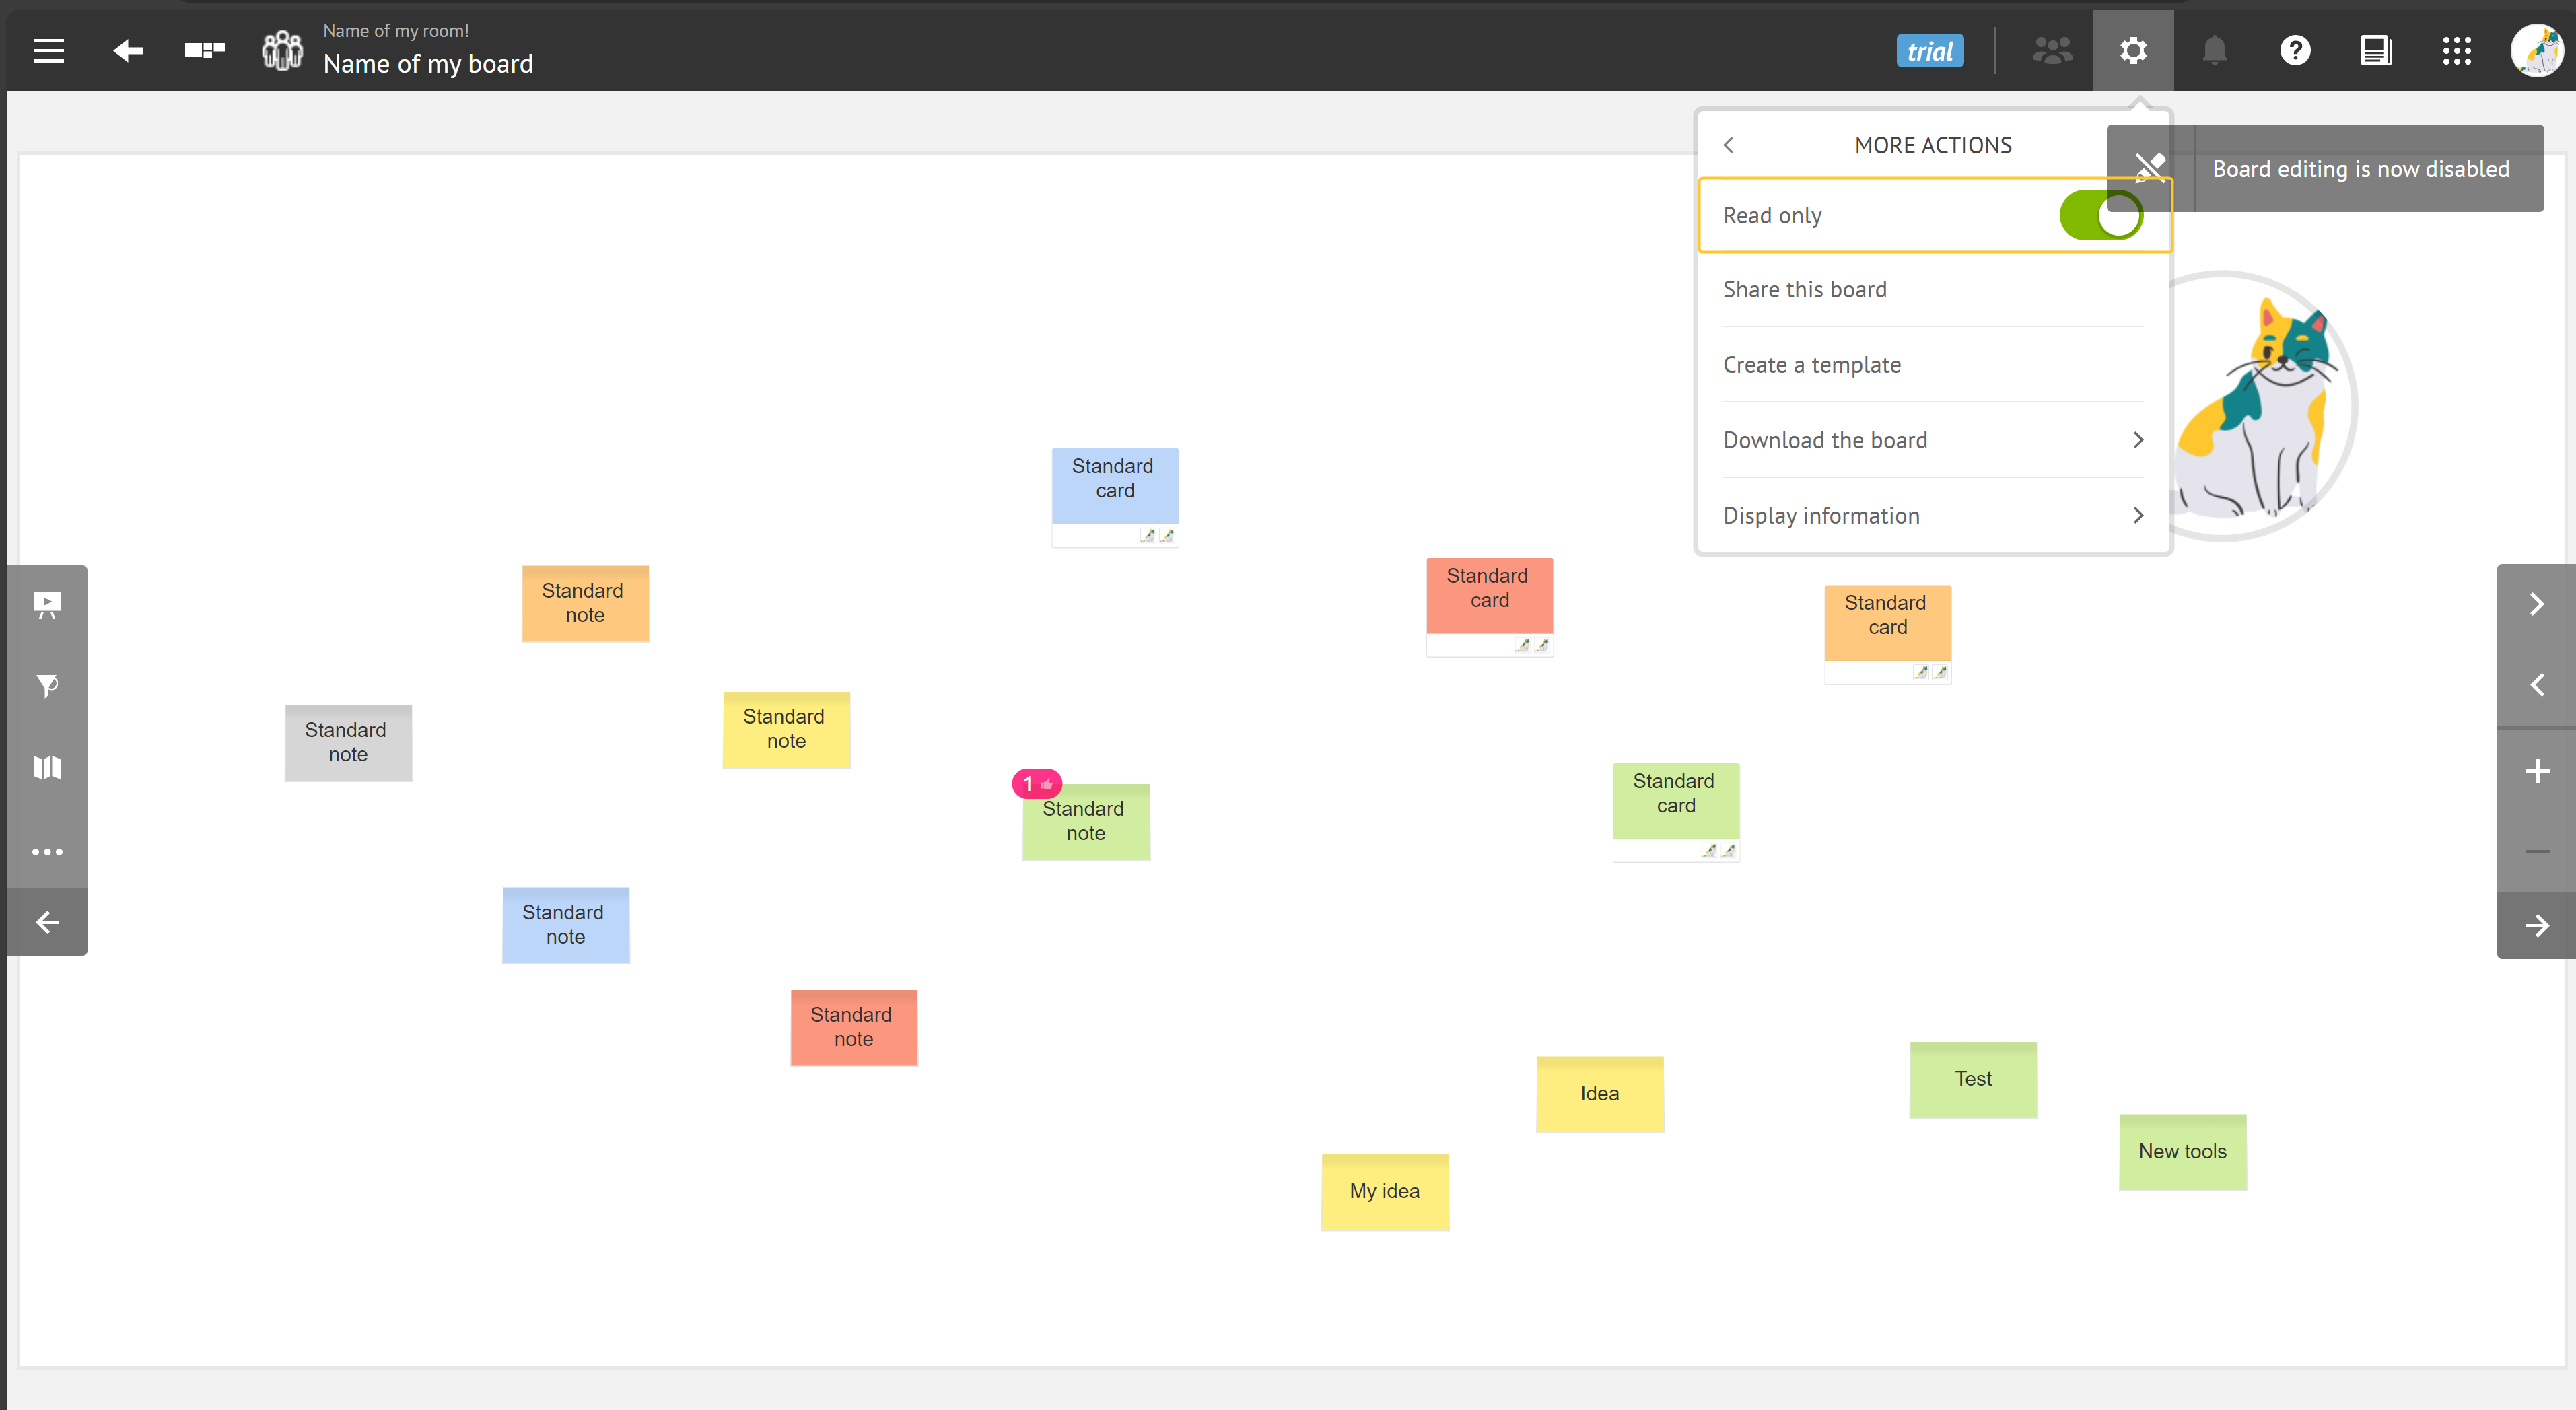
The board remains visible to all team members, but they are not able to modify its content.

You can enable / disable this option at any time using the same procedure.
Switching all your Boards to Read-only Mode
From your room view, click the Settings icon > Lock board editing > Read-only.

Exporting and Importing Boards
You can save a board with all its characteristics onto your computer and retrieve a board previously used in any iObeya room.
Exporting Boards
Download a board:
Directly from a current board.
In the board configuration menu, select Download the board > Download (ZIP).
The download process is launched in the download center of your web browser.
From Configure the room of your room view.
In the board’s contextual menu, select Download the board > Download (ZIP).
The download process is launched in the download center of your web browser.
The downloaded ZIP file contains all board content, the dock tools as well as the board parameters (format, board background, editing rights).
Importing Boards
From your room view:
Click Configure the room > Import in the dock.
Drag and drop the Board to the wall.
Click Choose a board (ZIP).
From your computer, select a ZIP file corresponding to an iObeya board.
You can also import a board directly from your computer’s documents. In Configure the room mode, just drag and drop your ZIP file into your room.
The board is inserted onto your wall, including all of its characteristics.
Making a Board “Public”
In iObeya, making a board “public” allows to share it with a wider audience than the room’s team members.
Note:
A Platform administrator can set a room to “public”, allowing you to share information with a wider audience than just the room's team members.
By default rooms and boards are private and require manual actions to be made “public”. See Managing Domains and Rooms to find out more.
To make a board “public”:
From your room view, click Configure the room.
Click the board you want to make public.
Click More actions.
Switch Public on.
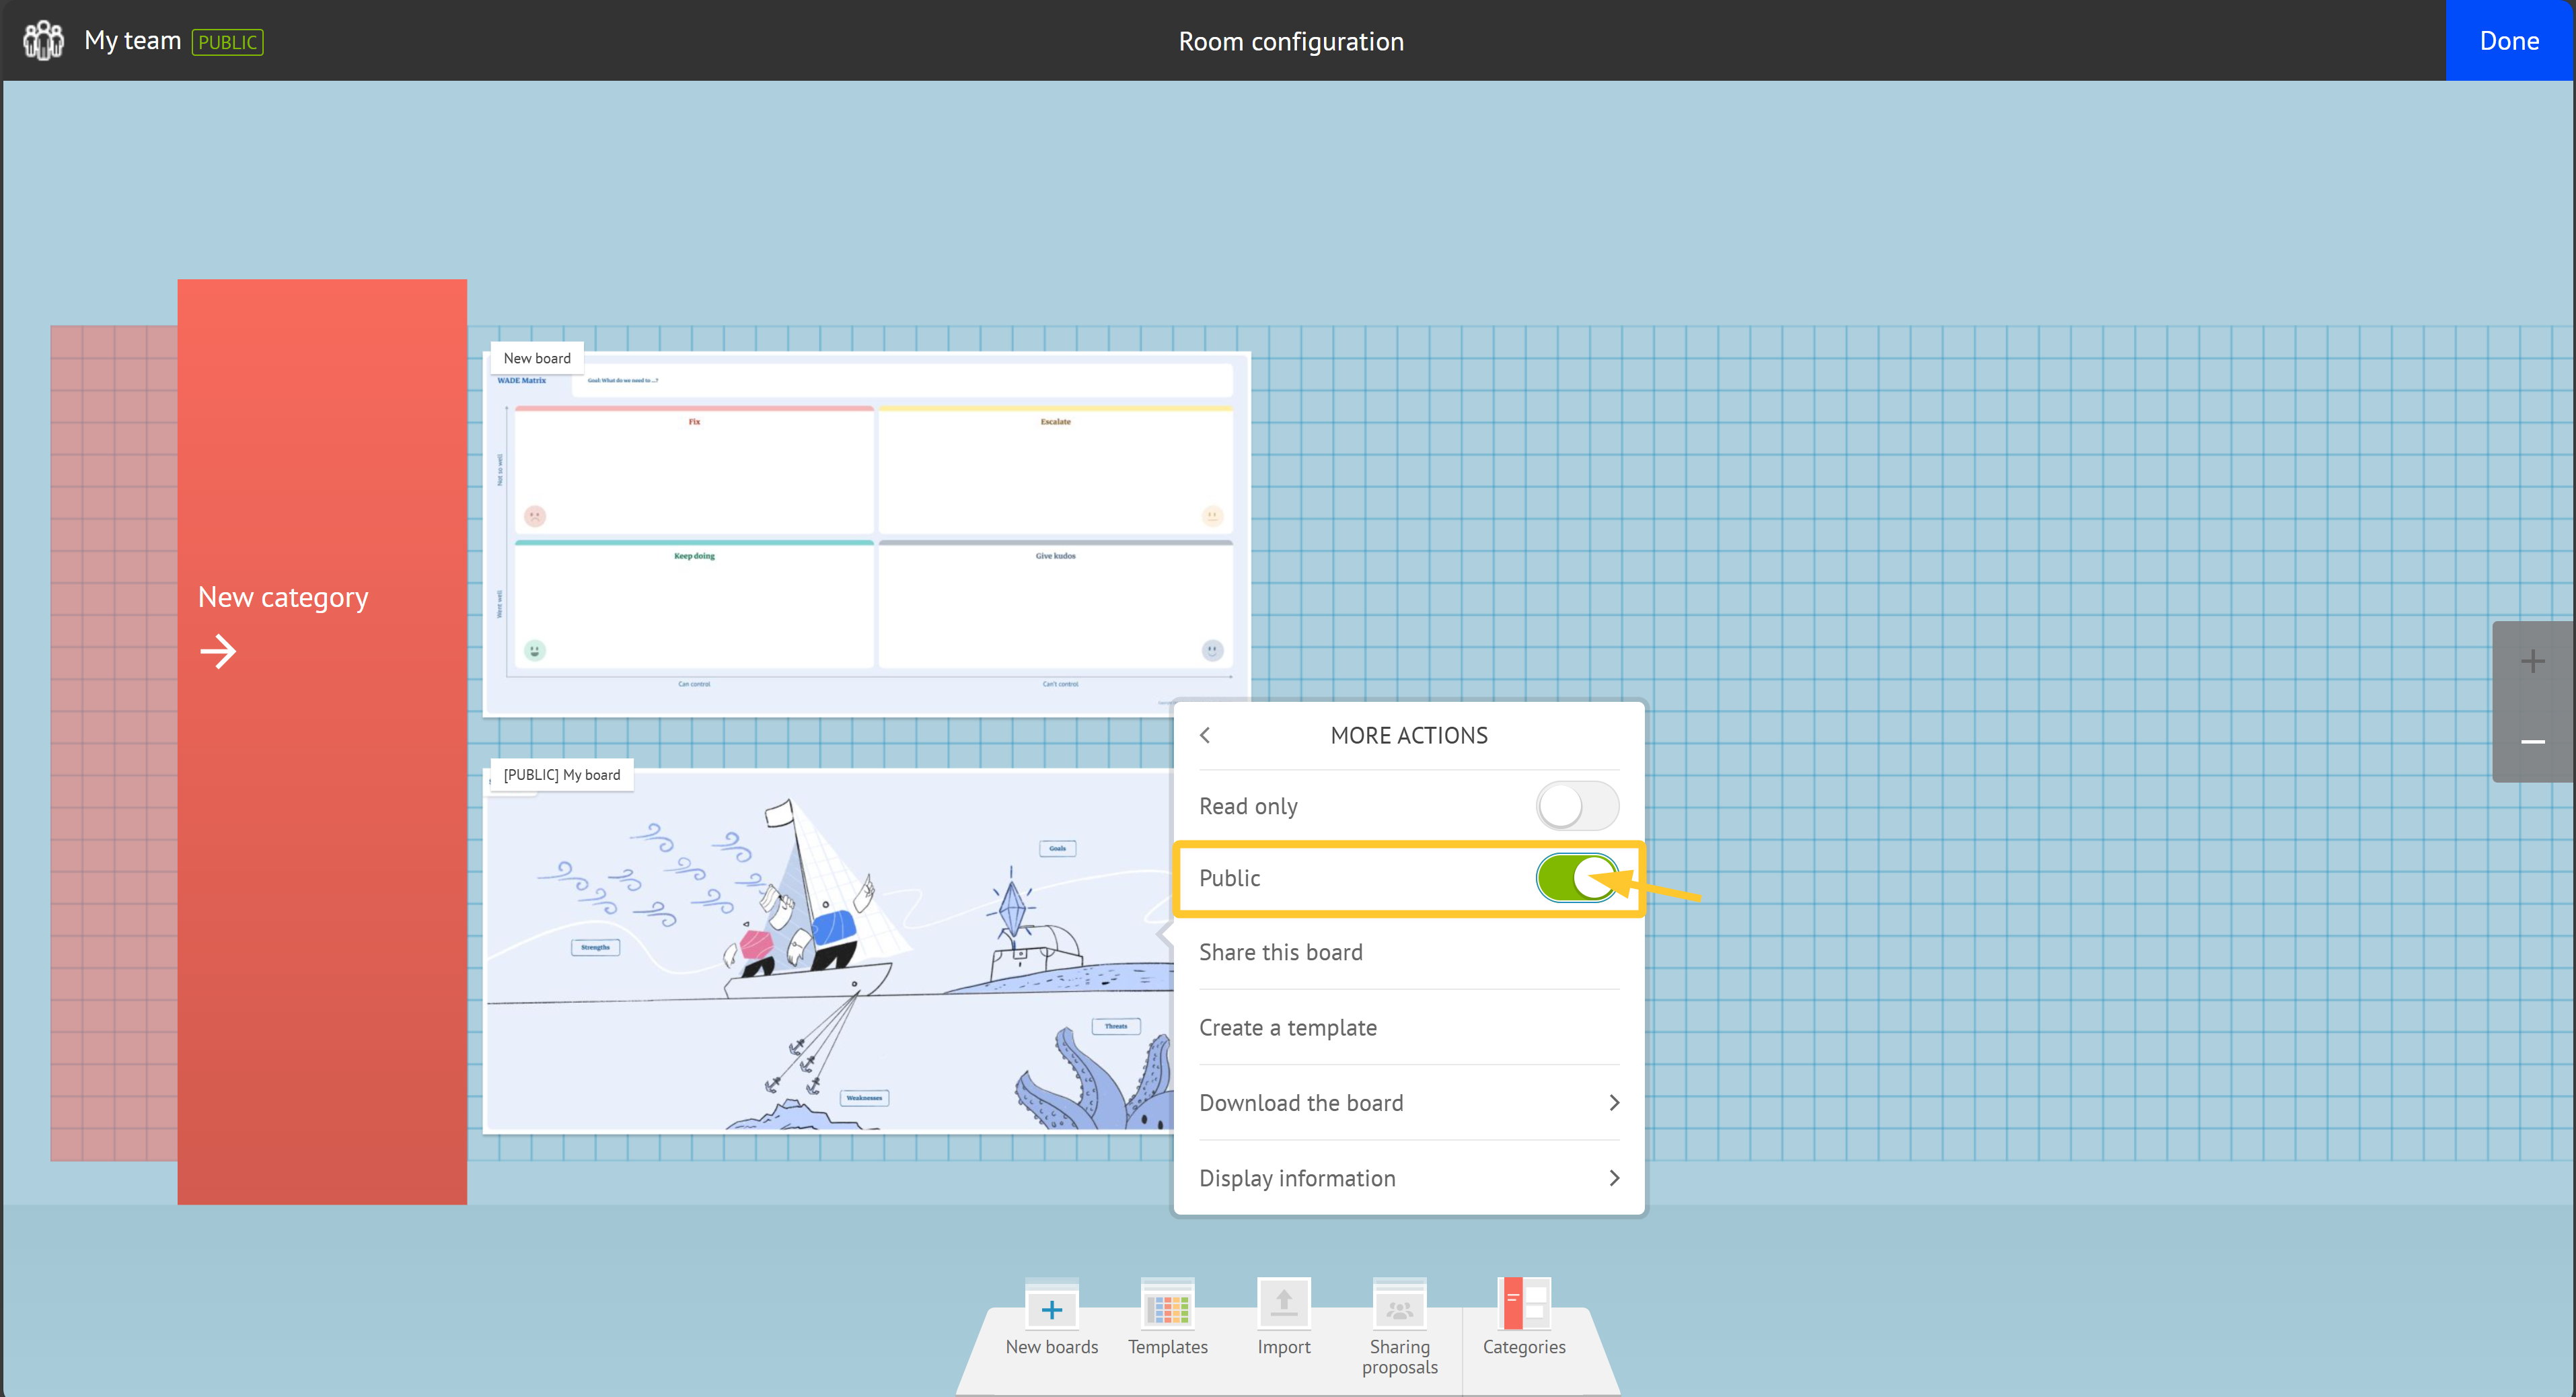
Your board is currently public.
Note:
A public board remains viewable to:
all team members,
any users that can access the domain to which the room belongs.
Warning:
Only room’s team members with editing permissions can edit the public board.


Sharing a Board with Another Room
In iObeya, collaboration across different teams or rooms is essential for seamless communication and effective workflow management. One of the key features that enhances this collaboration is the ability to share a board with another room.
To share a board with another room:

From your room view, click Configure the room.
Click the board you want to share.
Click More actions > Share this board > Share with an Administrator.
Enter the name of a user with Room Administrator permissions and then click the magnifying glass to find the user.
Select a user, grant read-only or read/write permissions and then click Share.
Your board is shared.
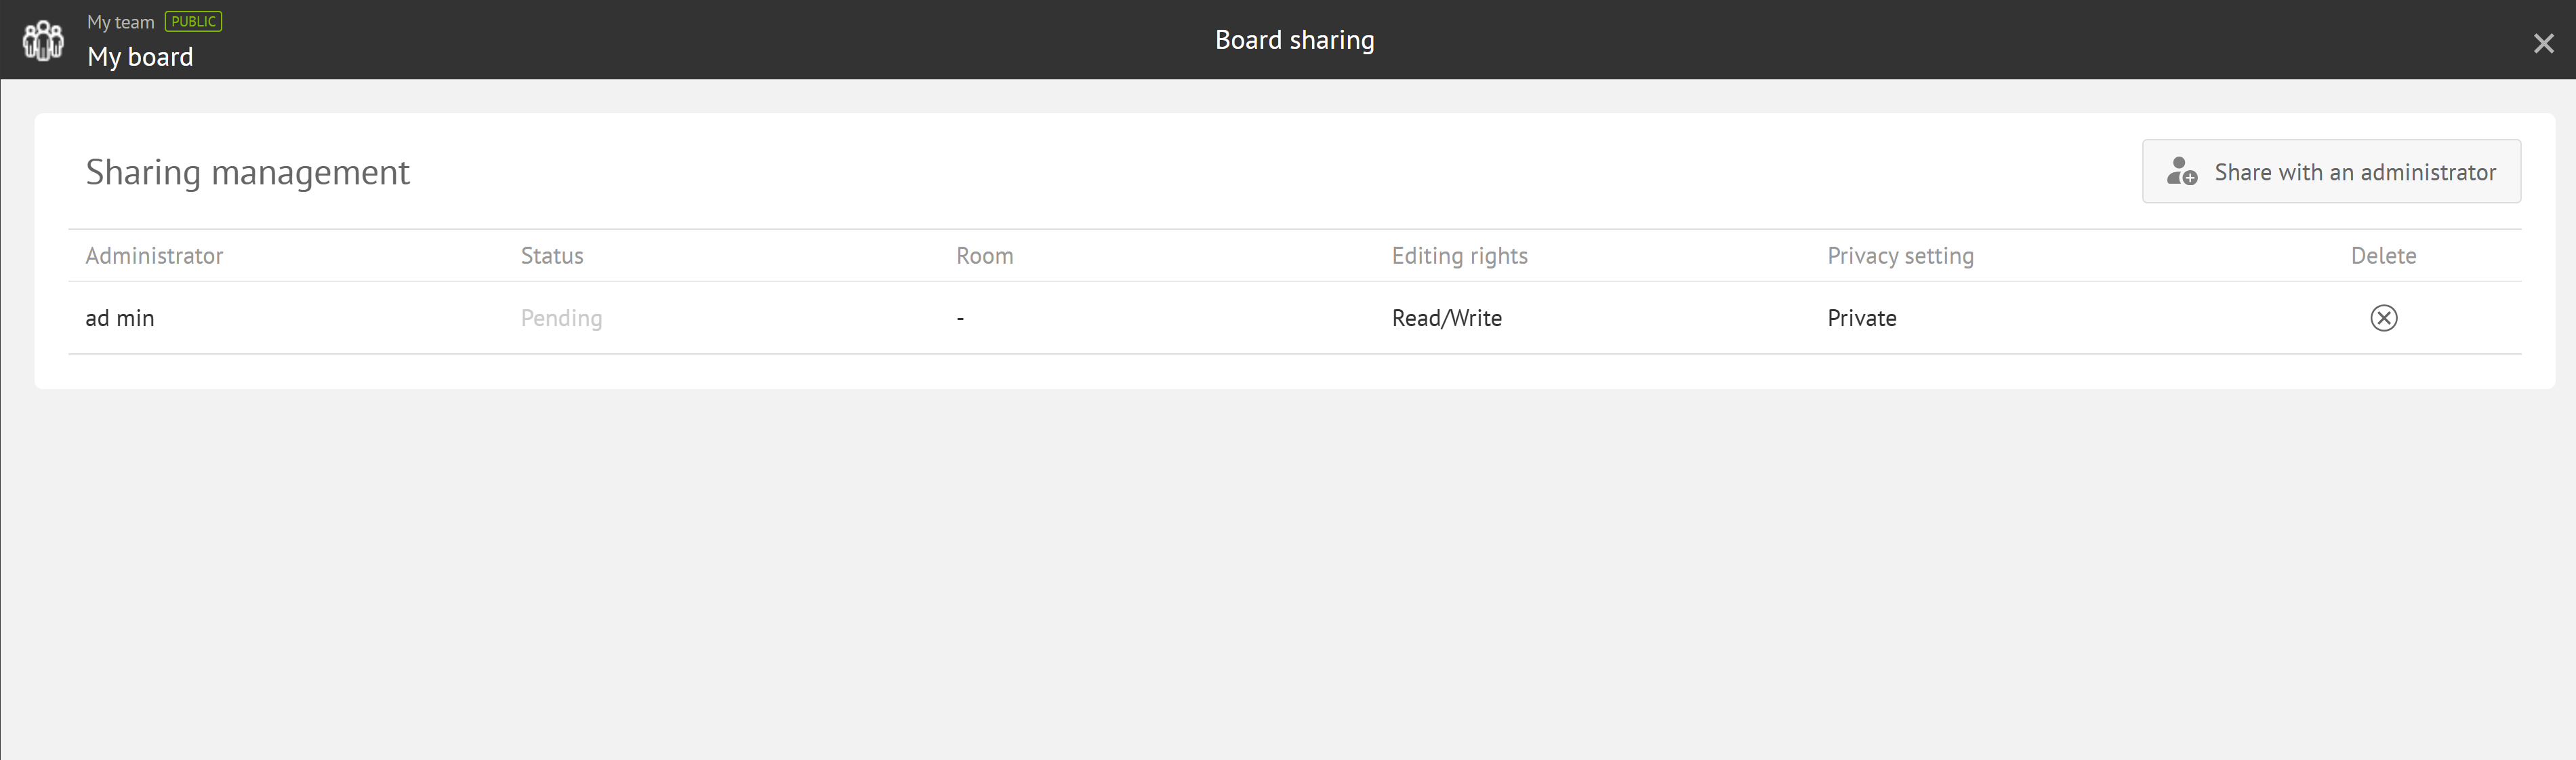
Repeat this step to add several recipients if required.
Note:
A board can be shared multiple times with a user. This Shared board can be used in multiple rooms.
Warning:
The owner of a source board is the only one who can share the board.

You can verify the status of the board that you have already chosen to share:
From your room view, click Configure the room.
Click the board once to open its contextual menu.
Click More actions > Share this board.
From the Sharing management screen, you can see if the sharing proposal has been accepted, and which room it has been added to or whether the proposal was refused.
Retrieving a Shared Board
The selected Room Administrators receive a sharing notification when they sign into iObeya.
Note:
In the Notification center, a message informs you that one or more boards have been shared with you.

Your board is now shared with one or more Room Administrators. If the shared board is edited, the original board is also edited. You can also receive a board, in other words, be the recipient of board sharing.
To retrieve a shared board:

Go to the room to which you want to add the shared board.
Click Configure the room.
The board is displayed in the Sharing proposals section of the dock.
You can use this shared board at any time by dragging and dropping it on to your wall, in the same way as with a blank board or a template.
If you need to use this board in several rooms, you need to ask the Board owner to share it with you as many times as required.
Tip:
You may need to configure the utilities in the room settings to use some tools of the shared board in the destination room.
Configuring a Shared Board
From the Room configuration, you can only rename the shared board.
Warning:
You can only edit Dock and Parameters of a shared board from the source board.
You cannot launch brainstorming and voting session from the shared board.
Refusing the Sharing Proposal
To refuse the sharing proposal:

From the room configuration, click the Sharing proposals folder.
Click the shared board.
Click Refuse > Delete.
The shared board is refused and no longer displayed in the Sharing proposals folder.
Editing the Shared Board
Warning:
You need read/write permissions to edit a shared board. If not, you can only access the board in read-only mode.
To edit the shared board:
From your room, access the shared board.
Click Edit this shared board at the bottom of the screen.
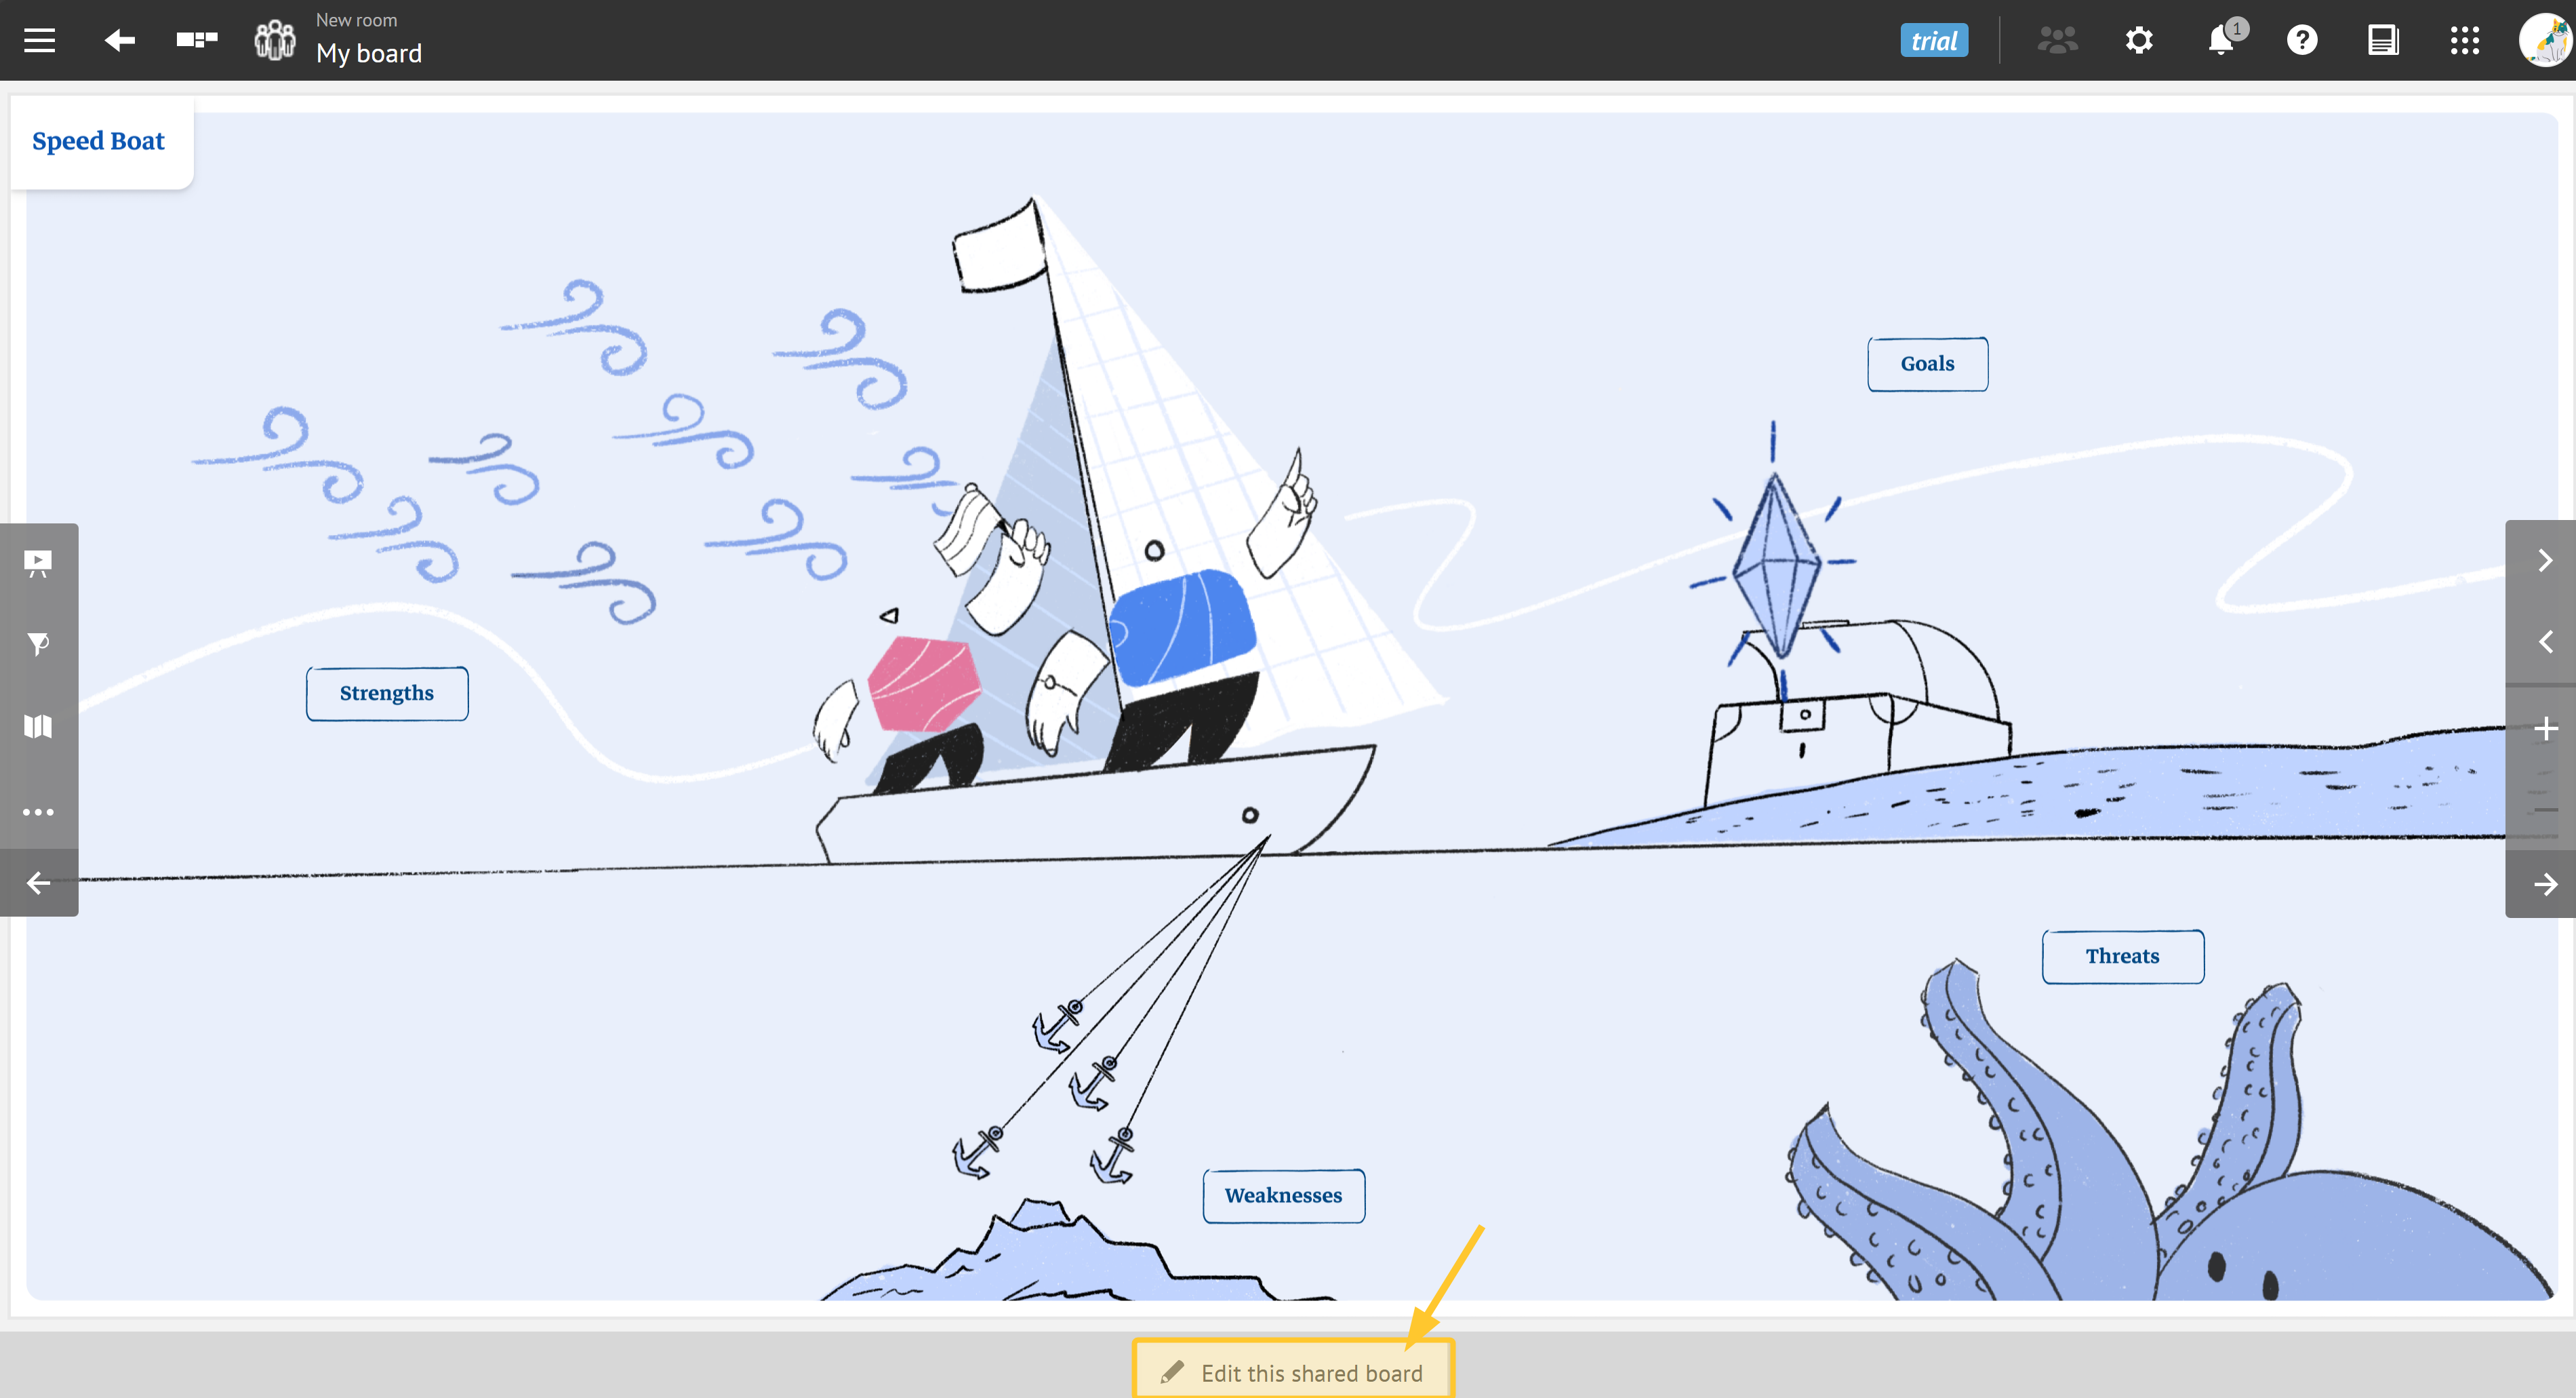

Note:
All modifications made on a shared board are applied to the original board, and conversely.
Was this article helpful?