Escalating an Action
- 4 Minutes to read
- Print
- PDF
Escalating an Action
- 4 Minutes to read
- Print
- PDF
Article summary
Did you find this summary helpful?
Thank you for your feedback
You can escalate actions at various levels within your organization for quicker decision-making.
This escalation feature helps highlight issues or difficulties that need attention and escalate them to the appropriate responsible parties for efficient resolution. It also allows them to quickly propose solutions.
This article guides you through the steps to configure action escalation in the QCD module of iObeya. You learn how to escalate actions, manage those that have been escalated, and respond quickly with potential solutions to effectively resolve issues.
Configuring Action Escalation
Warning:
Only room administrators can configure action escalation.
Action escalation is configured room by room through the QCD utility. As a room administrator, you define:
types of escalation levels,
rooms you want to “subscribe” to,
types of escalation levels that interest you in each room.

Escalation can be "vertical" or "horizontal." Actions created in a room (linked to a letter) then become visible directly in one or the other of these rooms, as shown in the example below:

To configure action escalation:
Go to Room Settings > Utilities.
From the QCD utility in the "Board utilities specific” area, click Configure the utility.
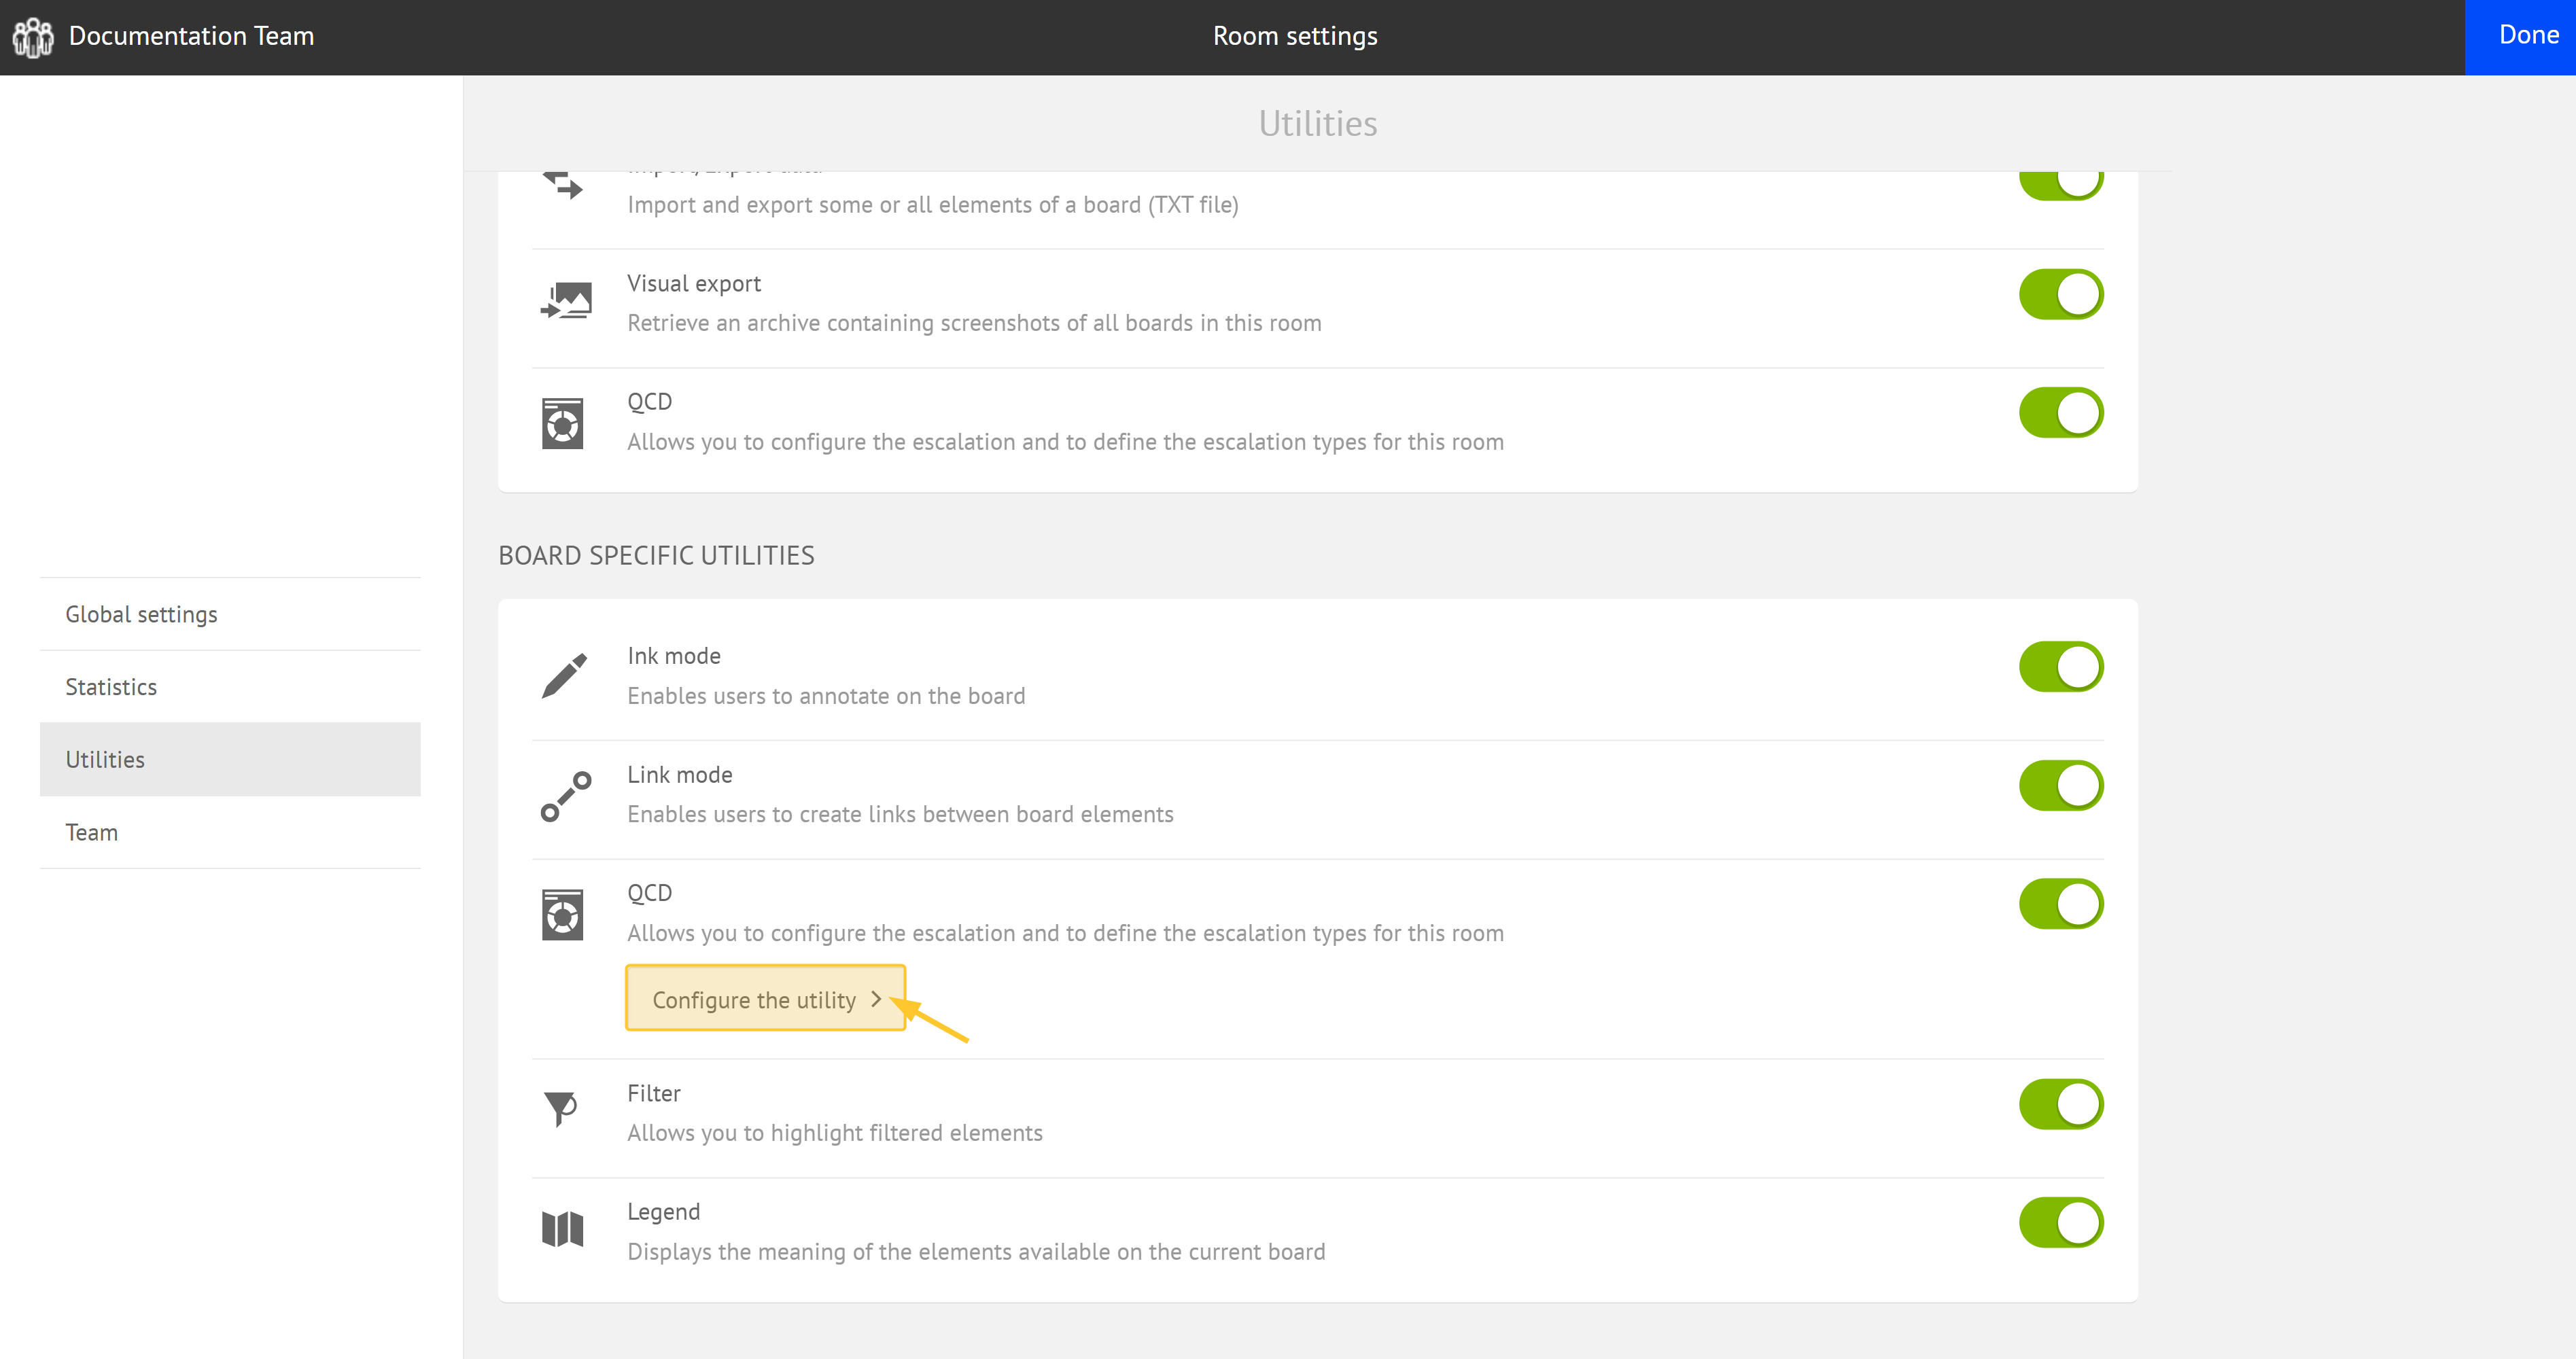
The following screen is displayed with 3 tabs:
Escalation: allows to:
enable tracking of escalated actions from other rooms,
decide if a notification is displayed when actions are escalated in the current room,
track escalated actions.
Esclation type: define the labels for your escalation types.
Category: define categories to easily organize your actions.
Define the types of escalation levels for your room.
From the "Escalation Type" tab, you can define the types of escalation levels for your room:
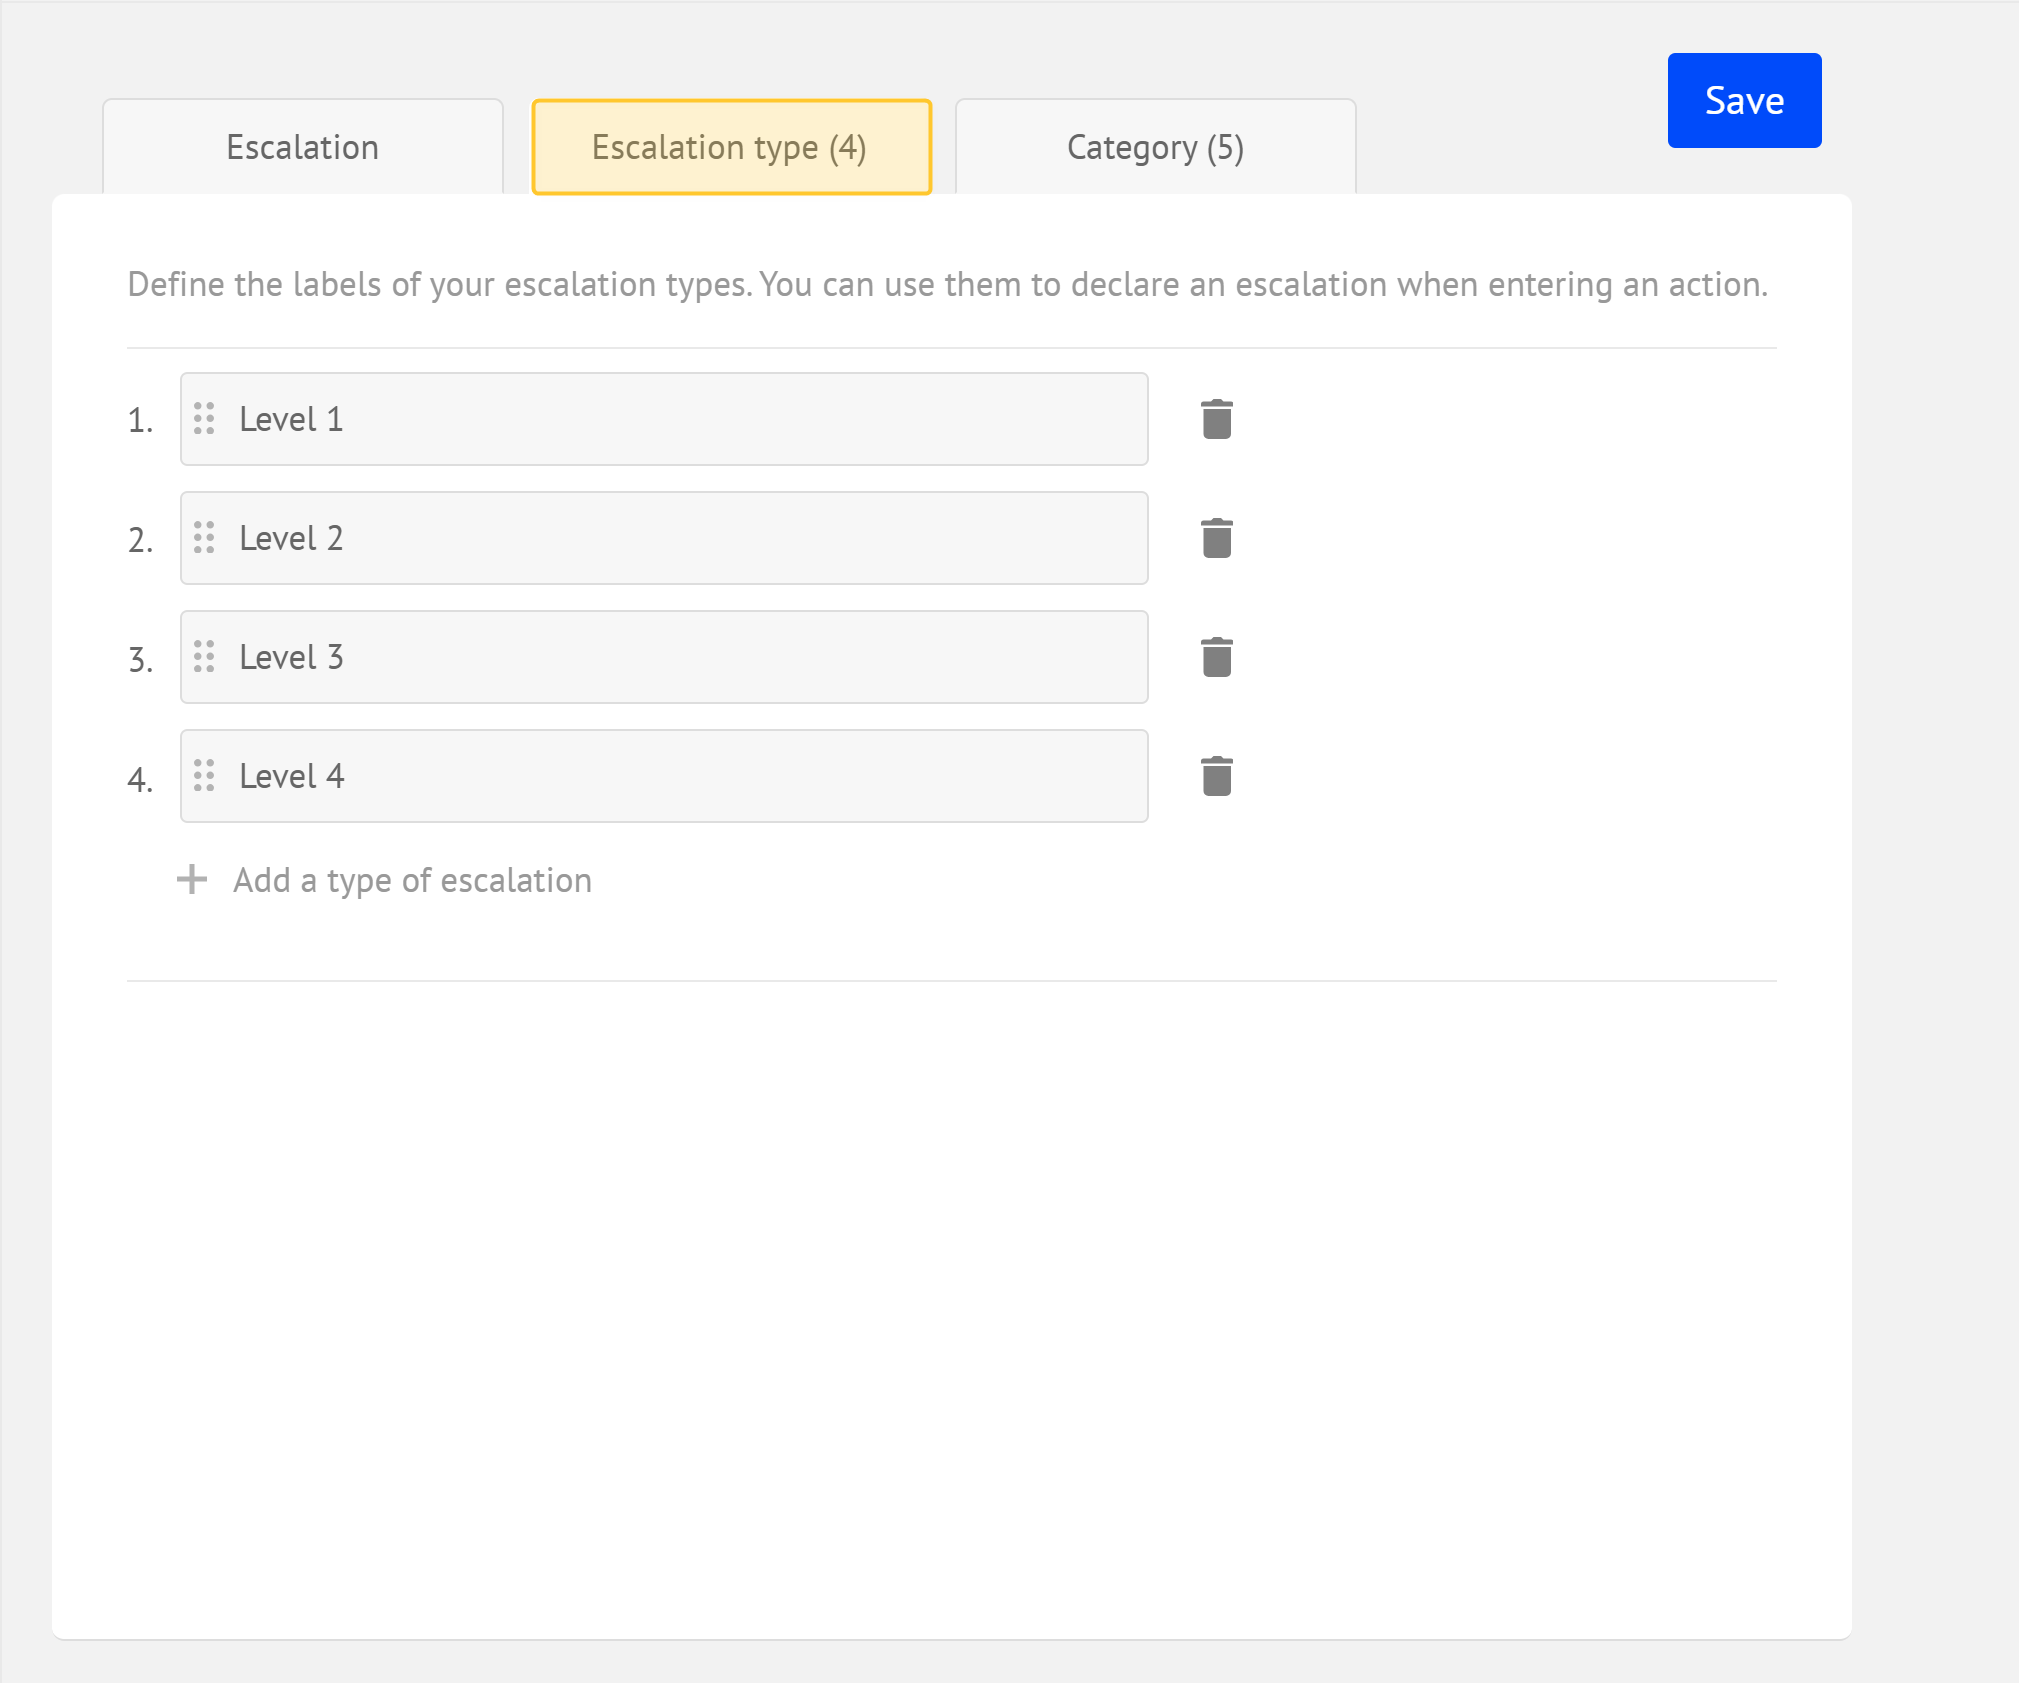
By default, this list is populated according to the configuration defined in the configuration file. (see Plateform configuration of the QCD Administration guide).
Note:
You can:
enter a maximum of 100 escalation types per room, with a maximum of 15 characters.
delete an escalation type assigned to one or more actions, causing them to lose that type.
Renaming an escalation type is reflected on all actions escalated to that type.
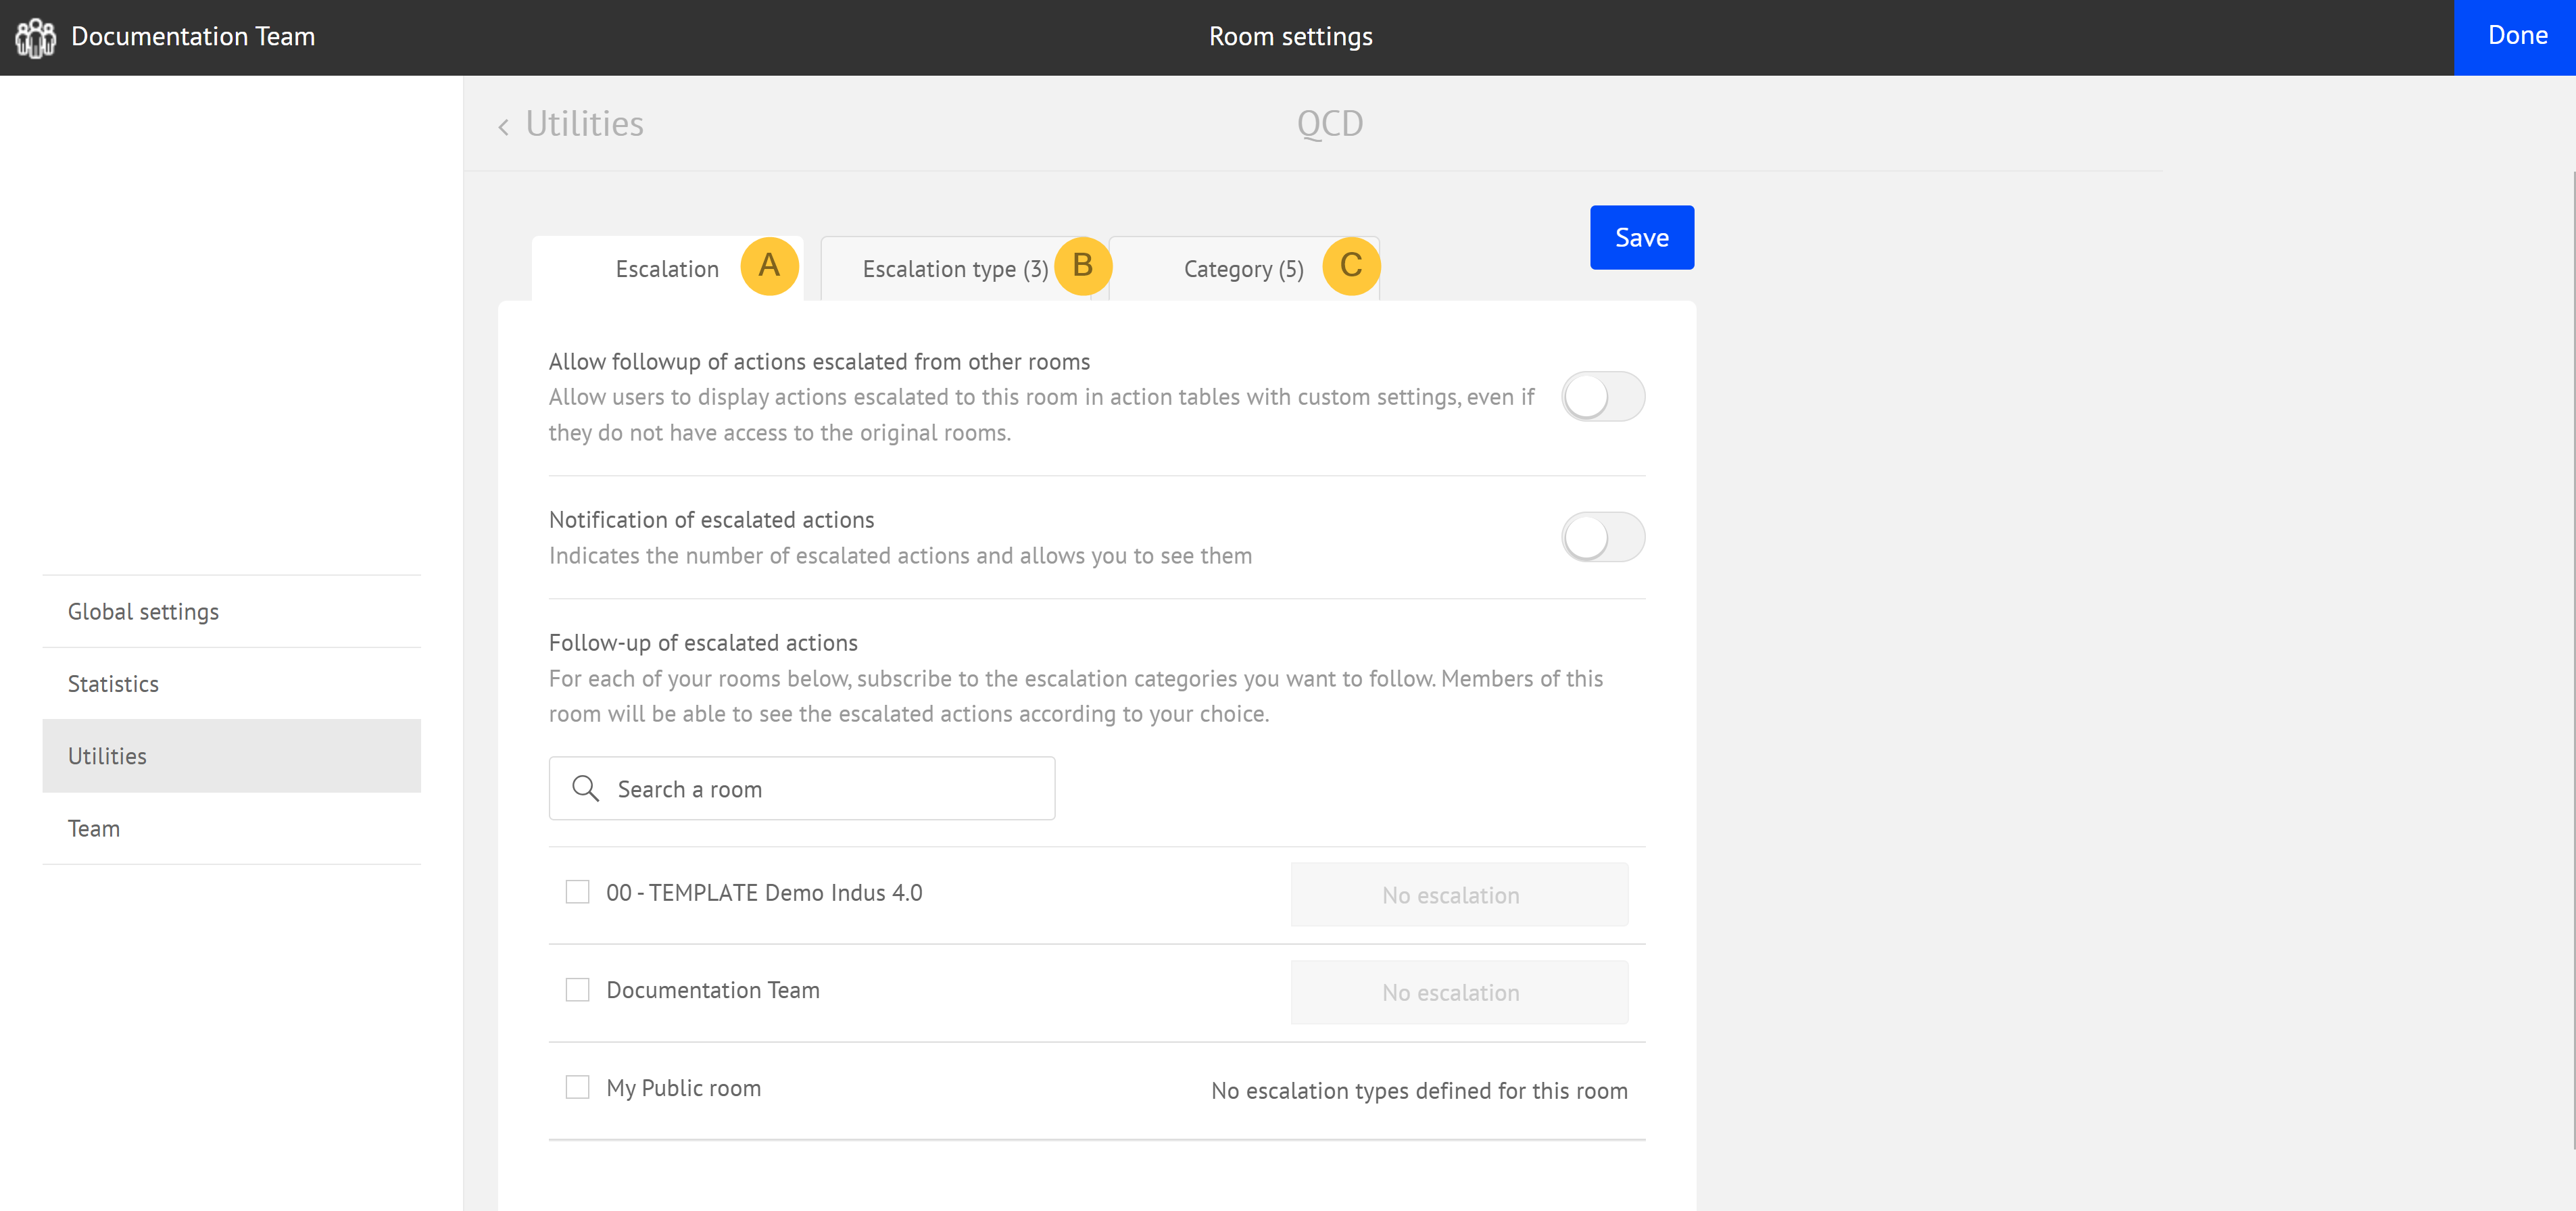
Subscribe to the escalation levels you want to track.
From the "Escalation" tab, you can define how actions is escalated in the current room. Actions are escalated based on their origin and type.
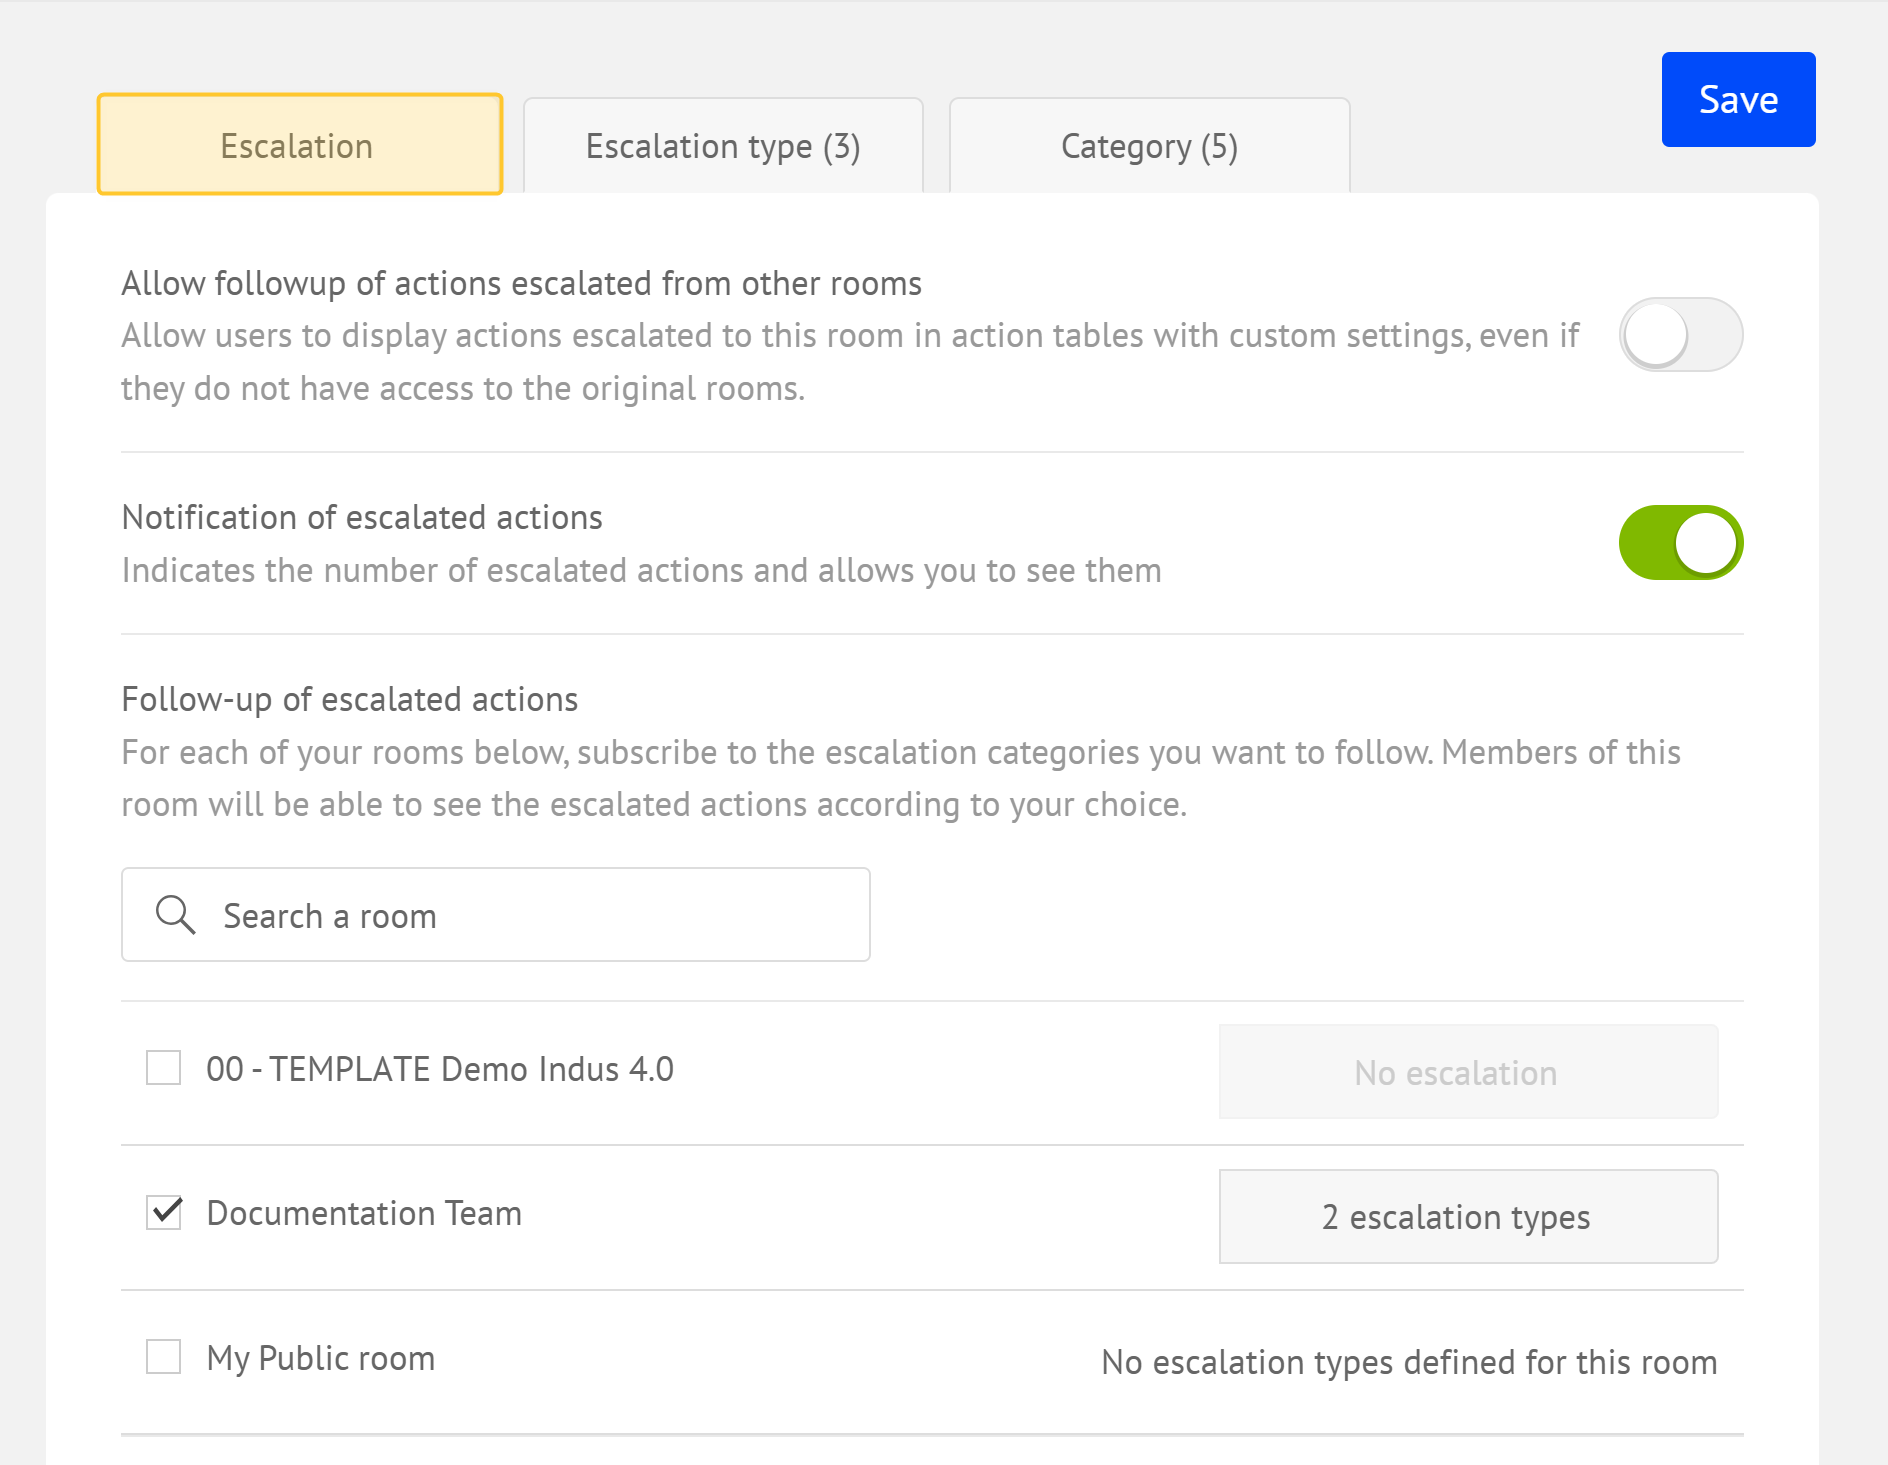
All the rooms you have access to are listed, and you can "subscribe" to each of them: To do so, check the boxes.
For each room, you can select the escalation types that are relevant to the current room:
Select the room
Click No escalation.
Select the escalation type(s) to track for your current room.
Confirm.
Note:
The members of this room can see the escalated actions you have selected.
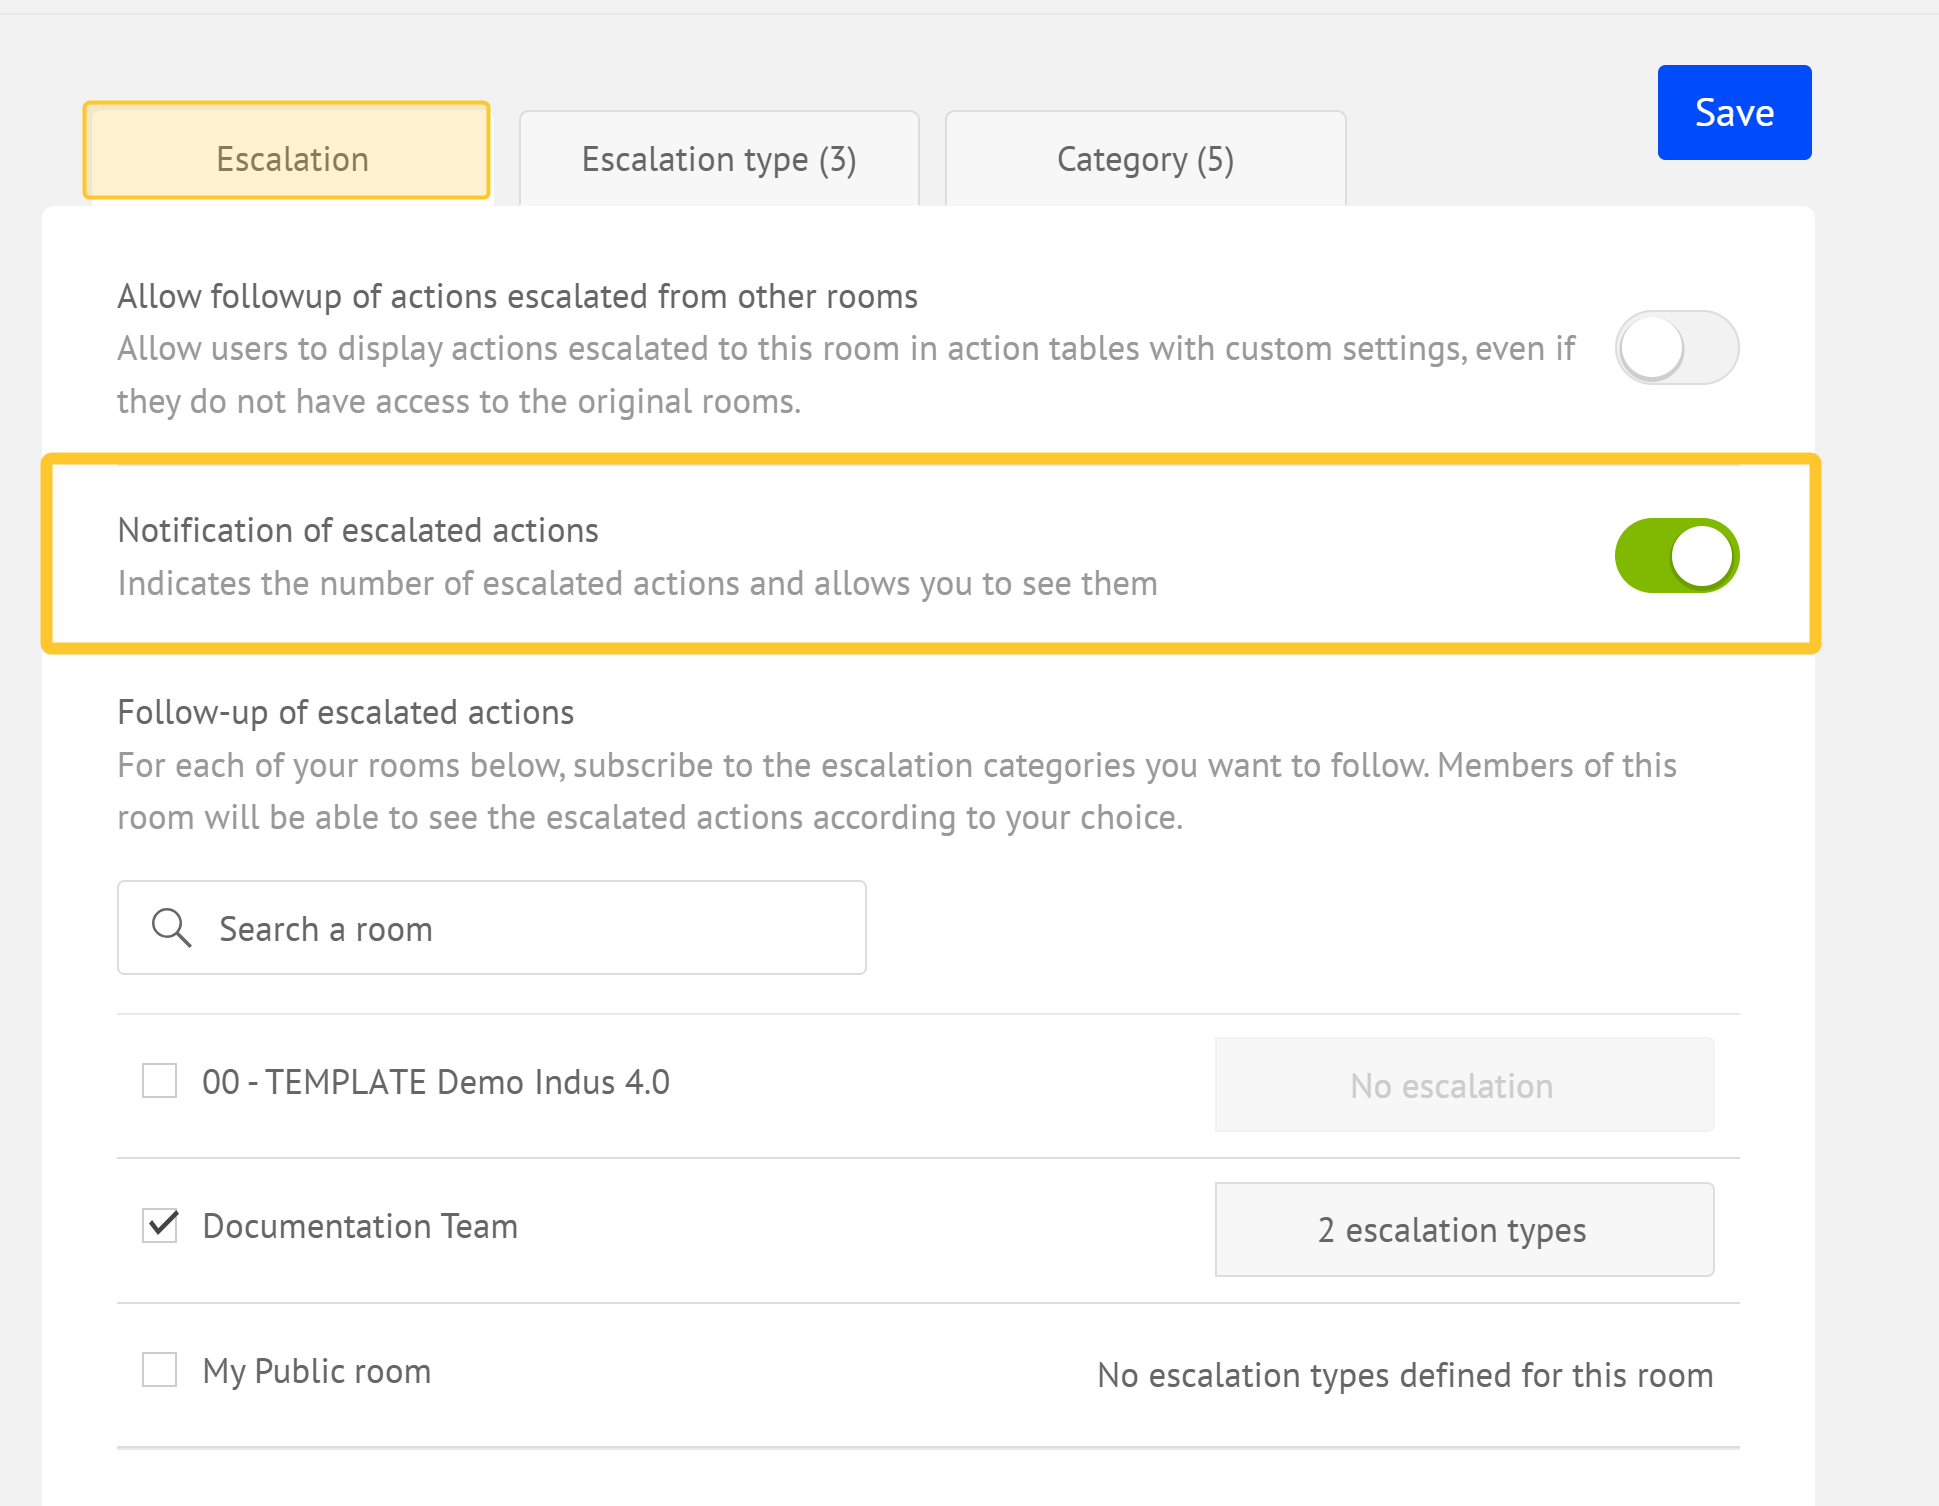
Manage the escalation notification.
From the "Escalation" tab, you can decide if a notification is displayed when actions are escalated in the current room
Allow or deny the followup of escalated actions from your room.
From the "Escalation" tab, you can decide whether to allow or deny the followup of escalated actions from your room
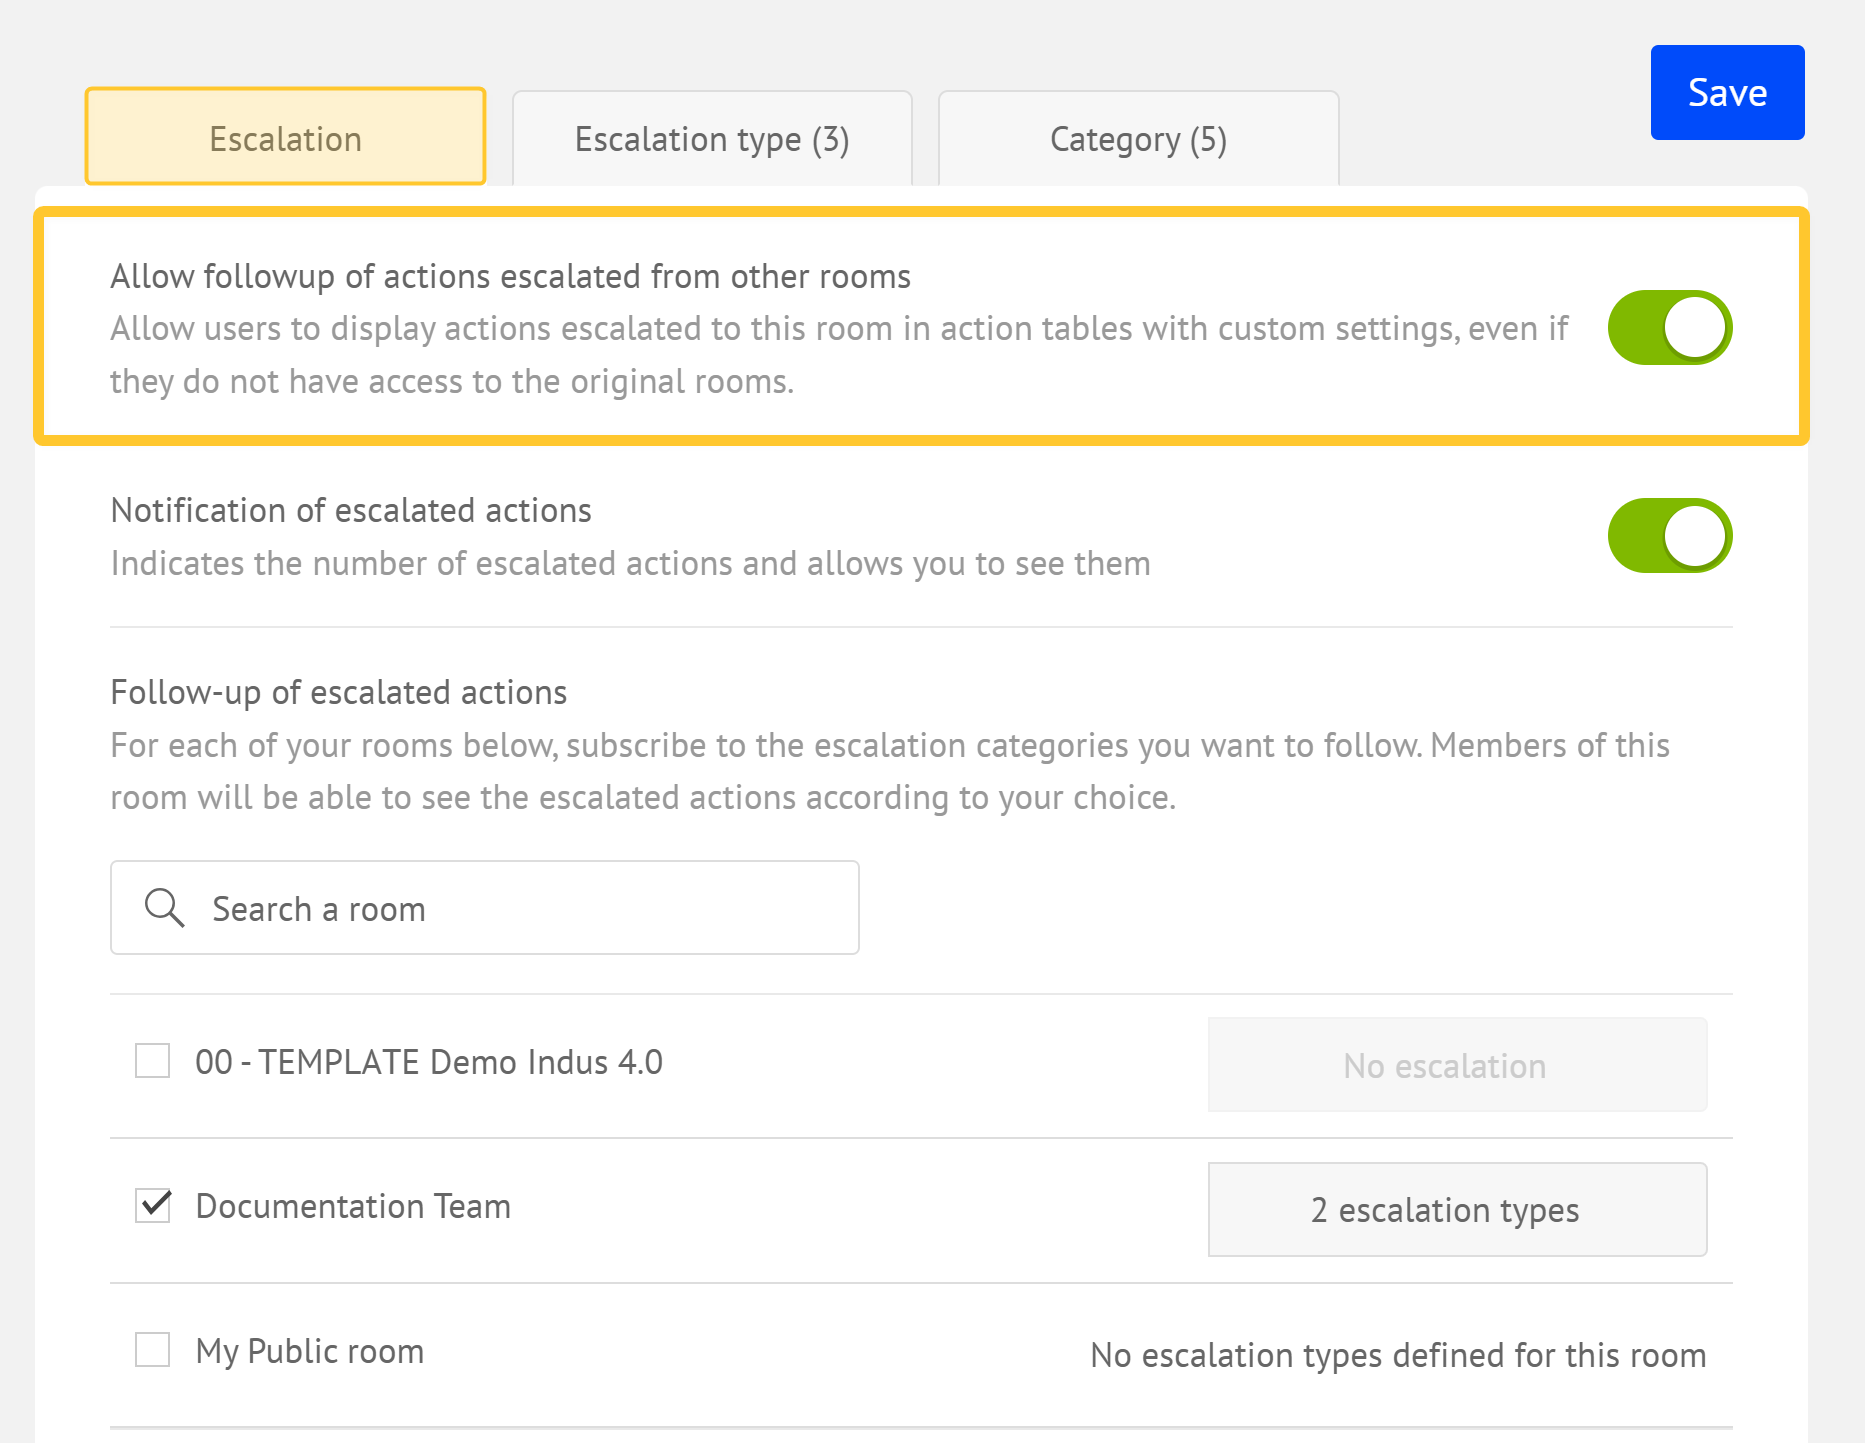
This allows to display escalated actions in the actions table with a custom settings, even for other members who do not have access to the original rooms.
Click Save to validate your settings.


Escalating an Action
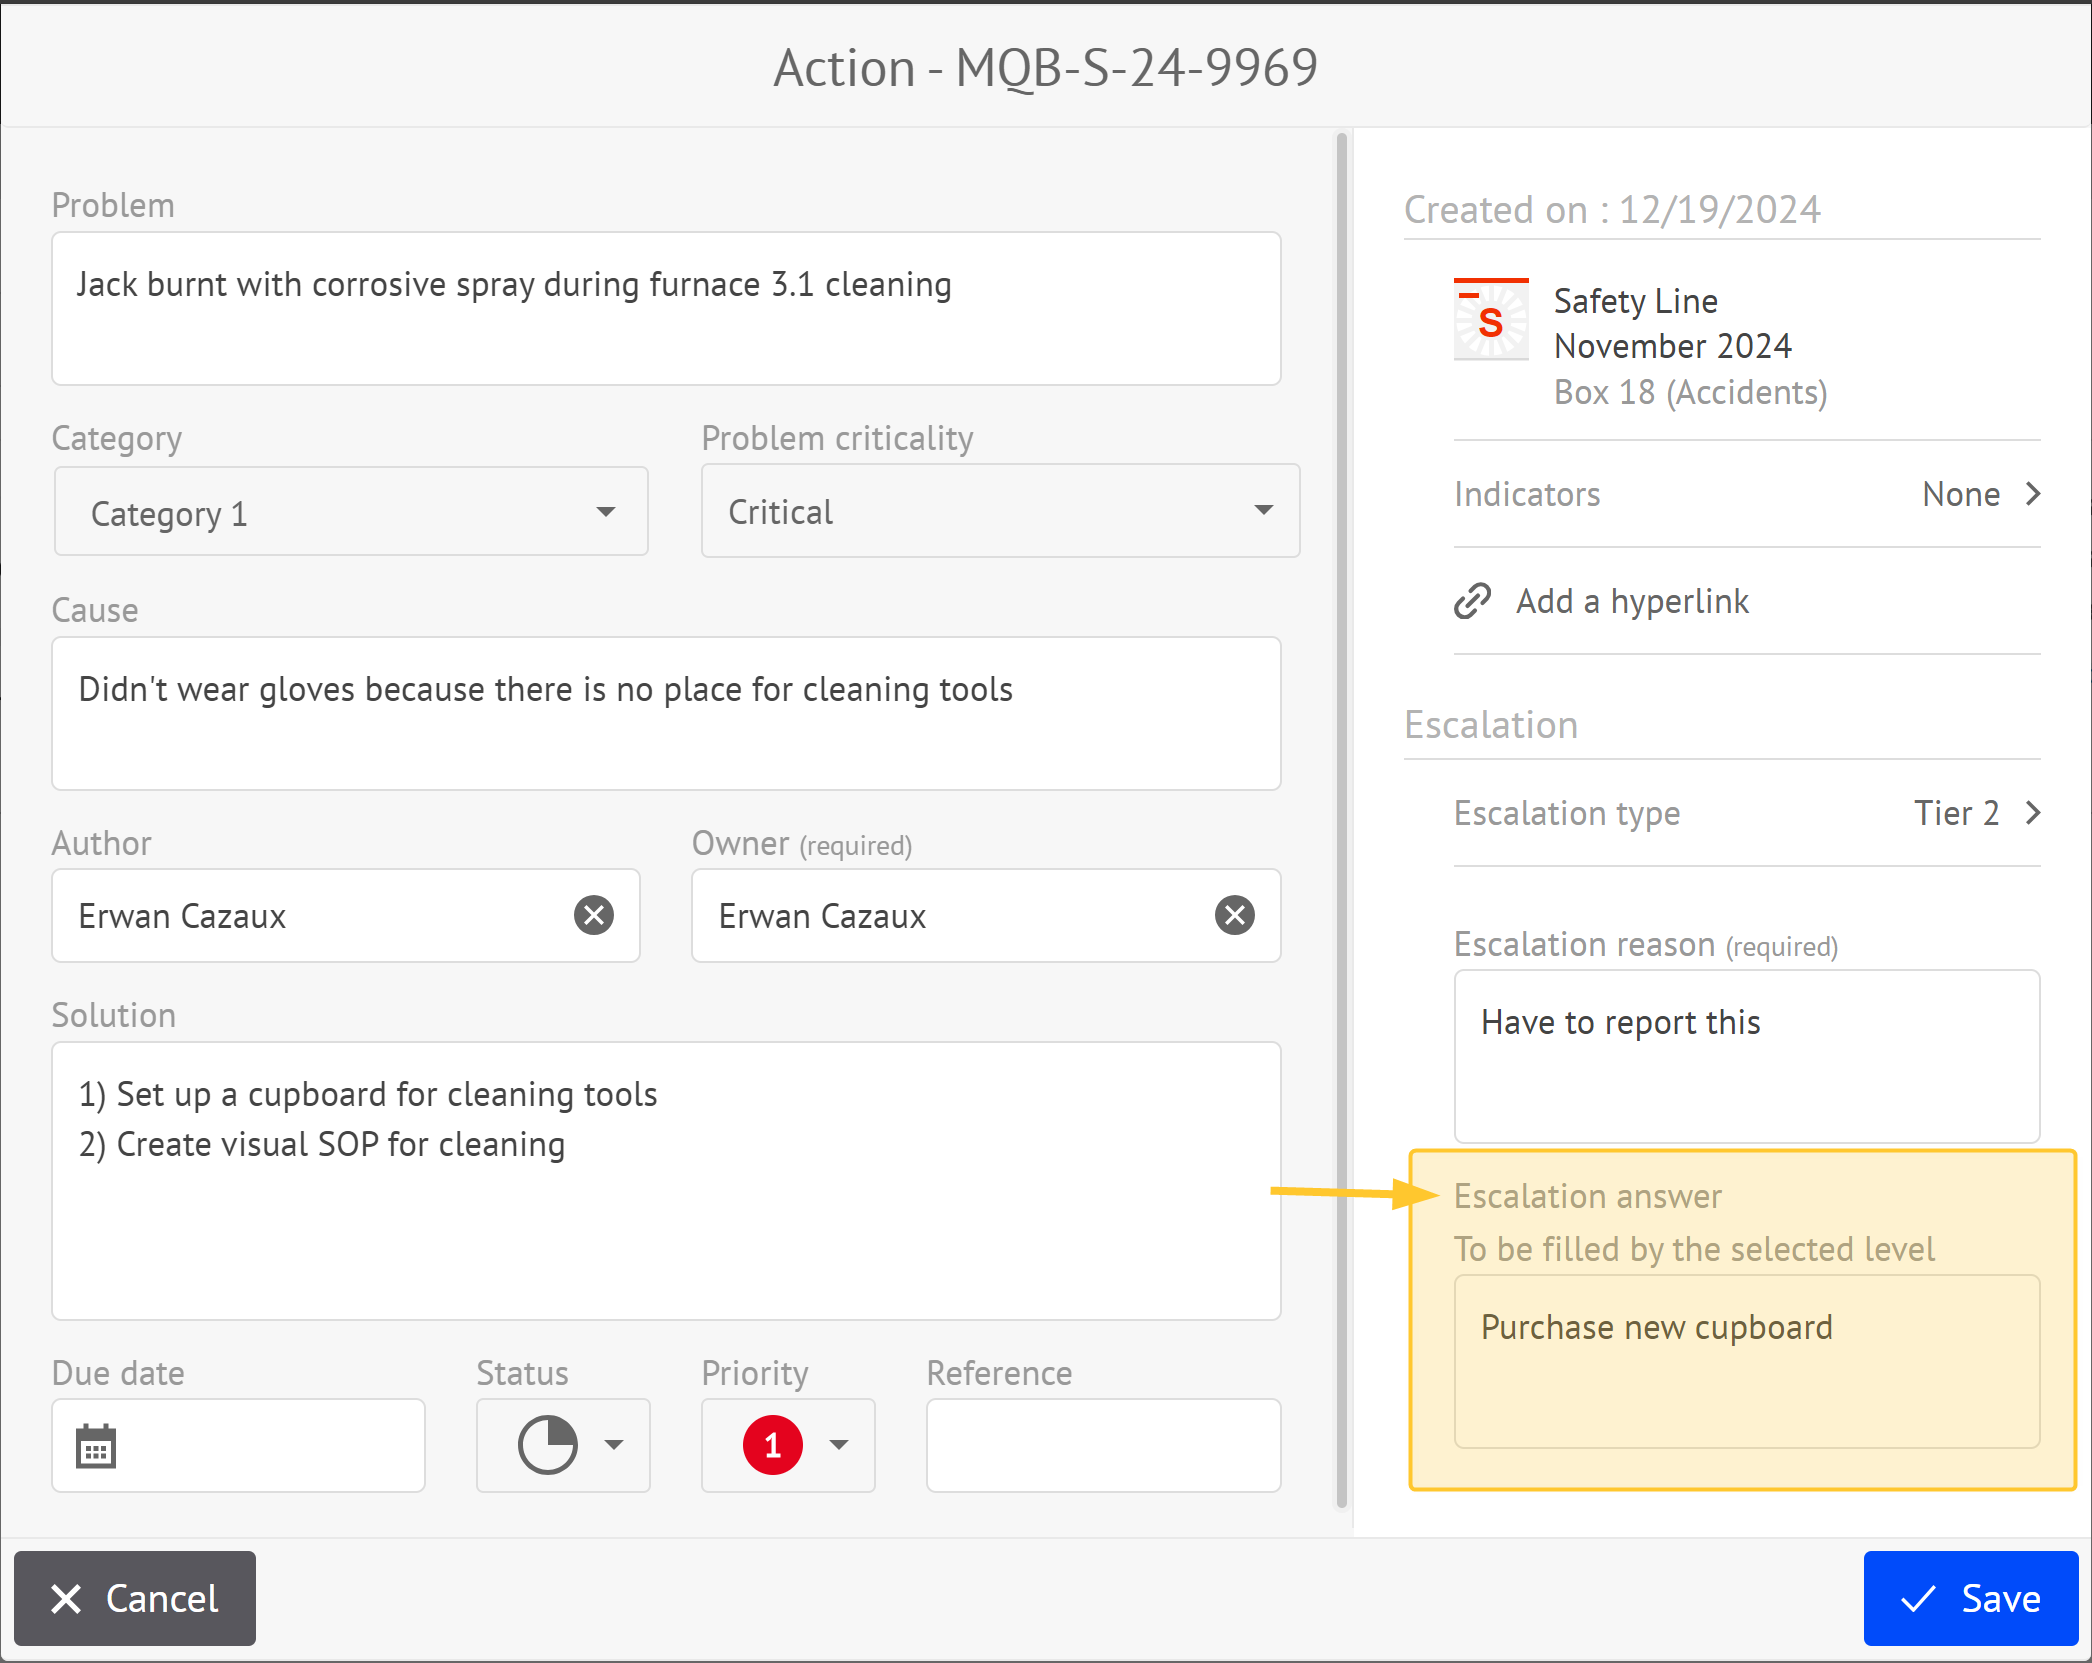
Escalating an action means highlighting an issue or action that requires special attention to a higher hierarchical level or a relevant team.
You escalate an action from the action creation or editing interface:
.png)
Select the appropriate escalation level type to escalate the action.
Note:
The room administrator defines the list of escalation level types. See Define the escalation level types for your room to find out more.
Indicate the reason for the escalation.
Managing Escalated Actions
Escalation Notification
If actions meet the escalation criteria set in the room, and you have enabled the feature in the room, a notification is displayed at the top right of the screen when you access your room.
This notification displays the number of open actions, both with and without an answer, that are escalated in the room.

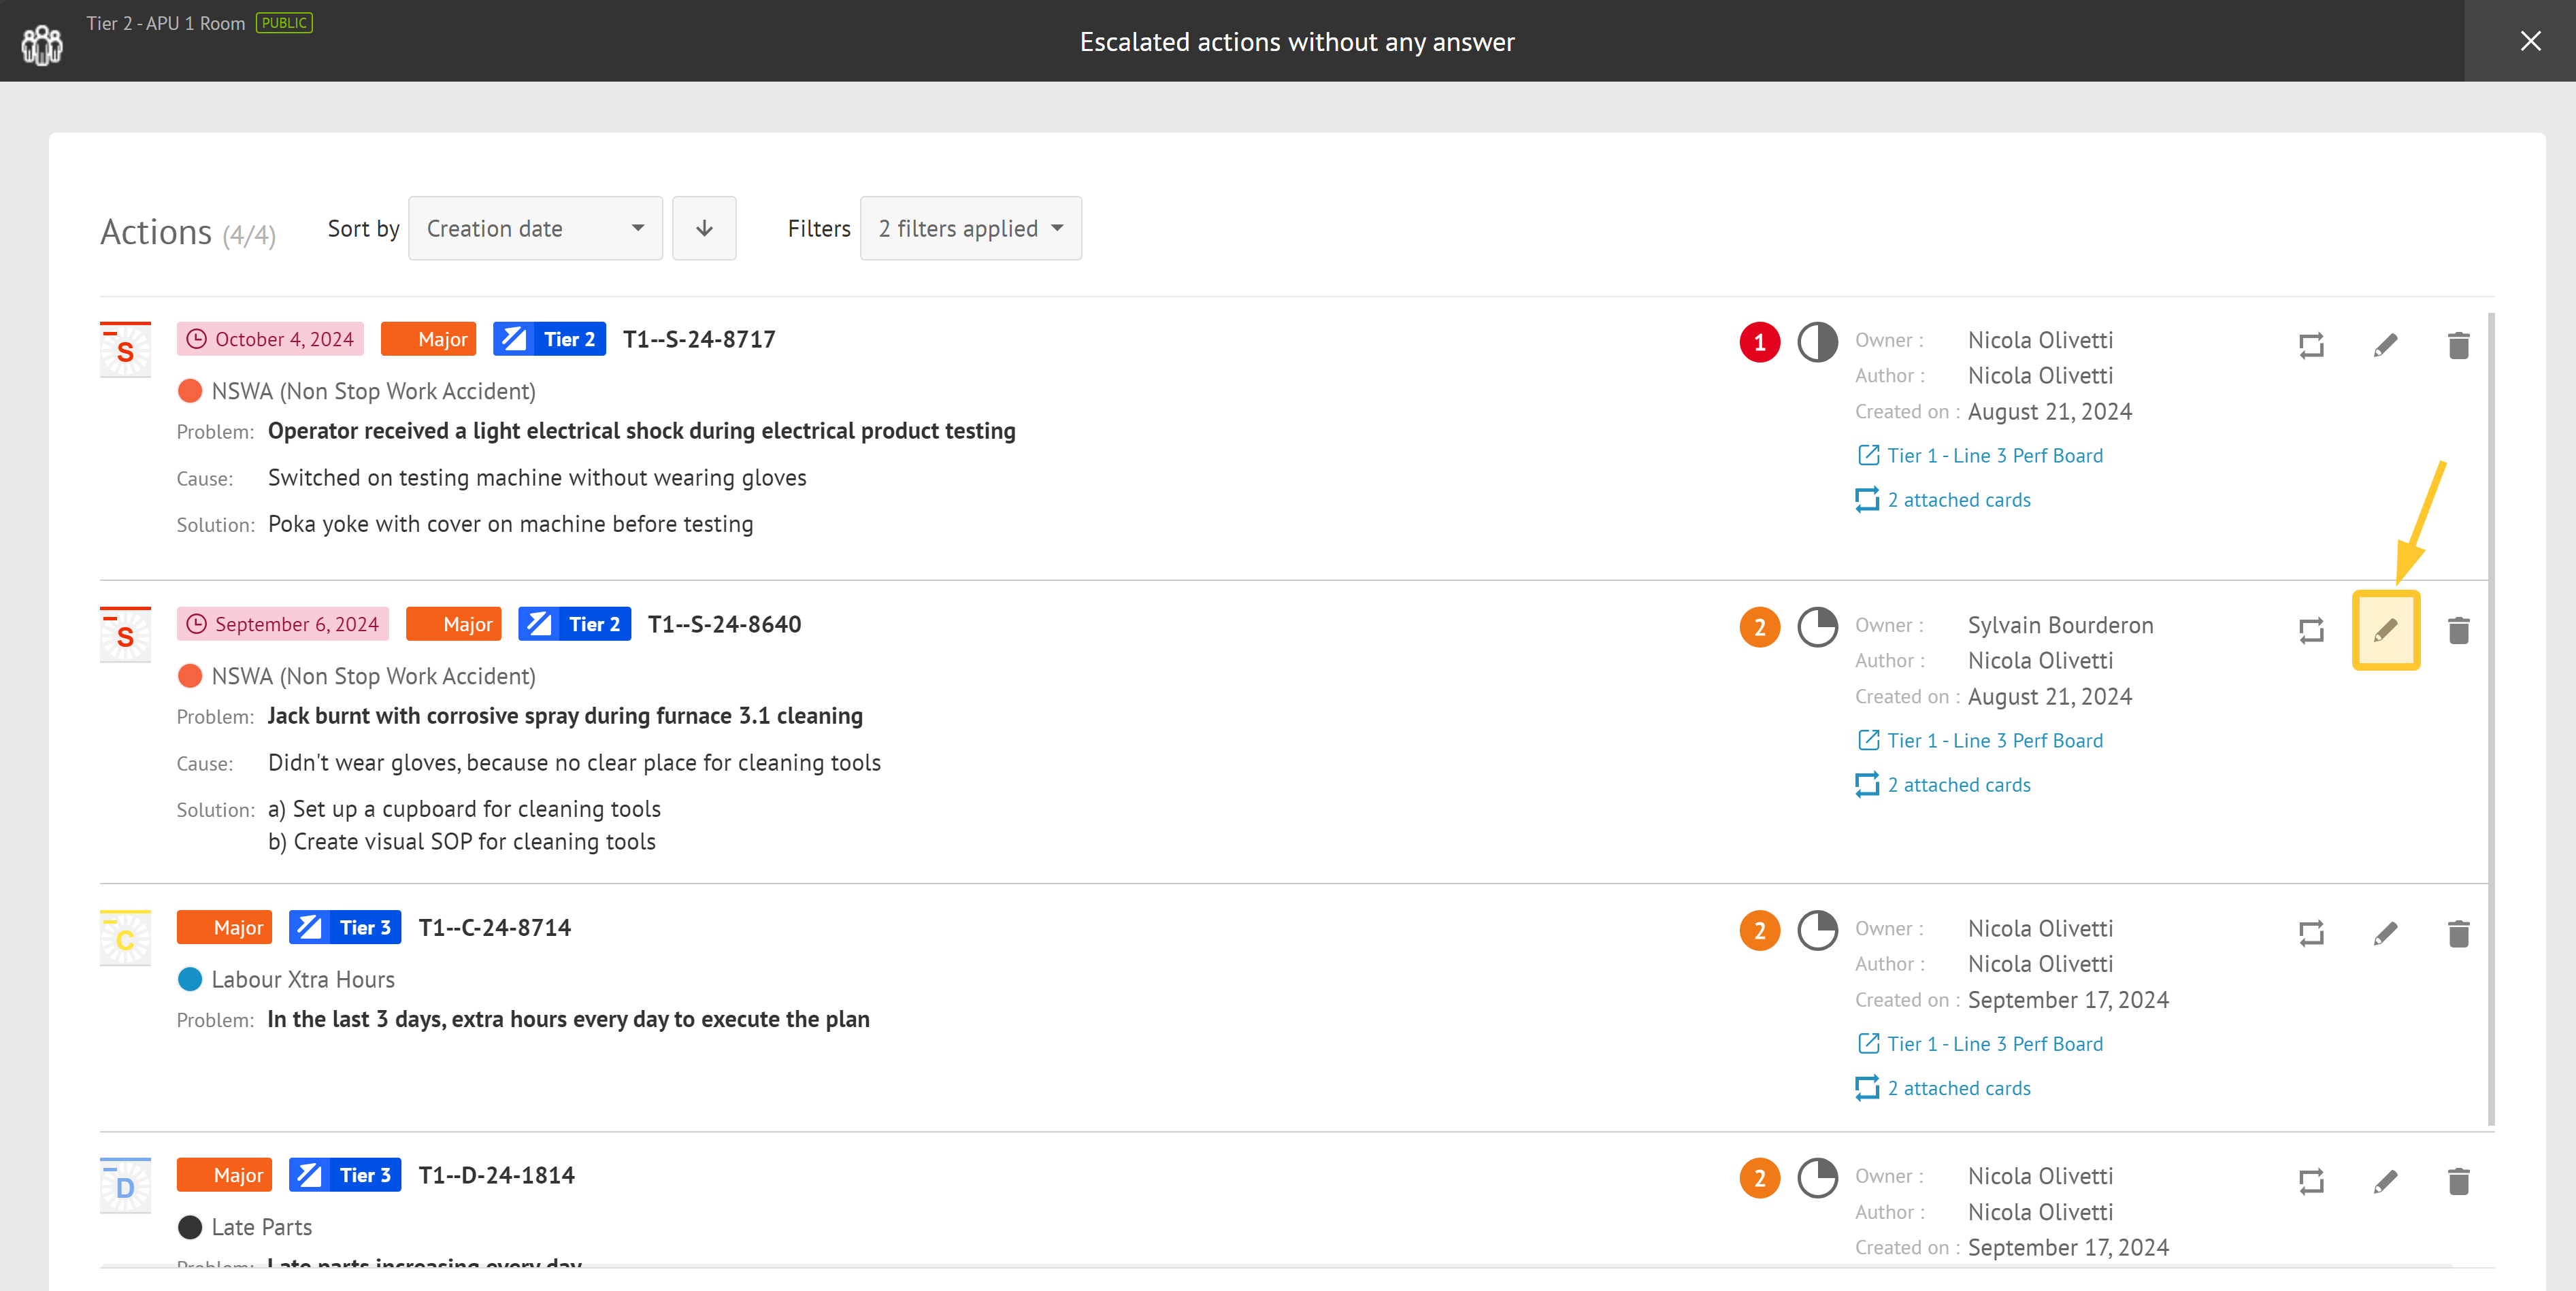
Viewing Escalated Actions to your Room
To view escalated actions to your room:

From your room or your QCD board, click the QCD utility.
Click View escalated actions to this room.
The list of escalated actions (without any answer) is displayed.
.png)
From this screen, you can:
filter and sort escalated actions.
Note :
Items in the filters are dynamic and depend on the actions present in the list, whether they are visible or not.
Filter and sorting also apply to all actions.
From left to right:
automatically create a related action card based on the selected escalated action.
edit an escalated action: you can de-escalate for example.
delete an escalated action if you are a Room administrator.
access directly the board where the escalated action was created.
access the related action cards with the escalated action.
.png)
De-escalating an Action: Answering with Potential Solutions
An escalated action can also be an action that is de-escalated.
De-escalating an action means bringing it down to a lower management level, after the action has been processed or a solution has been found. To do this:
Access the list of escalated actions from the QCD utility of your room or QCD board > View escalated actions to this room.
Click the pencil icon (edit).
Answer with solutions:
Click Save.
The action is de-escalated and is no longer displayed in the list of escalated actions (without any answer).


Viewing the Escalated and De-escalated Actions from your Action Plan
From your action plan, you can view if an action has been escalated or de-escalated.
Escalated and de-escalated actions have the following icons:

Blue icon: Escalated action awaiting a response.
Green icon: Escalated action with a response (de-escalation).
Was this article helpful?